background image

3.

Type 

diskpart.exe

 and press <Enter>.

4.

Type 

list disk

 and press <Enter>.

5.

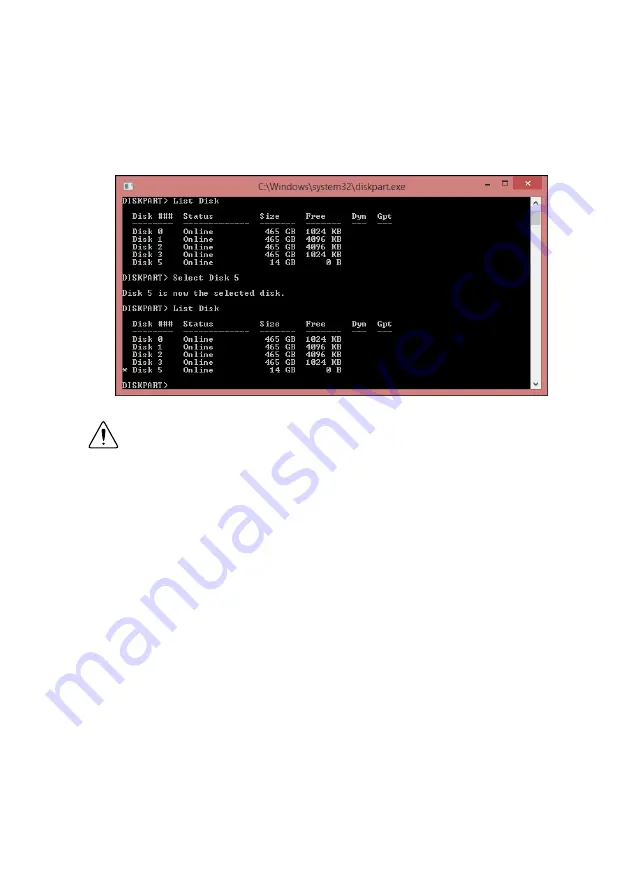
Identify the drive number that corresponds to the USB flash drive.

6.

Type

 select disk 

x

, where 

x

 is the drive number of the USB flash drive, and press

<Enter>. For example, in the following image, the USB flash drive is disk number 5. The
command is 

select disk 5

.

Caution


Following this process will delete all data on the USB flash drive.

7.

Type 

clean

 and press <Enter>. This command deletes all data from the USB flash drive.

8.

Type 

create partition primary

 and press <Enter>.

9.

Type 

active

 and press <Enter>

10. Type 

format fs=ntfs quick

 and press <Enter> to format the USB flash drive.

11. Type 

assign letter 

free volume letter

, where 

free volume letter

 is a

letter not currently associated with any disk drives. For example, 

assign letter K

.

12. Copy the contents of the reinstallation DVD to the root of the USB flash drive.

The USB flash drive is now bootable and will install Windows.

Reinstalling Windows

Complete the following steps to use the recovery media to install Windows.
1.

Connect the bootable USB flash drive to one of the USB ports on the IC-3120. Or
connect an external DVD drive to one of the USB ports on the IC-3120 and insert the
recovery DVD into the external drive.

2.

Connect a USB hub to the other USB port on the IC-3120. Connect a keyboard and
mouse to the USB hub. If a USB hub is not available, the keyboard can be used to
navigate the recovery software.

3.

Power on the IC-3120.

4.

Press the <F10> key on the keyboard.

26

  | 

ni.com

  | 

IC-3120 User Manual

Summary of Contents for IC-3120

Page 1: ...struments IC 3120 Manual Get Pricing Availability at ApexWaves com Call Today 1 800 915 6216 Email sales apexwaves com https www apexwaves com modular systems national instruments industrial controlle...

Page 2: ...tem 25 Restoring the Windows Operating System 25 Mounting the IC 3120 27 Securing the IC 3120 to a Mount 31 Clearance Requirements 31 Where to Go Next 32 Worldwide Support and Services 32 Hardware Ove...

Page 3: ...5 Serial Port 3 USB 2 0 Ports 4 Gigabit Ethernet Port 5 Gigabit Ethernet Ports with PoE 6 44 pin Digital I O Connector Connector Pinouts The IC 3120 provides the following connectors Chassis Grounding...

Page 4: ...used for both the system power and isolated outputs power if isolation is not required and the power supply meets the voltage and power requirements for both inputs Refer to the IC 3120 Specifications...

Page 5: ...thernet Ports The IC 3120 provides 3 Gigabit Ethernet ports PoE PORT 0 and PoE PORT 1 are capable of providing Power over Ethernet PoE The Ethernet ports provides a connection between the IC 3120 a ne...

Page 6: ...t in Device Manager The NI GigE Vision driver NI GEV does not support Wake on LAN The PoE Ethernet ports do not support Wake on LAN Figure 4 Ethernet Port Pin Locations 1 2 3 4 5 6 7 8 Table 2 Etherne...

Page 7: ...RS 232 mode Set the serial port mode in the BIOS setup utility The serial port is a 10 position RJ50 modular jack which can connect to serial devices such as PLCs scanners and lighting devices NI reco...

Page 8: ...rial Port Configuration Submenu on page 22 VGA Port Use the VGA port to connect a monitor to the IC 3120 Use any standard 15 pin VGA cable to access the VGA port The VGA port has a maximum resolution...

Page 9: ...rs 8 isolated inputs 8 isolated outputs 2 bidirectional differential inputs RS 422 or single ended input lines that can be used with a quadrature encoder and 8 bidirectional TTL lines The Digital I O...

Page 10: ...ND Digital ground reference for TTL and differential I O 9 Diff 1 Bidirectional RS 422 I O positive side or quadrature encoder phase B 10 VISO Isolated power voltage reference output 11 CISO Common gr...

Page 11: ...isolated output 31 Iso In 0 General purpose isolated input 32 iso In 1 General purpose isolated input 33 CISO Common ground reference for isolated inputs and outputs 34 Iso In 2 General purpose isola...

Page 12: ...cted to an output a large counter electromotive force may occur at switching time due to energy stored in the inductive load This flyback voltage can damage the outputs and the power supply To limit f...

Page 13: ...Output External Flyback Diode for Inductive Loads VISO CISO VCC Industrial Controller Load Overcurrent Protection Circuit Connecting to Differential I O The IC 3120 accepts differential RS 422 line dr...

Page 14: ...ff I O 1 3 3 V 10 k 10 k 10 k 10 k EN EN 7 5 k 7 5 k 7 5 k 7 5 k Figure 12 Connecting Differential Line Drivers Diff In 0 Diff In 0 Phase A Phase A Diff In 1 Diff In 1 Phase B Phase B External Device...

Page 15: ...In 1 Diff In 1 Phase B External Device Industrial Controller TTL I O The following image shows the circuit for a bidirectional TTL I O Figure 14 TTL Input Output Circuit 100 TTL_OUT TTL_OE TTL_IN 10 k...

Page 16: ...O 10 100 1000 ACT LINK USER1 USER2 PWR FAULT STATUS PoE0 PoE PORT 0 PoE PORT 1 PoE1 USER1 USER2 PWR FAULT STATUS IC 3120 Industrial Controller The following table describes the LEDs and indications IC...

Page 17: ...about the safe mode state 4 blinks RT only The IC 3120 has experienced two consecutive software exceptions The IC 3120 automatically restarts after an exception After the second exception the IC 3120...

Page 18: ...ed USER1 USER2 Green Yellow User controlled LEDs that can be controlled using the NI System Configuration API Related Information Safe Mode on page 19 PoE LEDs The following figure shows the location...

Page 19: ...ort 0 Speed LED 2 Port 0 Activity Link LED 3 Port 1 Speed LED 4 Port 1 Activity Link LED The following figure shows the locations of the LEDs for the network Gigabit Ethernet port Figure 18 LEDs for t...

Page 20: ...ity Use the RESET button to troubleshoot network connectivity 1 Hold the RESET button for 5 seconds and then release it to boot the IC 3120 into safe mode 2 After booting the controller into safe mode...

Page 21: ...ilder for Automated Inspection Vision Builder AI 2015 or later Software for using and reconfiguring the IC 3120 FPGA Different configurations are referred to as hardware personalities and are defined...

Page 22: ...timal default values are the same as the shipping configuration default values Press F1 from any root menu to display more information about navigating the BIOS setup program Menu items listed in blue...

Page 23: ...configurations to the USB ports Normally you do not need to modify these settings as the factory default settings provide the most compatible and optimal configuration possible Legacy USB Support Spec...

Page 24: ...ion options To select a boot device press Enter on the desired configuration on the desired configuration option and select a boot device from the resulting menu You can also disable certain boot devi...

Page 25: ...ility then exits and reboots the controller Discard Changes and Reset Any changes made to BIOS settings during this session of the BIOS setup utility since the last save are discarded The setup utilit...

Page 26: ...ng Started Guide for information about installing software and configuring the device Related Information Safe Mode on page 19 Restoring the Windows Operating System You can restore the Windows operat...

Page 27: ...etter free volume letter where free volume letter is a letter not currently associated with any disk drives For example assign letter K 12 Copy the contents of the reinstallation DVD to the root of th...

Page 28: ...for the IC 3120 If you do not want to create a custom mount a panel and DIN rail mount kit for the IC 3120 is available from National Instruments part number 781740 01 Caution If you choose not to mou...

Page 29: ...7 04 mm 757 in 19 24 mm 620 in 15 75 mm 560 in 14 23 mm 1 304 in 33 12 mm 973 in 24 71 mm 593 in 15 07 mm 593 in 15 06 mm 674 in 17 11 mm 374 in 9 51 mm 667 in 16 94 mm 985 in 25 03 mm 834 in 21 19 mm...

Page 30: ...imeters 1 20 in 25 92 mm 417 in 10 58 mm 301 in 17 64 mm 685 in 17 40 mm 963 in 24 46 mm 476 in 12 10 mm 1 738 in 44 14 mm 1 907 in 48 43 mm 924 in 23 46 mm 1 476 in 37 50 mm 752 in 19 10 mm 764 in 19...

Page 31: ...Figure 22 Side View with Dimensions in inches millimeters 130 38 mm 5 133 in 108 47 mm 4 270 in 3 80 mm 0 150 in 104 67 mm 4 121 in 30 ni com IC 3120 User Manual...

Page 32: ...32 screws and tighten them until they are secure 3 5 in lb Make sure the heads of the screws are flush with the mounting bracket Clearance Requirements The IC 3120 installation must meet the followin...

Page 33: ...nt versions of product documentation IC 3120 Specifications Contains detailed specifications for the IC 3120 IC 3120 Getting Started Guide Explains how to install and configure the software necessary...

Page 34: ...n obtain the DoC for your product by visiting ni com certification If your product supports calibration you can obtain the calibration certificate for your product at ni com calibration NI corporate h...

Page 35: ...party legal notices in the readme file for your NI product Refer to the Export Compliance Information at ni com legal export compliance for the NI global trade compliance policy and how to obtain rel...

Reviews: