background image

Chapter 1

Overview of FP-1600 Hardware and FieldPoint Software

FieldPoint FP-1600 User Manual

1-2

www.natinst.com

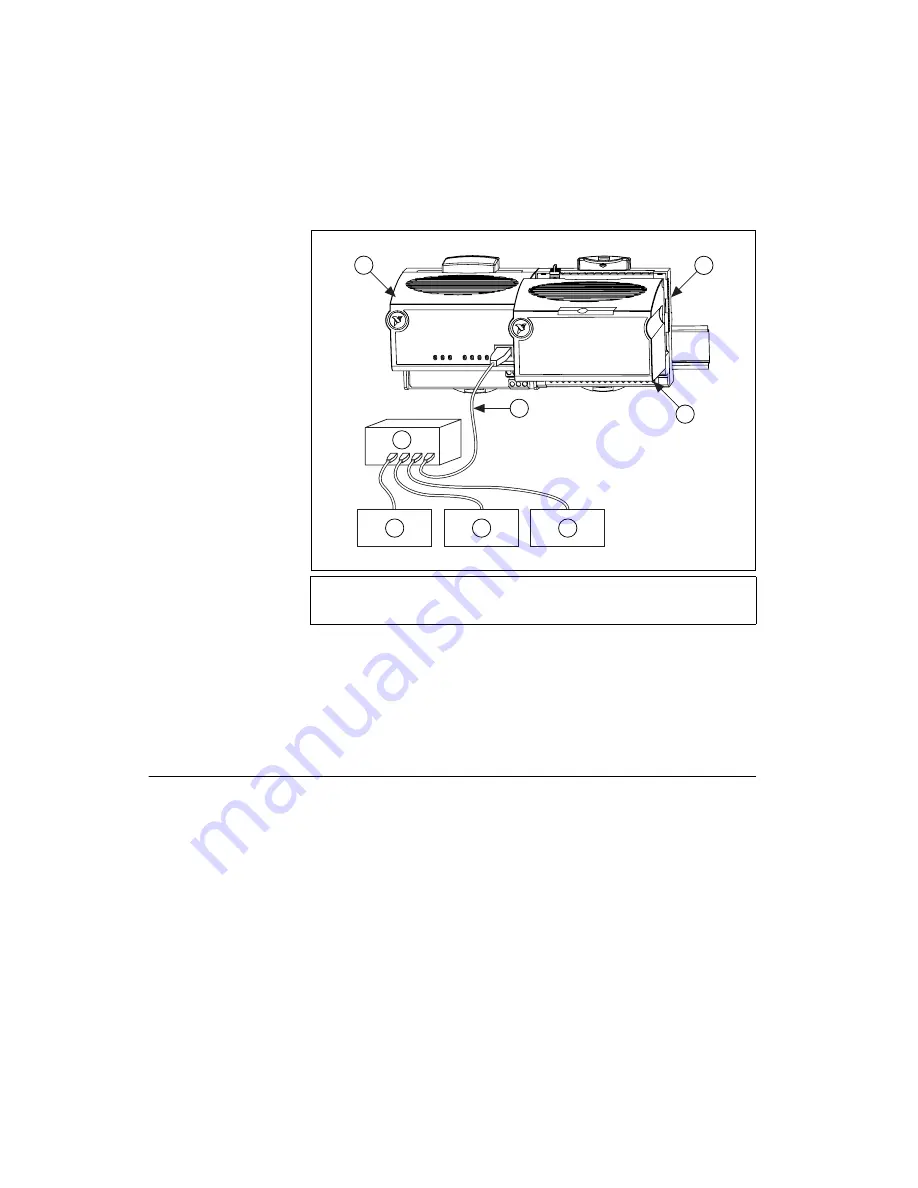
Figure 1-1 shows an FP-1600 connected to an Ethernet network.

Figure 1-1.  

Typical Ethernet Network Setup

In a distributed application, many FieldPoint banks are networked together. 
With Ethernet, you can use an unlimited number of FieldPoint banks. Each 
bank can be accessed by an unlimited number of host computers.

FieldPoint Software Overview

Your FieldPoint software includes a configuration utility as well as server 
and driver software for easy integration into application software packages. 
These software components manage the low-level communications and 
hardware details, simplifying programmatic access to I/O channels. 
Version 2.0 of the FieldPoint software runs on Windows 98, Windows 95, 
and Windows NT 4.0 and later, and includes the following components.

FieldPoint Explorer configuration utility

BridgeVIEW Server

LabVIEW VIs

1

FP-1600 Network 
Module

2

Terminal Base

3

I/O Module

4

Ethernet Cable

5

Ethernet Hub

6

Ethernet Devices

1

2

3

4

5

6

6

6

Summary of Contents for FIELDPOINT FP-1600

Page 1: ...FP 1600 User Manual FieldPoint FP 1600 User Manual July 1999 Edition Part Number 322394A 01 ...

Page 2: ...01 48 14 24 24 Germany 089 741 31 30 Hong Kong 2645 3186 India 91805275406 Israel 03 6120092 Italy 02 413091 Japan 03 5472 2970 Korea 02 596 7456 Mexico D F 5 280 7625 Mexico Monterrey 8 357 7695 Netherlands 0348 433466 Norway 32 27 73 00 Singapore 2265886 Spain Madrid 91 640 0085 Spain Barcelona 93 582 0251 Sweden 08 587 895 00 Switzerland 056 200 51 51 Taiwan 02 2377 1200 United Kingdom 01635 52...

Page 3: ... THEREOF This limitation of the liability of National Instruments will apply regardless of the form of action whether in contract or tort including negligence Any action against National Instruments must be brought within one year after the cause of action accrues National Instruments shall not be liable for any delay in performance due to causes beyond its reasonable control The warranty provided...

Page 4: ...Chapter 2 Hardware and Software Installation Mount the FP 1600 and Terminal Bases 2 1 Mounting the FP 1600 on a DIN Rail 2 1 Connecting Terminal Bases with DIN Rail Mounting 2 2 Removing the FP 1600 and Terminal Bases from the DIN Rail 2 3 Mounting the FP 1600 to a Panel 2 3 Connecting Terminal Bases with Panel Mounting 2 4 Removing the FP 1600 and Terminal Bases from the Panel 2 5 Mount I O Modul...

Page 5: ... Applications 3 13 FieldPoint BridgeVIEW Server 3 13 Lookout 3 15 LabVIEW VIs 3 16 LabWindows CVI Functions 3 18 FieldPoint OPC Server 3 19 Chapter 4 Feature Set Description High Speed Local Bus 4 1 Network Watchdog Timer 4 1 SnapShot Feature 4 2 Programmable Power Up State 4 3 HotPnP Hot Plug and Play 4 4 HotPnP During Power Up 4 4 HotPnP During Operation 4 4 Inserting New I O Modules 4 5 Replaci...

Page 6: ...1600 Power Connector Pinout 2 9 Figure 3 1 ToolTips Showing the Name of an Item 3 2 Figure 3 2 ScreenTips Showing a Description of an Item 3 3 Figure 3 3 FieldPoint Explorer Window 3 4 Figure 3 4 Comm Resource Configuration Dialog Box 3 5 Figure 3 5 Network Devices Window 3 6 Figure 3 6 Device Properties Window 3 9 Figure 3 7 Channel Configuration Dialog Box 3 11 Figure 3 8 Accessing Data in Looko...

Page 7: ...al describes how to install and use the FieldPoint FP 1600 network module How to Use This Manual Set FieldPoint User Manual Network Connection Hardware Configuration and Feature Set Description FieldPoint Server Online Help Operating Instructions for Modules and Bases Installation Specifications ...

Page 8: ...ons Bold text also denotes parameter names italic Italic text denotes variables emphasis a cross reference or an introduction to a key concept This font also denotes text that is a placeholder for a word or value that you must supply monospace Text in this font denotes text or characters that you should enter from the keyboard sections of code programming examples and syntax examples This font is ...

Page 9: ...al base and one or more I O modules The FieldPoint FP 1600 network module connects a 10 100 Ethernet network to FieldPoint I O modules Because the FP 1600 is an Ethernet device the maximum number of FP 1600 network modules that can be installed on your Ethernet network is determined by your network topology Each FP 1600 can support up to nine I O modules The FP 1600 network module connects directl...

Page 10: ...int Software Overview Your FieldPoint software includes a configuration utility as well as server and driver software for easy integration into application software packages These software components manage the low level communications and hardware details simplifying programmatic access to I O channels Version 2 0 of the FieldPoint software runs on Windows 98 Windows 95 and Windows NT 4 0 and lat...

Page 11: ...so provides a user interface from which you can interactively read and write values of these I O items to verify that your FieldPoint system has been correctly installed and configured BridgeVIEW Server The BridgeVIEW server for FieldPoint provides communication between FieldPoint devices and applications you develop using the BridgeVIEW graphical programming package for automation This native Bri...

Page 12: ...rol is an industry standard interface that uses Microsoft s Component Object Model COM The FieldPoint OPC server provides an interface to the I O items configured in the FieldPoint Explorer and software packages that are capable of using OPC including recent versions of Microsoft s Visual Basic and Visual C C programming environments and other third party software packages ...

Page 13: ...lly the more secure option but DIN rail mounting might be more convenient for your application The following sections give instructions for both mounting methods Note Write down the serial number from the back of your FP 1600 before you mount your FP 1600 You will need this information when you configure the FP 1600 Mounting the FP 1600 on a DIN Rail The FP 1600 has a simple rail clip for reliable...

Page 14: ...IN rail by pushing the rail clip to the locked position as shown in Figure 2 1 After the FP 1600 is mounted to the DIN rail connect the terminal base to the FP 1600 as explained in the next section Connecting Terminal Bases with DIN Rail Mounting Connecting Terminal Bases with DIN Rail Mounting Follow these steps to connect a terminal base to an FP 1600 network module using DIN rail mounting Cauti...

Page 15: ...n Figure 2 3 Figure 2 3 Connecting Terminal Bases Removing the FP 1600 and Terminal Bases from the DIN Rail To remove an FP 1600 network module or terminal base unlock it from the DIN rail by placing a screwdriver in the slot on the rail clip and opening it to the unlocked position Then disconnect the FP 1600 from the local bus connector of the terminal base and lift the network module or terminal...

Page 16: ...nel mount accessory includes a guide that you can use to drill pilot holes for mounting the FP 1600 Connecting Terminal Bases with Panel Mounting You can install terminal bases directly without using the panel mount accessory needed to mount the FP 1600 network module Follow these steps to connect terminal bases to an FP 1600 using panel mounting Caution To avoid damaging the FP 1600 and the termi...

Page 17: ...Place the protective cover onto the local bus connector of the last terminal base on the bank Removing the FP 1600 and Terminal Bases from the Panel To remove an FP 1600 network module and terminal bases from the panel reverse the process described in the previous sections Mounting the FP 1600 to a Panel and Connecting Terminal Bases with Panel Mounting First remove the terminal bases starting wit...

Page 18: ...e to remove from the terminal base Make sure you firmly pull the module straight off the terminal base Connect Your FP 1600 to the Network Connect the FP 1600 to an Ethernet network using the RJ 45 Ethernet port on the FP 1600 Connect the RJ 45 Ethernet port of the FP 1600 to an Ethernet hub using a standard Category 5 Ethernet cable You can also connect an FP 1600 directly to a computer using an ...

Page 19: ... standard Ethernet cable wiring connections for both normal and crossover cables Table 2 1 Ethernet Cable Wiring Connections Pin Connector 1 Connector 2 Normal Connector 2 Crossover 1 white orange white orange white green 2 orange orange green 3 white green white green white orange 4 blue blue blue 5 white blue white blue white blue 6 green green orange 7 white brown white brown white brown 8 brow...

Page 20: ... 2 7 Ethernet Cable Pinouts Connect Power to the FP 1600 Each FP 1600 on your network requires an 11 30 VDC power supply The FP 1600 filters and regulates this supplied power and provides power for all the I O modules in the bank Therefore you do not need to provide power separately to each FieldPoint I O module in the bank Connector 1 Connector 2 pin 1 pin 1 pin 8 pin 8 ...

Page 21: ...rately you can use the terminals provided on each terminal base for such power supply connections Refer to the documentation that came with your terminal base and I O module for more information on powering your field I O devices Calculating Power for a FieldPoint Bank The power requirements for a FieldPoint bank that uses an FP 1600 network module are calculated as follows Power 7 Watts 1 15 I O ...

Page 22: ...dPoint install the other application programs before you install your FieldPoint software The FieldPoint software installation installs the BridgeVIEW server LabVIEW VIs and examples Lookout driver class for use with serial FieldPoint modules and LabWindows CVI instrument driver only if it finds the corresponding application software installed 2 Insert the FieldPoint Configuration and Server Softw...

Page 23: ...ackages Getting Assistance While You Work FieldPoint Explorer includes several features to help answer your questions about using the software and to reduce the time you spend learning how to use and get the most out of FieldPoint Explorer These features include ToolTips ScreenTips and online help ToolTips identify tool bar icons and most items on the screen Rest your pointer over the element you ...

Page 24: ...rovide descriptions of the items in a dialog box to help explain what the item does or how you should use it Display ScreenTips by clicking on the question mark button in the title bar of the dialog box and then clicking on the item you want to know more about The ScreenTip appears as shown in Figure 3 2 Rest your pointer over an element to display ToolTips ...

Page 25: ...of FieldPoint Explorer Configure Your Hardware with FieldPoint Explorer To get started with FieldPoint Explorer follow these steps 1 Install the FP 1600 I O modules and FieldPoint software as described in Chapter 2 Hardware and Software Installation Verify that the FieldPoint system is powered on and the I O modules have their READY LEDs lit 2 From the Windows Start menu select Programs National I...

Page 26: ...next to IA Server with OPC in the DNH frame to expand the view Then right click on FieldPoint and select Add a comm resource to this server The Comm Resource Configuration dialog box appears as shown in Figure 3 4 Device Network Hierarchy DNH window shows a tree view of your FieldPoint systems consisting of the Server Communications Resource Devices and I O Items List View window shows details abo...

Page 27: ...ype from RS232 485 to Ethernet Each Ethernet comm resource represents a single bank of FieldPoint modules on the network 5 If you already know the device s address enter the address in the Hostname or IP Address field then proceed to the section Find and Configure Devices If you do not know the address click on Browse to locate the device The Network Devices window appears as shown in Figure 3 5 ...

Page 28: ...l assign to the FP 1600 Refer to the next section Ethernet Parameters for more information about each of the Ethernet parameters Ethernet Parameters You must provide the FP 1600 with several important network parameters These parameters are listed below IP address The unique computer readable address of a device on your network An IP address is typically represented as four numbers separated by pe...

Page 29: ... to obtain an appropriate IP address Ask the administrator to assign static IP addresses to your FP 1600 and the computer running the National Instruments Time Service Time Service is installed along with the FieldPoint software and runs automatically Also ask the network administrator to assign the proper subnet mask gateway IP address and DNS server addresses For a Network without a Network Admi...

Page 30: ...rt menu Type winipcfg in the Open field and click on OK The IP Configuration window appears which gives you information about the network setup for your computer Make sure that you have selected the correct Ethernet adapter from the pop up menu at the top of the window Most computers have only one Ethernet card but many are also configured for some type of dial up networking such as PPP or SLIP Ma...

Page 31: ... enter the Ethernet parameters you have chosen for the IP address subnet mask gateway IP DNS server IP and Time Server IP You can also click on Suggest Values to let the software provide default parameters If you have more than one FP 1600 you can enter a comment to help you identify each device To configure the device click on OK Note Suggest Values might provide settings that do not work with yo...

Page 32: ...cted to the FP 1600 Figure 3 3 shows an example of an expanded device hierarchy The default name of each device found includes the model number of the FieldPoint module followed by the sign and the address of the module for example FP 1600 0 For each I O module found one I O Item is created for each channel on the module and if all the channels are of the same type one I O Item is created to repre...

Page 33: ... here might not be available for your particular module d Set the range and output values of the selected channel s e Set the attributes for the selected channel s by selecting the attribute and entering the desired value f Send commands to the selected channel s by choosing a command and value and clicking on Send g Repeat this procedure for each channel you want to configure h Click on the OK bu...

Page 34: ...ite to output channels of I O Items that you have configured a Select a device with output channels in the DNH frame b Select the I O Item in the List View frame corresponding to the channel you want to write to c Click on the Write Value button pen and paper icon in the toolbar to write to the I O channel s represented by the I O Item d Enter the value you want to write in the Value box and click...

Page 35: ...erver The FieldPoint BridgeVIEW server is a device server based on the native BridgeVIEW server architecture The I O Items you configured in the FieldPoint Explorer become available to the BridgeVIEW server when you export the configuration data from FieldPoint Explorer into the BridgeVIEW common configuration database CCDB From within BridgeVIEW the Tag Configuration Wizard imports this configura...

Page 36: ... Configuration Editor window and then select FieldPoint from the list of servers that appears 6 All of the FieldPoint I O Items in your configuration file are automatically imported as tags into BridgeVIEW and are now accessible through the BridgeVIEW real time database Do not worry if you get a message that no tags were created for the network modules in your system as they do not have any I O It...

Page 37: ...dPoint Explorer as described in the Configure Your Hardware with FieldPoint Explorer section of this chapter 2 Start Lookout and create a new process or open an existing one 3 Register the FP 1600 as a networked computer in Lookout Select Object Object Explorer or Object Connection Browser from the menu bar and right click on the Network icon Choose Register network computer from the pop up menu T...

Page 38: ...VIs FP Open FP Get Configuration Info FP Create Tag FP Advise FP Read FP Write and FP Close directly access the I O Items you configured in the FieldPoint Explorer program In addition a set of examples is placed in your LabVIEW Examples directory These examples are the best way to get familiar with the LabVIEW VIs The FieldPoint LabVIEW Help document is in the same program group on your Windows ta...

Page 39: ...lorer 3 Use FP Advise to continuously monitor the I O Item at the rate specified in FieldPoint Explorer You can also set a new rate with this VI In this example the while loop executes at this advise rate If you used FP Read VI here instead of FP Advise the loop would free run at the fastest rate it could sustain reading the I O Item over the serial port each time the loop ran Note Do not put more...

Page 40: ...ctions The FieldPoint CVI Help document is in the same program group on your Windows taskbar as the FieldPoint Explorer program This help document describes each function in the instrument driver with a description of the C syntax a description of each parameter and a list of possible error codes Note FieldPoint CVI Interface Compatibility Modes The FieldPoint software ships with object obj files ...

Page 41: ...detailed instructions on how to access an OPC server However the basic steps involved are similar for most OPC client applications Follow these steps to use the FieldPoint OPC server 1 Open the FieldPoint OPC server National Instruments OPCFieldPoint This server was registered with Windows when you installed the FieldPoint software OPC clients should be able to show you a list of available registe...

Page 42: ... not require an access path Some OPC clients might expect the access path to be included in the Item ID name or might request the access path when you select I O Items You should be able to leave the access path blank empty string The FieldPoint OPC custom interface is an out of process server The FieldPoint OPC server supports both synchronous and asynchronous reads and writes The FieldPoint OPC ...

Page 43: ...fined state the watchdog state if such failures do occur You can set the watchdog output values to be different from the power up output values Some system applications do not differentiate between power up output values and watchdog output values whereas other applications treat the two conditions differently The FP 1600 supports both types of applications By default the watchdog timer for the ba...

Page 44: ...nel See the Network Watchdog Timer section in this chapter for more information Watchdog data enabled or disabled status for each channel See the Network Watchdog Timer section in this chapter for more information Watchdog enabled or disabled status of each module See the Network Watchdog Timer section in this chapter for more information After you store the SnapShot information you can still choo...

Page 45: ...define the power up states regardless of the current settings of any channel of a module Optionally you can utilize the Programmable Power Up State feature to incrementally modify previously stored SnapShot information If you subsequently enable the SnapShot feature you can ensure that your system powers up with the configuration and output levels that you specified when storing the Programmable P...

Page 46: ...tically recognized configured and made available on the network The following sections describe how the HotPnP feature works under different conditions Note Do not add or remove terminal bases while power is applied to the bank An I O module can be hot inserted only if an empty terminal base is already available in the bank HotPnP During Power Up On power up the FP 1600 automatically uploads an el...

Page 47: ...nt I O module is compatible with the one that was removed If the I O module is the same as or is compatible with the one removed the FP 1600 configures the replacement I O module with its predecessor s configuration and output value settings It also applies the effects of any commands sent by the host computer while the I O module was missing If the replacement module is incompatible with the one ...

Page 48: ...k communication traffic eliminating potential conflicts with the other banks in your network The FP 1600 indicates POST failure through the POWER and STATUS LEDs Refer to the section LED Indicators in Appendix B Troubleshooting for more information Enabled Incompatible with the removed module but compatible with the SnapShot information Same as the configuration stored in the SnapShot Enabled Disa...

Page 49: ... this occurs you can manually reset the unit to its factory settings When you reset the unit the following actions occur The IP address subnet mask DNS server IP gateway IP and time server IP are set to 0 0 0 0 The normal I O services are suspended until the FP 1600 is reconfigured The device will appear as Unconfigured in FieldPoint Explorer s Network Devices list The device s watchdog settings p...

Page 50: ...o flash When the LED flashes the FP 1600 is in reset mode 5 Power down the FP 1600 and move the reset switch back to the left 6 Reattach the FP 1600 to the rail or panel 7 Power up the FP 1600 The following tips should help you avoid having to manually reset the module When you configure the FP 1600 wait for the message The module s configuration was confirmed If this message does not appear the F...

Page 51: ...Use FieldPoint Explorer to reset the FP 1600 before moving it to a new network or subnet If you do not reset the FP 1600 the device might be unable to communicate with the new network To reset the FP 1600 from the FP 1600 Properties window click on Reset Module This resets the FP 1600 to the factory settings When you click on this button the module returns to an unconfigured state You must reconfi...

Page 52: ...ministrator to the local machine not onto a domain 2 Create a file called hosts This file has to be placed in the system32 drivers etc directory of the system root for example c winnt system32 drivers etc hosts 3 The file should include the following lines 127 0 0 1 localhost 12 34 56 78 hostname where hostname is the hostname of your FP 1600 and 12 34 56 78 is the IP address of your FP 1600 Under...

Page 53: ...mmunication 3 Run the Network Device Configurator FPCONFIG EXE on your networked computer The Network Devices window appears You can also use the FieldPoint Explorer to configure the device Refer to Chapter 3 Hardware and Software Configuration for more information about how to configure your computer with the FieldPoint Explorer Viewing and Editing the FP 1600 TCP IP settings To view the TCP IP s...

Page 54: ...nd TCP IP from the Network protocol list Click on OK You may need the Microsoft Windows NT 98 95 disks or CD ROM that came with your computer and you may have to restart your computer after closing the Network control panel Problem The FP 1600 does not appear in the Network Devices dialog when browsing Possible causes and solutions Confirm that there is power to the module and that both the FP 160...

Page 55: ...ossible causes and solutions Make sure that the IP address for the computer running National Instruments Time Service is correctly configured for the FP 1600 Make sure that National Instruments Time Service was installed on the desired machine and is running If Time Service is installed but is not running restart it Under Windows 98 95 Open an MS DOS prompt and enter c windows system timeservice s...

Page 56: ... FP 1600 detects an error The FP 1600 indicates specific error conditions by flashing STATUS a specific number of times Table B 1 describes the STATUS LED flashing sequences and the corresponding error condition The green PROCESS LED lights when you update the non volatile flash memory of the FP 1600 either by changing its network settings saving channel settings or power up values or by upgrading...

Page 57: ...ter 3 Hardware and Software Configuration for more information 1 The FP 1600 is in Reset mode Switch the FP 1600 back to Normal mode by powering down the device and sliding the switch underneath the unit away from the I O modules Restore power and configure the module Refer to Appendix A Resetting the FP 1600 for more information 2 The FP 1600 has detected an error in its firmware This usually occ...

Page 58: ...les are designed and tested for immunity and susceptibility as well as for emissions Network Network interface 10BaseT and 100BaseTX Ethernet Compatibility IEEE802 3 Communication rates 10 Mbps 100 Mbps autonegotiated Cabling distance 100 m Power supply range 11 to 30 VDC Power consumption 7 watts 1 15 I O Module Consumption Maximum terminal bases per bank 9 Maximum number of banks determined by n...

Page 59: ...Appendix C Specifications FieldPoint FP 1600 User Manual C 2 www natinst com Compliance Electrical safety designed to meet IEC 1010 EMI emissions immunity CISPR 11 ...

Page 60: ...uestions FAQs and their corresponding answers or solutions including special sections devoted to our newest products The database is updated daily in response to new customer experiences and feedback Troubleshooting Wizards Step by step guides lead you through common problems and answer questions about our entire product line Wizards include screen shots that illustrate the steps being described a...

Page 61: ...anch offices maintain a Web site to provide information on local services You can access these Web sites from www natinst com worldwide If you have trouble connecting to our Web site please contact your local National Instruments office or the source from which you purchased your National Instruments product s to obtain support For telephone support in the United States dial 512 795 8248 For telep...

Page 62: ...of one FieldPoint network module and one or more terminal bases and I O modules bps bits per second C celsius CISPR International Special Committee On Radio Interference DNS domain name system EDS electronic data sheet EMI electromagnetic interference FTP file transfer protocol HotPnP Hot Plug and Play IEC International Electrotechnical Commission I O input output LED Light emitting diode m meter ...

Page 63: ...Glossary FieldPoint FP 1600 User Manual G 2 www natinst com POST power on self test PPP point to point protocol SLIP serial line internet protocol V Volts VDC Volts direct current ...

Page 64: ... properties 3 9 using Network Device Configurator B 2 connecting FP 1600 to network 2 6 to 2 7 connecting terminal bases DIN rail mount 2 2 to 2 3 panel mount 2 4 to 2 5 D diagnostic resources online D 1 DIN rail mount See mounting on DIN rail documentation conventions used in manual x how to use manual set ix related documentation x E editing HOSTS files B 1 environment specifications C 1 Etherne...

Page 65: ...rk setup figure 1 2 high speed local bus 4 1 HotPnP Hot Plug and Play 4 4 to 4 6 installation cabling 2 7 to 2 8 connecting FP 1600 to network 2 6 to 2 7 mounting I O modules onto terminal bases 2 5 to 2 6 mounting on DIN rail 2 1 to 2 3 mounting to panel 2 3 to 2 4 power connection 2 8 to 2 9 powering on the FP 1600 2 10 serial number information note 2 1 network watchdog timer 4 1 overview 1 1 t...

Page 66: ...2 9 powering on the FP 1600 2 10 serial number information note 2 1 software installation 2 10 I O modules inserting new 4 5 mounting onto terminal bases 2 5 to 2 6 replacing 4 5 IP addresses See Ethernet network ipcfg utility 3 8 L LabVIEW VIs diagram for example application figure 3 18 overview 1 3 using with FP 1600 3 16 to 3 18 LabWindows CVI functions overview 1 3 using with FP 1600 3 18 LED ...

Page 67: ...blem solving See troubleshooting PROCESS LED B 5 R removing FP 1600 and terminal bases DIN rail mount 2 3 panel mount 2 5 resetting FP 1600 to factory configuration A 1 to A 3 RX LED B 6 S ScreenTips 3 2 to 3 3 serial number information note 2 1 SnapShot feature 4 2 to 4 3 software See FieldPoint software software related resources D 2 specifications compliance C 2 environment C 1 network C 1 STAT...

Page 68: ...I 5 FieldPoint FP 1600 User Manual W watchdog timer 4 1 Web support from National Instruments D 1 to D 2 online problem solving and diagnostic resources D 1 software related resources D 2 winipcfg utility 3 8 Worldwide technical support D 2 ...

Reviews: