background image

NI 9219 Calibration Procedure

16

ni.com

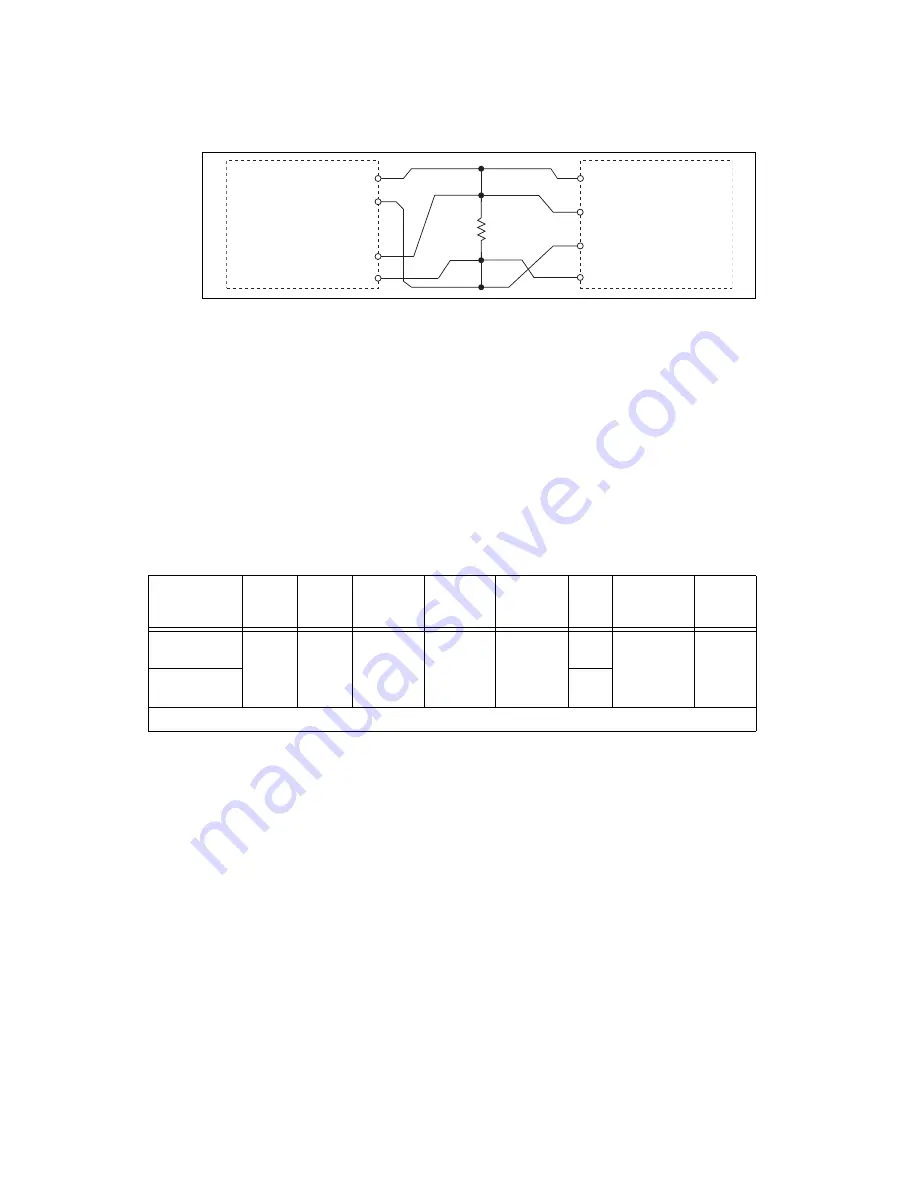
Figure 8.  

4-Wire RTD Accuracy Verification Connections to the NI 9219

2.

Create an AI voltage channel in the 1 V range on the NI 9219.

3.

Commit the task to place the NI 9219 in voltage mode. This prevents the module from interfering 
with the resistance measurements of the DMM.

4.

Configure the DMM for a 4-wire resistance measurement in the appropriate range according to the 
test point from Table 17.

5.

Enable Auto Zero on the DMM.

6.

Acquire a resistance reading with the DMM. Record this measurement as 

ref

.

7.

Disconnect the DMM from the resistor to ensure that the terminals on the DMM do not interfere 
with the resistor while the NI 9219 makes measurements.

8.

Clear the task.

9.

Create an AI RTD channel on the NI 9219. Configure the channel according to Table 16.

10. Acquire 20 unscaled I32 4-wire readings with the NI 9219. Record the average of the readings as 

data

unscaled

.

11. Scale the data by using the formula below to change the unscaled data into 

.

where 

range

max

 is the maximum value for the selected range in Table 17.

12. Perform the following calculation using the recorded 

ref

 and 

channel

 values.

Table 16.  

NI 9219 Configuration for 4-Wire RTD Accuracy Verification

Measurement 

Type

Min 
(°C)

Max 

(°C)

Excitation 

Source

Excitation 

Value

Resistance 

Config

r0

*

ADC 

Timing 

Mode

Sample 

Timing 

Type

4-Wire RTD 

Pt1000

0

800

Internal

0.0005

4-Wire

1000

High 

Resolution

On 

Demand

4-Wire RTD 

Pt100

100

*

 RTD nominal resistance at 0 °C.

R

TestPoint

Ω

HI

LO

NI 9219

DMM

Ω 

SENSE

HI

LO

EX+ (3)

HI (4)

EX– (5)

LO (6)

Ch 

x

channel

data

unscaled

2

24

-----------------------------

range

max

=

Accuracy

channel

ref

=

Summary of Contents for 9219

Page 1: ...erification 17 Half Bridge Accuracy Verification 19 Full Bridge Accuracy Verification 23 Adjustment 25 Voltage and Thermocouple Accuracy Adjustment 26 Current Accuracy Adjustment 29 4 Wire and 2 Wire Resistance Accuracy Adjustment 32 4 Wire RTD 3 Wire RTD and Quarter Bridge Accuracy Adjustment 37 Half Bridge Accuracy Adjustment 42 Full Bridge Accuracy Adjustment 45 Accuracy Under Calibration Condi...

Page 2: ...ontains C reference and general information about measurement concepts Calibration Interval National Instruments recommends a calibration interval of one year for the NI 9219 You should adjust the recommended calibration interval based on the measurement accuracy demands of your application Test Equipment National Instruments recommends that you use the equipment in Table 1 for calibrating the NI ...

Page 3: ...under 3 V DMM2 If this instrument is unavailable use a second DMM with 20 ppm for uncertainty voltages under 1 V and 0 8 V offset error in smallest range Current Accuracy 270 ppm uncertainty for current 2 nA offset error in smallest range Discrete Resistors RTD Accuracy TCR 10 ppm C Resistor values 4020 1 402 1 20 5 4 99 5 Resistance Accuracy TCR 10 ppm C Resistor values 8450 1 845 1 20 5 Quarter ...

Page 4: ...edures The calibration process includes the following steps 1 Initial Setup Install the device and configure it in Measurement Automation Explorer MAX 2 Verification Verify the existing operation of the device This step confirms whether the device is operating within the published specifications prior to adjustment 3 Adjustment Adjust the calibration constants of the device The adjustment procedur...

Page 5: ... ground to prevent the entire system from floating Note The test limits listed in Tables 5 7 9 11 13 15 17 19 21 are derived using the values in Table 24 Figure 1 NI 9219 Channel and Terminal Assignments Table 2 NI 9219 Signal Name Terminal Signal Name Signal Description 1 T TEDS Data 2 T TEDS COM 3 EX HI Positive excitation or input signal 4 HI Positive input signal 5 EX LO Negative excitation or...

Page 6: ...e NI 9219 Table 3 NI 9219 Terminal Assignments by Mode Mode Terminal 1 2 3 4 5 6 Voltage T T HI LO Current T T HI LO 4 Wire Resistance T T EX HI EX LO 2 Wire Resistance T T HI LO Thermocouple T T HI LO 4 Wire RTD T T EX HI EX LO 3 Wire RTD T T EX EX LO Quarter Bridge T T HI LO Half Bridge T T EX HI EX Full Bridge T T EX HI EX LO Digital In T T HI LO Open Contact T T HI LO V V HI V LO NI 9219 DMM S...

Page 7: ...e NI 9219 Record the average of the readings as Vchannel 8 Perform the following calculation using the recorded Vref and Vchannel values 9 Compare the calculation result to the Upper Limit and Lower Limit values in Table 5 Table 4 NI 9219 Configuration for Voltage Accuracy Verification Measurement Type Min V Max V ADC Timing Mode Sample Timing Type Voltage 60 60 High Resolution On Demand 15 15 4 4...

Page 8: ...ation Complete the following steps to verify the thermocouple accuracy of an NI 9219 1 Connect the NI 9219 to the DMM and source as shown in Figure 3 Figure 3 Thermocouple Accuracy Verification Connections to the NI 9219 1 1 Max 0 80 0 000260 0 000260 Mid 0 00 0 000014 0 000014 Min 0 80 0 000260 0 000260 0 125 0 125 Max 0 10 0 000041 0 000041 Mid 0 00 0 000010 0 000010 Min 0 10 0 000041 0 000041 T...

Page 9: ... Table 7 9 Perform the following calculation using the recorded Vref and Vchannel values 10 Compare the calculation result to the Upper Limit and Lower Limit values in Table 7 11 Set the source output to zero and clear the acquisition 12 Repeat steps 2 through 11 for all test points and all channels on the NI 9219 NI recommends that you verify the values for all the iterations listed in Table 7 fo...

Page 10: ...m Table 9 4 Enable Auto Zero on the DMM 5 Create an AI current channel on the NI 9219 Configure the channel according to Table 8 6 Commit the task 7 Acquire a current reading with the DMM Record this measurement as Iref 8 Acquire 20 current readings per channel on the NI 9219 Note Perform the DMM measurements and the NI 9219 measurements as simultaneously as possible in order to reduce error from ...

Page 11: ...9 to the resistor and the DMM as shown in Figure 5 Connect the leads of the DMM as close as possible to the terminals on the NI 9219 to ensure that the DMM reference measurements include the same lead wire resistance as the NI 9219 2 wire measurement Figure 5 2 Wire Resistance Accuracy Verification Connections to the NI 9219 2 Create an AI voltage channel in the 1 V range on the NI 9219 3 Commit t...

Page 12: ...ccuracy Verification Complete the following steps to verify the quarter bridge accuracy of an NI 9219 1 Connect the NI 9219 to the resistor and the DMM as shown in Figure 6 Observe the following conditions when connecting the equipment to the NI 9219 Connect the leads of the DMM as close as possible to the terminals on the NI 9219 to ensure that the DMM reference measurements include the same lead...

Page 13: ...le the NI 9219 makes measurements 8 Clear the task 9 Create an AI bridge V V channel on the NI 9219 Configure the channel according to Table 12 10 Acquire 20 unscaled I32 quarter bridge readings with the NI 9219 Record the average of the readings as dataunscaled 11 Scale the data by using the formula below to change the unscaled data into where rangemax is the maximum value for the selected range ...

Page 14: ... resistance as the NI 9219 4 wire measurements Figure 7 4 Wire Resistance Accuracy Verification Connections to the NI 9219 2 Create an AI voltage channel in the 1 V range on the NI 9219 3 Commit the task to place the NI 9219 in voltage mode This prevents the module from interfering with the resistance measurement of the DMM 4 Configure the DMM for a 4 wire resistance measurement in the appropriate...

Page 15: ...e following steps to verify the 4 wire RTD accuracy of an NI 9219 1 Connect the NI 9219 to the resistor and the DMM as shown in Figure 8 Connect the sense leads of the DMM as close as possible to the same point that the sense leads of the NI 9219 HI and LO connect to the resistor to ensure that the DMM reference measurements include the same lead wire resistance as the NI 9219 4 wire measurements ...

Page 16: ...ents 8 Clear the task 9 Create an AI RTD channel on the NI 9219 Configure the channel according to Table 16 10 Acquire 20 unscaled I32 4 wire readings with the NI 9219 Record the average of the readings as dataunscaled 11 Scale the data by using the formula below to change the unscaled data into where rangemax is the maximum value for the selected range in Table 17 12 Perform the following calcula...

Page 17: ...e same point where the LO lead from the NI 9219 connects to the resistor to ensure that the DMM reference measurements include the same lead wire resistance as the NI 9219 3 wire measurements Figure 9 3 Wire RTD Accuracy Verification Connections to the NI 9219 2 Create an AI voltage channel in the 1 V range on the NI 9219 3 Commit the task to place the NI 9219 in voltage mode This prevents the mod...

Page 18: ...ith the DMM Record this measurement as BottomHalfDMM 11 Disconnect the DMM from the resistor and the NI 9219 12 Calculate the DMM measurement of the 3 wire system from the following equation 13 Clear the task 14 Create an AI RTD channel on the NI 9219 Configure the channel according to Table 18 15 Acquire 20 unscaled I32 3 wire readings with the NI 9219 Record the average of the readings as dataun...

Page 19: ...channels on the NI 9219 NI recommends that you verify the values for all the iterations listed in Table 19 for each channel but you can save time by verifying only the values and channels used in your application Half Bridge Accuracy Verification Complete the following steps to verify the half bridge accuracy of an NI 9219 1 Connect the NI 9219 to DMM1 as shown in Figure 11 Figure 11 Half Bridge A...

Page 20: ...d the voltage source as shown in Figures 12 13 or 14 for the appropriate test point value indicated in Table 21 Observe the following conditions when connecting the equipment to the NI 9219 Connect the leads of DMM1 as close as possible to the terminals on the NI 9219 Connect the HI lead of DMM2 as close as possible to the same point that the HI lead of the NI 9219 connects to the resistor network...

Page 21: ...ections to the NI 9219 Configuration 4 9 Configure DMM1 for a voltage measurement in the 10 V range 10 Enable Auto Zero on DMM1 11 Configure DMM2 for a voltage measurement in the 10 V range 12 Enable Auto Zero on DMM2 HI V LO DMM2 NI 9219 HI V LO DMM1 V V Source EX 3 HI 4 EX 5 Ch x 1 kΩ 1 1 kΩ 1 5 kΩ 1 5 kΩ 1 HI V LO DMM2 NI 9219 HI V LO DMM1 V V Source EX 3 HI 4 EX 5 Ch x 1 kΩ 1 1 kΩ 1 5 kΩ 1 5 k...

Page 22: ...Upper Limit and Lower Limit values in Table 21 17 Clear the acquisition 18 Repeat steps 8 through 17 for all test points 19 Repeat steps 1 through 18 for all channels on the NI 9219 NI recommends that you verify each channel but you can save time by verifying only the channels used in your application 20 Disconnect the DMMs and the resistors from the device Table 21 NI 9219 Verification Test Limit...

Page 23: ...ast 2 5 V 7 Set the voltage source to VExcitationModule Use the smallest available range needed to source VExcitationModule Using a range larger than necessary creates unwanted additional noise 8 Connect the NI 9219 to DMM1 DMM2 and the source as shown in Figures 16 or 17 for the appropriate test point value indicated in Table Observe the following conditions when connecting the equipment to the N...

Page 24: ...tion Connections to the NI 9219 Configuration 2 Figure 17 Full Bridge Accuracy Verification Connections to the NI 9219 Configuration 3 9 Configure DMM1 for a voltage measurement in the 10 V range 10 Enable Auto Zero on DMM1 HI LO DMM2 HI LO DMM1 V V Source 10 kΩ 1 10 kΩ 1 NI 9219 EX 3 HI 4 LO 6 EX 5 Ch x RTestPoint HI V LO DMM2 HI V LO DMM1 V V Source 10 kΩ 1 10 kΩ 1 NI 9219 EX 3 HI 4 LO 6 EX 5 Ch...

Page 25: ...vice Adjustment Following the adjustment procedure automatically updates the calibration date and temperature in the EEPROM of the NI 9219 Note National Instruments recommends a complete adjustment of your device to renew the calibration interval However if you do not want to perform an adjustment you can update the calibration date and onboard calibration temperature without making any adjustment...

Page 26: ...9219 instance of the DAQmx Setup C Series Calibration VI LabVIEW Block Diagram NI DAQmx Function Call Call DAQmxInitExtCal with the following parameters deviceName The name of the device you want to calibrate This name can be found under Devices and Interfaces in Measurements Automation Explorer password NI calHandle calHandle LabVIEW Block Diagram NI DAQmx Function Call Call DAQmxSetup9219Cal wit...

Page 27: ...stment points 7 Configure the DMM for a voltage measurement 8 Enable Auto Zero on the DMM 9 Acquire a voltage reading with the DMM LabVIEW Block Diagram NI DAQmx Function Call Call DAQmxCSeriesSetCalTemp with the following parameters calHandle calHandle temperature The external temperature value in degrees Celsius LabVIEW Block Diagram NI DAQmx Function Call Call DAQmxGet9219CalAdjustPoints with t...

Page 28: ...the adjustment to the EEPROM 13 Repeat steps 3 through 12 for each voltage range on the NI 9219 channel 14 Repeat steps 3 through 13 for each channel on the NI 9219 15 Disconnect the source and the DMM from the device LabVIEW Block Diagram NI DAQmx Function Call Call DAQmxAdjust9219Cal with the following parameters calHandle calHandle channelName cDAQ1Mod8 aix value The DMM reading x refers to the...

Page 29: ... in current mode using the NI 9219 instance of the DAQmx Setup C Series Calibration VI LabVIEW Block Diagram NI DAQmx Function Call Call DAQmxInitExtCal with the following parameters deviceName The name of the device you want to calibrate This name can be found under Devices and Interfaces in Measurements Automation Explorer password NI calHandle calHandle LabVIEW Block Diagram NI DAQmx Function C...

Page 30: ...Block Diagram NI DAQmx Function Call Call DAQmxSetup9219Cal with the following parameters rangeMin 0 025 rangeMax 0 025 calHandle calHandle channelName cDAQ1Mod8 aix measType DAQmx_Val_Current bridgeConfig DAQmx_Val_NoBridge x refers to the channel number LabVIEW Block Diagram NI DAQmx Function Call Call DAQmxCSeriesSetCalTemp with the following parameters calHandle calHandle temperature The exter...

Page 31: ...ire a current reading with the NI 9219 using the NI 9219 instance of the DAQmx Adjust C Series Calibration VI 12 Repeat steps 7 through 11 for every value in the array LabVIEW Block Diagram NI DAQmx Function Call Call DAQmxGet9219CalAdjustPoints with the following parameters calHandle calHandle adjustmentPoints An array of reference values for the DAQmx Adjust Calibration VI bufferSize The size of...

Page 32: ...leads of the DMM as close as possible to the same point that the sense leads of the NI 9219 HI and LO connect to the resistor to ensure that the DMM reference measurements include the same lead wire resistance as the NI 9219 4 wire measurements 2 Open a calibration session to your device using the DAQmx Initialize External Calibration VI The default password is NI LabVIEW Block Diagram NI DAQmx Fu...

Page 33: ...bration VI LabVIEW Block Diagram NI DAQmx Function Call Call DAQmxSetup9219Cal with the following parameters rangeMin 0 rangeMax 1050 10500 calHandle calHandle channelName cDAQ1Mod8 aix measType DAQmx_Val_Resistance bridgeConfig DAQmx_Val_NoBridge x refers to the channel number LabVIEW Block Diagram NI DAQmx Function Call Call DAQmxCSeriesSetCalTemp with the following parameters calHandle calHandl...

Page 34: ...urement 8 Enable Auto Zero on the DMM LabVIEW Block Diagram NI DAQmx Function Call Call DAQmxGet9219CalAdjustPoints with the following parameters calHandle calHandle adjustmentPoints An array of reference values for the DAQmx Adjust Calibration VI bufferSize The size of the adjustmentPoints array in elements LabVIEW Block Diagram NI DAQmx Function Call Call DAQmxSetup9219Cal with the following par...

Page 35: ... Set up the signal acquisition using the NI 9219 instance of the DAQmx Setup C Series Calibration VI LabVIEW Block Diagram NI DAQmx Function Call Call DAQmxSetup9219Cal with the following parameters rangeMin 0 rangeMax 1050 10500 calHandle calHandle channelName cDAQ1Mod8 aix measType DAQmx_Val_Resistance bridgeConfig DAQmx_Val_NoBridge x refers to the channel number ...

Page 36: ... time and temperature of the adjustment to the EEPROM 16 Repeat steps 2 through 15 for each 4 wire resistance mode on the NI 9219 17 Disconnect the DMM and the resistor from the device 18 Repeat steps 1 through 17 for each channel on the NI 9219 LabVIEW Block Diagram NI DAQmx Function Call Call DAQmxAdjust9219Cal with the following parameters calHandle calHandle channelName cDAQ1Mod8 aix value The...

Page 37: ...me point that the sense leads of the NI 9219 HI and LO connect to the resistor to ensure that the DMM reference measurements include the same lead wire resistance as the NI 9219 4 wire measurements 2 Open a calibration session to your device using the DAQmx Initialize External Calibration VI The default password is NI LabVIEW Block Diagram NI DAQmx Function Call Call DAQmxInitExtCal with the follo...

Page 38: ...IEW Block Diagram NI DAQmx Function Call Call DAQmxSetup9219Cal with the following parameters rangeMin 0 rangeMax 505 5050 calHandle calHandle channelName cDAQ1Mod8 aix measType DAQmx_Val_Temp_RTD bridgeConfig DAQmx_Val_NoBridge x refers to the channel number LabVIEW Block Diagram NI DAQmx Function Call Call DAQmxCSeriesSetCalTemp with the following parameters calHandle calHandle temperature The e...

Page 39: ... for a 4 wire resistance measurement LabVIEW Block Diagram NI DAQmx Function Call Call DAQmxGet9219CalAdjustPoints with the following parameters calHandle calHandle adjustmentPoints An array of reference values for the DAQmx Adjust Calibration VI bufferSize The size of the adjustmentPoints array in elements LabVIEW Block Diagram NI DAQmx Function Call Call DAQmxSetup9219Cal with the following para...

Page 40: ... 11 Set up the signal acquisition using the NI 9219 instance of the DAQmx Setup C Series Calibration VI LabVIEW Block Diagram NI DAQmx Function Call Call DAQmxSetup9219Cal with the following parameters rangeMin 0 rangeMax 505 5050 calHandle calHandle channelName cDAQ1Mod8 aix measType DAQmx_Val_Temp_RTD bridgeConfig DAQmx_Val_NoBridge x refers to the channel number ...

Page 41: ...nal Calibration VI This VI also saves the date time and temperature of the adjustment to the EEPROM 16 Disconnect the resistor and the DMM from the device 17 Repeat steps 1 through 16 for each channel on the NI 9219 LabVIEW Block Diagram NI DAQmx Function Call Call DAQmxAdjust9219Cal with the following parameters calHandle calHandle channelName cDAQ1Mod8 aix value The DMM reading x refers to the c...

Page 42: ...ance of the DAQmx Setup C Series Calibration VI LabVIEW Block Diagram NI DAQmx Function Call Call DAQmxInitExtCal with the following parameters deviceName The name of the device you want to calibrate This name can be found under Devices and Interfaces in Measurements Automation Explorer password NI calHandle calHandle LabVIEW Block Diagram NI DAQmx Function Call Call DAQmxSetup9219Cal with the fol...

Page 43: ...g the equipment to the NI 9219 Connect the leads of DMM1 as close as possible to the terminals on the NI 9219 Connect the HI lead of DMM2 as close as possible to the same point that the HI lead of the NI 9219 connects to the resistor network Connect the LO lead of DMM2 as close as possible to the EX terminal of the NI 9219 11 Configure DMM1 for a voltage measurement in the 10 V range 12 Enable Aut...

Page 44: ...mx Close External Calibration VI This VI also saves the date time and temperature of the adjustment to the EEPROM 19 Disconnect the DMMs and the resistors from the device 20 Repeat steps 1 through 19 for each channel on the NI 9219 LabVIEW Block Diagram NI DAQmx Function Call Call DAQmxAdjust9219Cal with the following parameters calHandle calHandle channelName cDAQMod8 aix value Ratioref x refers ...

Page 45: ...tance of the DAQmx Setup C Series Calibration VI LabVIEW Block Diagram NI DAQmx Function Call Call DAQmxInitExtCal with the following parameters deviceName The name of the device you want to calibrate This name can be found under Devices and Interfaces in Measurements Automation Explorer password NI calHandle calHandle LabVIEW Block Diagram NI DAQmx Function Call Call DAQmxSetup9219Cal with the fo...

Page 46: ...9219 Connect the leads of DMM1 as close as possible to the terminals on the NI 9219 Connect the HI lead of DMM2 as close as possible to the same point that the HI lead of the NI 9219 connects to the resistor network Connect the LO lead of DMM2 as close as possible to the same point that the LO lead of the NI 9219 connects to the resistor network 11 Configure DMM1 for a voltage measurement in the 1...

Page 47: ... External Calibration VI This VI also saves the date time and temperature of the adjustment to the EEPROM 19 Repeat steps 10 through 18 for each full bridge mode on the NI 9219 20 Disconnect the DMMs and the resistors from the device 21 Repeat steps 1 through 20 for each channel on the NI 9219 LabVIEW Block Diagram NI DAQmx Function Call Call DAQmxAdjust9219Cal with the following parameters calHan...

Page 48: ...ccuracy Under Calibration Conditions Mode Range PPM of Reading PPM of Range Minimum Maximum Voltage 60 V 60 V 60 V 744 17 Voltage 15 V 15 V 15 V 745 55 Voltage 4 V 4 V 4 V 740 147 Voltage 1 V 1 V 1 V 308 14 Voltage 125 mV 125 mV 125 mV 308 82 Thermocouple 125 mV 125 mV 308 82 Current 25 mA 25 mA 1067 24 4 Wire Resistance 10 k 0 10 5 k 776 61 4 Wire Resistance 1 k 0 1 05 k 771 474 4 Wire RTD Pt1000...

Page 49: ...erved 372264A 01 Jun11 Note For operational specifications refer to the most recent NI 9219 Operating Instructions and Specifications online at ni com manuals Where to Go for Support The National Instruments Web site is your complete resource for technical support At ni com support you have access to everything from troubleshooting and application development self help resources to email and phone...

Reviews: