


5
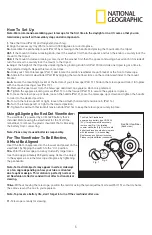
Using/Aligning the Red Dot Viewfinder:
The viewfinder is powered by a CR-1620 battery that is
included. Before using the viewfinder for the first time,
remember to remove the plastic insulator that is blocking
the battery from connecting.
Note: Please recycle used batteries responsibly.
For The Viewfinder To Be Effective,
It Must Be Aligned
Insert the 26 mm eyepiece into the focuser and power on the
viewfinder by flipping the switch to the “On” position.
10a.
Point the telescope at an easy to identify target like a
tree that is approximately 200 yards away. Center the object
in the eyepiece. Lock the telescope into place by tightening
the panhandle.
Note: Terrestrial objects may appear inverted, sideways
or at an angle depending on how your tube is oriented
due to optical design. This rotation is perfectly normal on
all Newtonian reflectors and will not affect astronomical
viewing.
10b-e.
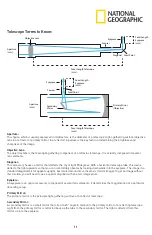
Without moving the telescope, position the red dot using the two adjustment screws(Part 15) so that it shares
the same view as the one in your eyepiece.
Note: To preserve battery life, don’t forget to turn off the viewfinder after use.
11.
Telescope is ready for viewing.
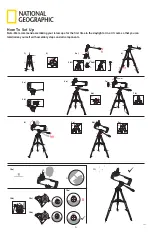
How To Set Up
Note: We recommend assembling your telescope for the first time in the daylight or in a lit room so that you can
familiarize yourself with assembly steps and all components.
1.
Take the tripod (Part 3) and fully extend each leg.
2.
Align the accessory tray (Part 4) and turn 180 degrees to lock into place.
3a.
Assemble the panhandle mount (Part 2) by screwing in the handle and placing the mount onto the tripod.
3b1.
If the mount includes a locking knob, insert the washer first then the spacer and turn the knob to securely lock the
mount to the tripod.
3b2.
If the mount includes a locking screw, insert the washer first then the spacer and using a hex wrench (if included),
turn the screw to securely lock the mount to the tripod.
4.
Adjust the height of the tripod by unlocking the leg locking knob first (Part 10) and slide one tripod leg at a time to
the preferred length. Repeat this two more times.
5a.
Grab your 114mm telescope (Part 1) and locate the red dot viewfinder mount bracket at the front of telescope.
5b.
Slide in the red dot viewfinder (Part 8) by aligning the two hollow circles on the red dot viewfinder to the mount
bracket.
6a-b.
Locate the mounting bracket at the bottom of your telescope (Part 11). Slide in the telescope and lock it into place
with the mount locking screw (Part 12).
7a.
Remove the dust cover from the telescope and insert an eyepiece. 26 mm is preferred.
7b.
Tighten the eyepiece locking screws (Part 13) on the focuser (Part 5) to secure the eyepiece in place.
8.
To move the telescope up or down, loosen the handle (Part 2), move the telescope up or down and tighten the handle
to lock it to the desired position.
9a.
To turn the telescope left or right, loosen the azimuth (horizontal) tension knob. (Part 14).
9b.
Turn the telescope left or right to the desired position.
9c.
Tighten the azimuth (horizontal) tension knob (Part 14) to keep the telescope securely in place.
CR1620
BATTERY
3V
The Red Dot Viewfinder is
powered by a battery type CR-1620
(3V); if a replacement is necessary,
remove cap (Fig. 1) by twisting
counter clockwise (Fig. 2) remove old
battery and insert new battery in place
with the positive (+) side showing.
Replace cap and tighten clockwise.
Please recycle batteries responsibly.
Fig. 1
Fig. 2
Red Dot Viewfinder
(back view)
English
Summary of Contents for NT114CF
Page 14: ...14 Notes...
Page 15: ...15 Notes...


