background image

Basic information overview

6

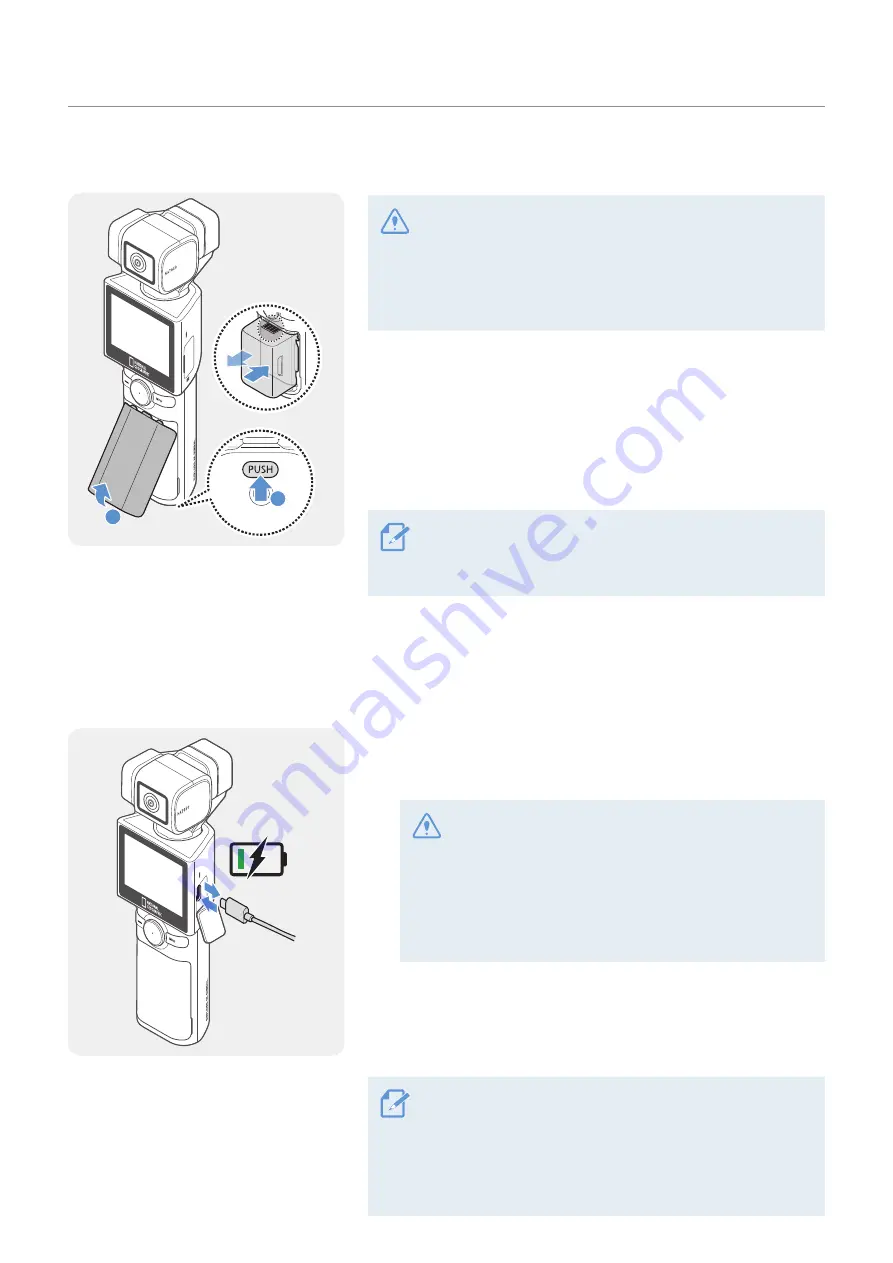
1.4  Removing and inserting the battery

2

1

• For optimal performance, use a genuine battery. 
• The performance of the product may be limited and the 

camera performance is not guaranteed if you do not use an 
authentic battery. For more information on battery safety 
and use, refer to the Battery Information Guide.

1


Open the battery cover by pressing the battery cover 
release button and take out the battery by holding the 
grooves on both sides of the battery.

2


Check that the metal part of the new battery is facing 
upward and insert it in the correct direction.

The product uses a removable battery. Ensure that the 
battery cover is tightly closed and sealed before using the 
product.

1.5  Charging the product

1.5.1  Charging the product with a cable

1


Connect the product to a USB adapter or computer USB port 
using the included USB cable.

• Fully charge the battery before using the product for 

the first time.

• Use an adapter that supports 2A or higher. The product 

may not charge when using certain adapters.

• If you use a cable other than the included authentic 

cable, the product may not charge.

2


When charging begins, the product’s LED indicator will turn 

red

, and when charging is complete, the LED indicator will 

turn off.

• It takes 180 minutes to fully charge the battery. (You can charge 

two batteries at the same time by using battery charger.)

• For the fastest charging of the product, use the charger. 
• Charging time may vary depending on the charging 

environment.

Summary of Contents for NC-200

Page 1: ...NC 200 USER GUIDE National Geographic gimbal cam is a portable gimbal camera that combines ease of use and functionality...

Page 2: ...menu tree 11 2 1 2 Using the LCD function 12 2 1 3 Screen layout 12 2 2 Using the buttons 14 2 3 Overview of LED status and beep 15 3 Overview of National Geographic gimbal cam features 16 3 1 Using A...

Page 3: ...kpack mount Main unit Battery Pouch Ferrite core Battery charger 1 1 2 Accessories sold separately Mini tripod Microphone ND filter LCD protective film Hard protective case small Hard protective case...

Page 4: ...amera Pan motor Speaker Trigger M4 mount connector Strap holder LCD LED status Recording button Joystick Mode Power button Battery cover 1 2 2 Main unit side view Roll motor Microphone USB port SD car...

Page 5: ...ensure that the memory card is in the correct direction and insert it into the slot until you hear a click Ensure that the memory card is in the correct direction before inserting it into the product...

Page 6: ...battery cover is tightly closed and sealed before using the product 1 5 Charging the product 1 5 1 Charging the product with a cable 1 Connect the product to a USB adapter or computer USB port using t...

Page 7: ...ly and has not been designed for outdoor use or tested for charging leisure vehicles mobile motor generators etc Only charge genuine batteries designated for the product Use a 5V adapter and an adapte...

Page 8: ...life is based on the LCD brightness set to 100 and always on Battery life will vary depending on resolution and frame settings screen brightness and other factors 1 8 Connecting the product to the bac...

Page 9: ...lect the corresponding ID from the search list and tap Connect If the head tracker is not found or the connection fails tap Reconnect to search again Up to three head trackers are listed in order of s...

Page 10: ...lot and USB port before using the product Be careful not to get foreign objects inside the battery cover The proper operating temperature for the product is 10 35 C The battery life may vary depending...

Page 11: ...11 2 Using the product 2 1 Overview of the LCD 2 1 1 Main menu tree The main menu tree of the product is as follows Settings menu Gimbal quick settings Album Preset...

Page 12: ...When the product is turned on the camera preview recording mode battery level and microSD card information are displayed on the LCD Num Description Displays SD card information and status Estimated r...

Page 13: ...on off display grid in preview screen Settings LCD brightness Turn beep on off Turn live streaming on off Gimbal quick settings screen Num Description Gimbal mode settings Gimbal direction settings Sw...

Page 14: ...he camera to the left Move the camera to the right Move the camera upward Move the camera down Trigger Movement Preview screen layout Recording Holding Use the gimbal control mode set by the user chos...

Page 15: ...op recording a video flickers slowly Take a photo continuous shot flickers once Start stop taking a panorama flickers once Timer shooting flickers every second Calibration in progress flickers quickly...

Page 16: ...I tracking Face tracking Face ID Tracking mode off AI tracking mode 1 Swipe left on the preview screen to open the gimbal quick settings then change the tracking mode to AI tracking mode 2 Face recogn...

Reviews: