17
Operation
17
Soft Sub-Floor
The slide plate should be adjusted to a low setting 1” (2.5 cm) off the floor. Blades should
be as flat of an angle as possible. Use a heavy duty blade (these blades have a bend to
them) or a regular blade bevel down. When using a regular blade, bending up the cor-
ners of the blade will help from the blade digging into the floor. Sometimes a shank blade
or a shank blade with a carbide tip will work.
DITCHING
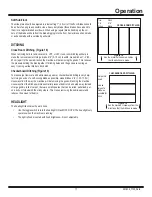
Cross Room Ditching (Figure 18)
When removing hard to remove ceramic, VCT, or VAT, cross-room ditching will help to
make the removal easier. Using a blade 2”-6” (5-15 cm) in width, make ditches 1’-2’ (30-
60 cm) apart in the same direction the machine will be removing the goods. This relieves
the pressure holding the tiles together. If ditching helps and the goods are coming up
easy, try using a wider blade to ditch with.
Checkerboard Ditching (Figure 19)
To make carpet removal and debris clean-up easier, checkerboard ditching is very help-
ful. Using as wide of a self-scoring blade as possible, make ditches 4’-6’ (1.25-1.75 m)
crossways from the way the machine will be removing the goods. Running the machine
crossways from the ditches will make smaller pieces of debris to be hauled away. Instead
of large gummy rolls of carpet, there are small squares that can be rolled, palletized, put
on a dolly, or folded with the sticky side in. This makes removing the debris easier and
reduces the amount of debris.
HEADLIGHT
The headlight illuminates the work zone.
• Use the toggle switch to turn the headlight ON and OFF.
NOTE: The headlight only
operates when the machine is running.
•
The light is fixed-mounted with fixed brightness--it is not adjustable.
CROSS-ROOM DITCHING
Ditch
2”-6”
Blade
Tile
1’-2’
Strips
Figure 18
Run the machine the same direction
that the ditches are made
Carpet 4’-6’
apart
Use as
large of a
blade as
possible for
ditch
Figure 19
Run the machine crossways from the
directions that the ditches are made
CHECKERBOARD DITCHING
401836_7700_RevK


