PREPARATION AND DRILLING OF TRIM STRIP
1.
Position motorcycle securely on center stand or side stand.
2.
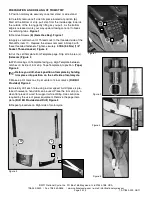
Carefully remove Left side trim piece located at position
(a)
.
Start at the bottom of strip, pull strip from the inside edge towards
the outside of the fairing gently lifting as you pull. As the bottom
edge is released, work your way upward taking care not to break
the retaining tabs.
Figure 1
3.
Remove Screws
(b) (5mm Hex Key). Figure 1
4.
Apply a small amount of Thread Lock to the threaded side of the
Standoffs, item 10. Replace the screws removed in Step 3 with
these threaded fasteners. Tighten securely.
4 ft/lb (5.4 Nm) (1/2”
Socket, Thread Locker) Figure 2
5.
Cut the Left Template from Template page. Snip at tab, area (c).
(Scissors) Figure 3
6.
With markings on Template facing up, align Template between
notches on inside of trim strip. Tape Template into position.
(Tape)
Figure 3
Before you drill, check position of template by holding
trim piece into position on the Left side of motorcycle.
7.
Make a pilot mark on strip at center of cross marks.
(Drill Bit
Provided) Figure 4
8.
Carefully drill each hole using a slow speed. A drill press is pre-
ferred, however a hand drill can be used. Place the trim strip on a
clean flat piece of wood for support while drilling. Use caution as
required by the use of power equipment. Remove the paper tem-
plate.
(Drill Bit Provided and Drill) Figure 5
9.
Repeat procedure on Right side of motorcycle.
©2011 National Cycle, Inc. PO Box 158, Maywood, IL 60153-0158 USA
708-343-0400 / Fax: 708-343-0625 / www.nationalcycle.com / e-mail: [email protected]
Page 2 of 4
10-17840-000 08/11
Figure 1
Figure 4
Figure 5
Figure 2
Figure 3
a
b
b
R
L
c
c
c
c


