


Assembly and Instructions
The parts needed to assemble the
manikin are:
(1) manikin torso, (1) manikin head
(1) airway sample, (2) pine tree push
pins, (2) washers and (2) hairpin
clips. (1) Rubberband
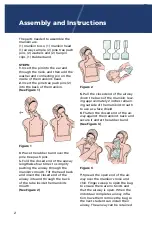
STEPS:
1. Insert the pin into the ear and
through the neck, and then add the
washer and connecting pin on the
inside of the manikin's head.
2. Insert the pine tree push pins (2)
into the back of the manikin.
(See Figure 1)
Figure 1
3. Place the rubber band over the
pine tree push pins.
4. Fold the closed end of the airway
lengthwise four times to simplify
pushing the airway through the
manikin's mouth. Tilt the head back
and insert the closed end of the
airway into and through the back
of the tube inside the manikin's
mouth.
(See Figure 2)
Figure 2
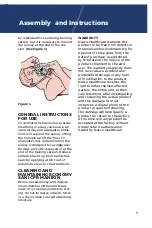
5. Pull the closed end of the airway
down the back of the manikin, leav-
ing approximately 2 inches remain-
ing outside of the manikin's mouth
to use as a face shield.
6. Flatten the closed end of the air-
way against the manikin's back and
secure it under the rubber band.
(See Figure 3)
Figure 3
7. Spread the open end of the air-
way over the manikin's nose and
chin. Finger sweep to open the bag
to ensure there are no twists and
that the airway is open. When the
individual completes airway infla-
tion, have them remove the bag so
the next student can install their
airway. The airway can be retained
2
PP2752_EconomyAdultSaniManikin_5.5x8.5_Rvised12/14.indd 2
12/16/14 11:50 AM
PP2752_EconomyAdultSaniManikin_5.5x8.5_Rvised12/14.indd 2
12/16/14 11:50 AM
PP2752_EconomyAdultSaniManikin_5.5x8.5_Rvised12/14.indd 2
12/16/14 11:50 AM


