Napoleon LEX 485 User Manual Download Page 15

www.napoleongrills.com


15

Protection Of Infrared Burners

: The infrared burners of your grill are designed to provide a long service 

life, though care must taken to prevent cracking of their ceramic surfaces. Fractures will cause the burners 

to malfunction. The following provides a few of the causes of cracks and the steps you can take to avoid 

them. Damage caused by failure to follow these steps is not covered by your grill warranty.
1.  Impact with hard objects - Never allow hard objects to strike the ceramic. Take care when inserting or 

removing cooking grates and accessories into or from the grill. 
2.  Contact with water or other liquids - Cold liquids contacting the hot ceramic surfaces can cause them 

to break. Never throw water into the grill to douse a flame. If the ceramic or interior of a burner becomes 

wet while not in use, later operation of the burner can create steam, which can produce sufficient 

pressure to crack the ceramic. Repeated soaking of the ceramic can also cause it to swell and expand. This 

expansion causes undue pressure on the ceramic that can cause it to crack and crumble.
 

i)   Never throw water into the grill to control flare-ups.


ii)  Do not attempt to operate the infrared burners in open air while raining.
iii) If you find standing water in your grill (because of exposure to rainfall, sprinklers, etc.), inspect 

the ceramic for evidence of possible watersoaking. If the ceramic appears to be wet, remove 

the burner from the grill. Turn it upside down to drain the excess water and bring indoors to dry 

thoroughly.

3.  Impaired ventilation of hot air from the grill - For the burners to function properly, hot air must have a 

way to escape the grill.  If the hot air is not allowed to escape, the burners can become deprived of oxygen 

causing them to back-flash. If this occurs repeatedly, the ceramic could crack. Never cover more than 75% 

of the cooking surface with solid metal (i.e., griddle or large pan).
4.  Incorrect cleaning - Do not clean the ceramic tile with a wire brush. If debris is collecting on your 

burner, light the burner and operate on high for 5 minutes with the lid open, allowing debris to burn off.

Infrared Burners

: Because of the high intensity of the infrared burner, most drippings and food particles 

that fall onto the burner surface are immediately incinerated.  However, some debris and residue may 

remain.  To remove this residue after cooking, operate the grill on high for 5-10 minutes. Do not clean the 

ceramic tile with a wire brush. 

Troubleshooting

Problem

Possible Causes

Solution

Low heat / Low flame 

when valve turned to 

high.

For Universal Liquefied Petroleum Gas - 

improper lighting procedure.

For natural gas - undersized supply line.

For both gases - improper preheating.

Ensure lighting procedure is followed carefully.  

All gas grill valves must be in the off position 

when the tank valve is turned on. Turn tank 

on slowly to allow pressure to equalize. See 

lighting instructions.

Pipe must be sized according to installation 

code.

Preheat grill with both main burners on high 

for 10 to 15 minutes.

Excessive flare-ups/

uneven heat.

Sear plates installed incorrectly.

Improper preheating.

Excessive grease and ash build on sear 

plates and in drip pan.

Ensure sear plates are installed with the 

holes towards the front and the slots on the 

bottom. See assembly instructions.

Preheat grill with both main burners on high 

for 10 to 15 minutes.

Clean sear plates and drip pan regularly. Do 

not line pan with aluminum foil. Refer to 

cleaning instructions.

Burners burn with 

yellow flame, 

accompanied by the 

smell of gas.

Possible spider web or other debris, or 

improper air shutter adjustment.

Thoroughly clean burner by removing.  See 

general maintenance instructions. Open air 

shutter slightly according to combustion air 

adjustment instructions.  (This must be done 

by a qualified gas installer.)

Flames lift away from 

burner, accompanied 

by the smell of gas, and 

possibly difficulties in 

lighting.

Improper air shutter adjustment.

Close air shutter slightly according to 

combustion air adjustment instructions.  (This 

must be done by a qualified gas installer.)

Summary of Contents for LEX 485

Page 1: ...re department LEX 485 SAI Global SAI 400025 AS4557 DO NOT REMOVE WARNING Do not try to light this appliance without reading the LIGHTING instructions section of this manual Do not store or use gasolin...

Page 2: ...er the wholesale price of any warranted but defective part s NAPOLEON will not be responsible for the installation labor or any other costs or expenses related to the re installation of a warranted pa...

Page 3: ...the supply when being stored indoors Inspect the gas line hose before each use If there is evidence of excessive abrasion or wear it must be replaced before using the gas grill with a replacement hose...

Page 4: ...rtial enclosure that includes an overhead cover and no more than two sidewalls These sidewalls may be parallel as in a breezeway or at right angles to each other Within a partial enclosure which inclu...

Page 5: ...LL HEIGHT 49 1 4 125cm 59 1 4 151cm LID OPEN 14 1 4 36cm 35 89cm OVERALL WIDTH 57 3 4 147cm OVERALL DEPTH 27 1 2 70cm 36 1 4 92cm GRILL HEIGHT GRILL SIZE 485 in 2 3130 cm 2 WARMING RACK SIZE 190 in 2...

Page 6: ...th drip pan Do not route hose over top of back panel Ensure all hose connections are tightened using two wrenches Do not use teflon tape or pipe dope on any hose connection Ensure the hose does not co...

Page 7: ...Cylinder Installation Cylinder Connection Ensure that the gas regulator hose is kink free Remove the cap or plug from the cylinder fuel valve Insert the POL regulator nipple onto the POL fuel valve Ha...

Page 8: ...t and remove all sources of ignition See Leak Testing Diagram for areas to check Turn all burner controls to the off position Turn gas supply valve on Brush a half and half solution of liquid soap and...

Page 9: ...burner lights or light by match 4 If the pilot and burner will not ignite within 5 seconds turn the control knob to the off position and wait 5 minutes for any excess gas to dissipate Either repeat s...

Page 10: ...ound chicken on the rotisserie will be done in approximately 1 hours on medium to high See Your all Season Grill cookbook by Napoleon for more detailed instructions WARNING Barbecue sauce and salt can...

Page 11: ...nto the charcoal and vaporize into smoke giving the food its delicious grilled taste The Napoleon infrared burner cooks in the same way In each burner 10 000 ports each with its own tiny flame cause t...

Page 12: ...to Napoleon s woodchip smoker Chicken pieces High setting 2 min each side then medium low to low setting 20 25 min The joint connecting the thigh and the leg from the skinless side should be sliced 3...

Page 13: ...mbustion air Keep the cylinder enclosure ventilation openings located on the cart sides and at the front and back of the bottom shelf free and clear from debris WARNING Turn off the gas at the source...

Page 14: ...brown hue This discoloration is normal and does not affect the performance of the grill Porcelain enamel components must be handled with additional care The baked on enamel finish is glass like and wi...

Page 15: ...leaning Do not clean the ceramic tile with a wire brush If debris is collecting on your burner light the burner and operate on high for 5 minutes with the lid open allowing debris to burn off Infrared...

Page 16: ...umbling noise and fluttering blue flame at burner surface Lack of gas Supply hose is pinched Dirty or clogged orifice Spider webs or other matter in venturi tube Universal Liquefied Petroleum Gas regu...

Page 17: ...ent 4 Proof of purchase photocopy of the invoice In some cases the Customer Solutions Representative could request to have the parts returned to the factory for inspection before providing replacement...

Page 18: ...lly assembled and operates to your satisfaction 3 Assemble the grill where it is to be used lay down cardboard or a towel to protect parts from being lost or damaged while assembling 4 Most stainless...

Page 19: ...www napoleongrills com 19 1 X N430 0002 16 X N570 0073 1 4 20 X 3 8 3 8 10mm non relvolving caster left side...

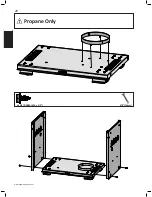
Page 20: ...www napoleongrills com 20 Propane Only 4 x N570 0080 14 x 1 2 3 8 10mm...

Page 21: ...www napoleongrills com 21 6 x N570 0080 14 x 1 2 3 8 10mm Propane Only...

Page 22: ...www napoleongrills com 22 3 8 10mm 4 x N570 0080 14 x 1 2 1 X N430 0002...

Page 23: ...the grill head remove zip tie holding regulator This was installed at the factory to protect the regulator hose during shipping and is no longer required Take care when removing the tie not to damage...

Page 24: ...www napoleongrills com 24 3 8 10mm 4 x N570 0080 14 x 1 2 ATTENTION Ensure that all tabs are bent down before installation...

Page 25: ...www napoleongrills com 25 2 x N570 0080 14 x 1 2 3 8 10mm Back View Front View ATTENTION Ensure that all tabs are bent up after installation...

Page 26: ...www napoleongrills com 26 disposable grease tray...

Page 27: ...www napoleongrills com 27 3 8 10mm 6 x N570 0080 14 x 1 2 Back View Front View ATTENTION Ensure that all tabs are bent up after installation...

Page 28: ...www napoleongrills com 28 3 8 10mm 2 x N570 0073 1 4 20 X 3 8...

Page 29: ...www napoleongrills com 29 8 x N570 0076 8 X 1 2 4 x N570 0013 8 X 5 8 Engage edge of shelf under ribs in end cap N570 0013 8 X 5 8...

Page 30: ...www napoleongrills com 30 4 x N570 0082 1 4 20 X 5 8 3 8 10mm 4 x N735 0001 Tabs located on either side of ice bucket must engage notches in side shelf...

Page 31: ...napoleongrills com 31 4 x N570 0082 1 4 20 X 5 8 3 8 10mm 4 x N735 0001 1 x N160 0023 Fit orifice into burner tube and secure with hose retainer clip supplied Attach the wire to the side burner electr...

Page 32: ...www napoleongrills com 32 4 x N570 0099 14 x 3 4 3 8 10mm 4 x N340 0007 WARNING Do not over tighten the screws as this will cause the handle to crack Propane Only 1 2 3 3 8 10mm N570 0080 14 x 1 2...

Page 33: ...www napoleongrills com 33 2 x N105 0011 1 2 x N160 0022 2 3 BOTTOM TOP 4...

Page 34: ...www napoleongrills com 34 FOLD TABS OVER TO SECURE GLASS IN PLACE...

Page 35: ...www napoleongrills com 35...

Page 36: ...www napoleongrills com 36 Rotisserie Kit Assembly Instruction optional Assemble rotisserie kit components as shown Ensure stop bushing is tightened on the inside of hood casting...

Page 37: ...ttached so that no part of the hose touches the underside of the grill or drip pan A fire will result if these directions are ignored Clip hose to side panel using hose retainer clip supplied Ensure t...

Page 38: ...st be leak tested before operating the grill Do not use pipe dope or teflon tape on this connection Tighten the connection with two wrenches WARNING FIRE HAZARD WARNING Do not route hose over top of r...

Page 39: ...light bracket x 21 N570 0008 8 x 1 2 screw x 22 N475 0347 AU control panel x 23 N010 0835 AU manifold assembly p N010 0838 AU manifold assembly n 24 Z510 0003 black silicone lid bumper x 25 N660 0002...

Page 40: ...062 door handle x 63 N555 0025 lighting rod x 64 N485 0016 pivot pin door top x 65 N485 0017 pivot pin door bottom x 66 N570 0099 14 x 3 4 screw x 67 N570 0082 1 4 20 x 5 8 screw x 68 N735 0001 insula...

Page 41: ...ire clip x 99 N590 0189 cutting board x 100 N500 0041 side burner plate x 101 N100 0037 side burner electrode x 102 N305 0059 side burner grate x 103 N455 0057 side burner orifice 62 x 104 N160 0016 s...

Page 42: ...21 45 80 46 41 21 31 91 97 102 98 100 90 21 93 20 26 26 22 69 25 19 94 92 18 55 36 79 21 90 103 74 95 71 73 67 106 104 72 72 52 75 67 68 83 82 83 81 3 17 12 11 55 14 64 61 66 60 58 76 59 62 59 65 63...

Page 43: ...www napoleongrills com 43 Notes...

Page 44: ...N415 0275 AU...

Reviews: