


of 6
7/17/99
WI988
2
1.
Before connecting and configuring the PHASTLink interface, you must install, program, and test the Napco
Gemini system according to the manufacturer's instructions.
2.
Turn off power to the Gemini panel.
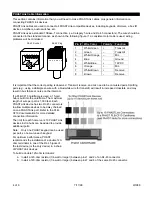
3. Connect the GEM-RS232 module to the Gemini panel with the supplied RJ-11 style modular to modular cable.
4. Connect the DB-9 connector of the serial cable to the serial connector on the GEM-RS232 module.
5.
Connect the DB-9 connector on the other end of the serial cable to the serial connector on the SAM module.
6.
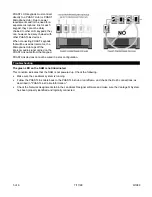
Connect the SAM to the Landmark system with a PHASTLink cable, using either of the RJ-45 PHASTLink ports
on the SAM. As with any other PHASTLink-compatible devices, additional devices may be daisy-chained from
the SAM.
7.
Turn on the power to the Gemini panel. The red LED on the SAM should illuminate. The green LED will flash
every two seconds until it establishes contact with a PHAST Master Control Unit (MCU), at which point the
greed LED will shut off. The green LED will then flash whenever data is sent and received, indicating that the
Gemini panel is communicating with the PHASTLink network.
8.
Go to "Landmark Software Configuration and Programming."
Landmark Software Configuration
This is only a general outline of the steps used in Landmark Designer to configure and program the Napco Gemini
panel as a Landmark system device. Refer to the Landmark online help for more detailed instructions.
1.
Start the Landmark Designer program and open the appropriate project file.
2.
Look in Files > Supported Manufacturers to make sure that the NAPCO products are included in the list of
supported manufacturers. If not, check the box next to NAPCO and add it to the list.
3.
Obtain a list of NAPCO sensors and other devices that have been (or will be) configured in the NAPCO panel.
4.
Select the NAPCO tab in the Device toolbar and drag an icon for each of these sensors or other devices onto
the appropriate rooms in the project. Do this in the same manner as for other Landmark system devices.
5.
Have Landmark Designer "Specify Hardware" for the project after adding the NAPCO sensors or devices.
6.
Carry out the network assignment steps for the NAPCO alarm panel, as follows:
a.
Click on the Network task button.
b.
Select the Attachments tab.
c.
The NAPCO panel should be listed in the Unattached Software list box and the Unattached Hardware list
box.
Note: The NAPCO alarm panel and the SAM module must be connected and powered-up for the NAPCO
panel to appear in the Unattached Hardware list box.
d.
Select NAPCO Panel in the Unattached Software list box.
e.
Click the Identify button (or check the Auto Attach check box). The NAPCO panel should appear in the
Attached Hardware list box.
7.
Bring up the Properties window for each sensor or device that you added from the NAPCO device tab and
select the Configuration tab. Make any required configuration changes for that particular device. Configuration
options include:
•
Zone Number – This represents the logical zone programmed to correspond to the physical input contact of
the NAPCO panel. These can be auto-numbered or manually entered.
•
Open/Closed – This indicates whether the zone contacts are normally open or normally closed for
default/ready status.
•
Master Security Code – Each NAPCO panel has a unique Master Security Code. This code must be
entered in this field to establish proper communication with the panel.
8.
Test the NAPCO panel from a NAPCO device's Control tab.
Click on the Arm or Disarm buttons and make sure that the panel actually arms or disarms. This will determine
if end-to-end communication is working.
If the panel fails to arm or disarm, or if any events in the zone(s) going into the alarm panel are not working,
check the following:
•
Check the network log and make sure that the Master Security Code is correct.


