Page 3
4. Wire zone device to the keypad Blue and Gray wires.
EZM Zone 50ms Response (Default = 0)
The default loop response of each keypad expansion zone is 750mS,
however the response time of any zone can be reduced to 50mS as
follows:
•
To reduce zone 1 to 50mS, enter 1 on the display and press
U
.
•
To reduce zone 2 to 50mS, enter 2 on the display and press
U
.
•
To reduce both zone 1 and 2 to 50mS, enter 3 and press
U
.
Access Control Message (Default = 0)
The default Access-Control message is “
**ENTER NOW**
”. This
display may be changed to any of the following messages:
ENTRY
MESSAGE
0
“
** ENTER NOW **
” (Default)
1
“
Door Control
”
2
“
Gate Control
”
3
“
Light Control
”
Enter the number of the message you wish displayed and press
U
.
Exit Delay Time Display (Default = 045)
The delay time which permits exit through an
Exit/Entry Zone
after the
system is armed, allows a user to leave the premises without setting
off an immediate alarm.
Exit Delay
may be programmed for up to 255
seconds (4¼ minutes). Enter the number of seconds and press
U
.
Note:
Changing this configuration updates the
keypad only,
not the
panel. The panel delay time is updated via Dealer Mode only; to keep
the panel and keypad delay times synchronized, be certain to program
the keypad for the same time as programmed for the panel.
Entry Delay Time Display (Default = 030)
Entry delay time permits entry through
Exit/Entry Zone(s)
after the
system is armed without setting off an immediate alarm.
Entry Delay
allows the user time to enter and disarm the system. Upon entering,
the keypad sounder will sound an entry sound to remind the user to
disarm the system.
Entry Delay
Time
may be programmed for up to
255 seconds (4¼ minutes). Enter the number of seconds and press
U
.
Note:
Changing this configuration updates the
keypad only,
not
the panel. The panel delay time is updated via Dealer Mode only; be
certain to program the keypad for the same time as programmed for
the panel.
Exiting Keypad Configuration Mode
Press
R
to loop back through selections or press
C
to enter
the Zone Descriptions Mode, in which you can change the zone de-
scriptions that appear on the keypad display. If you wish to exit the
Keypad Configuration Mode, press
C
(display will read “
OUT OF
SYSTEM
”). Replace the green wire to the Remote Bus Panel Terminal.
Display will display panel status.
ZONE DESCRIPTIONS MODE
Zones are independent circuits that protect specific areas of the
premises. The displayed zone descriptions may be changed to suit the
particular design of the premises. To change Zone Descriptions:
1. Disconnect green wire from Remote Bus panel terminal.
2. Press
C
and the display reads “
OUT OF SYSTEM
”.
3. Enter factory code: 11123
R
.
The software version number appears briefly, then “
RP CONFIGURA-
TION MODE
” appears. After a few seconds, the words “
Feedback
Beep Presently ON
” appear.
4. Press
C
and “
ZN DESCRIPTIONS MODE
” displays.
•
Scroll descriptions forward or backward using
R
and
B
, respectively.
•
To return to normal keypad operation, press
C
and reconnect the green
wire to the Remote Bus panel terminal.
•
After entering Zone Descriptions Mode, the keypad will automatically return
to “
OUT OF SYSTEM
” if no activity is detected for longer than 4 minutes.
Entering a new zone description
•
Use
R
and
B
to scroll to the desired zone.
•
Use
1
and
2
to position the cursor within the display.
•
Use
3
and
6
to scroll through numbers, letters, etc.
•
Use
4
and
5
to erase text while moving the cursor back-
wards and forwards.
•
With the cursor located under a word, use button
7
to move the
entire word to the left, and use
8
to move the word to the right.
•
Press
U
to save when the zone description is complete.
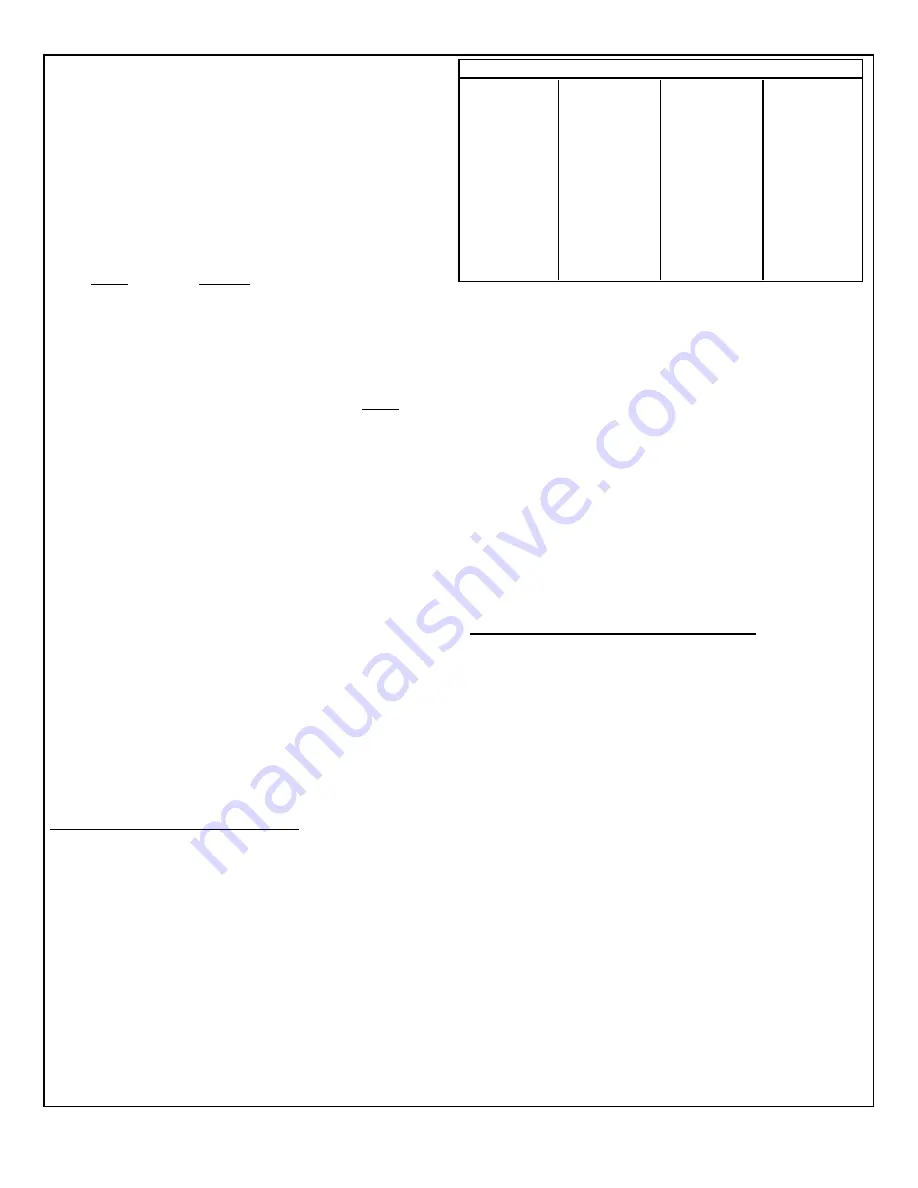
Quick Word List
The keypad contains pre-programmed zone descriptions, avoiding the
need to scroll through individual numbers, letters, and symbols. Press
G
followed by the two-digit number of the entry listed in the Quick
Word List table (above). For example, to enter the description “DINING
ROOM”, press
G
1 9
G
6 1.
Note:
A space is automatically set
after Quick Words are entered, and entering
G
0
0
splits an
existing word.
LCD TO LCD TRANSFER OPTION
Zone descriptions can be transferred from the programmed keypad
(master) to the unprogrammed others (slaves) in the system.
1. Program the primary keypad (master) with the appropriate zone
descriptions, etc, as described in Zone Descriptions Mode above.
2. As a safety precaution, remove AC and DC power to the panel.
3. Wire all keypads to the panel and reapply power.
The LCD TO LCD TRANSFER OPTION is accessed through Keypad
Configuration Mode, as follows:
4. Disconnect green wire from Remote Bus panel terminal.
5. Press
C
and the display will read “
OUT OF SYSTEM
”.
6. Enter the factory code of 11123
R
.
The software version number appears briefly, then the words “
RP
CONFIGURATION MODE
” appear. After a few seconds, the words
“
Feedback Beep Presently ON
” appear.
7. Press
C
and
P
and “
LCD TO LCD TRANSFER OPTION
” will
display. The keypad is now ready to replicate keypad data to the
other keypads in the system.
8. In order for the transfer to take place, all keypads must be physically
linked to each other and isolated from the panel. Therefore, connect all
green wires from all keypads. Do not connect green wires to panel.
9. To initiate the transfer, press
U
. The master keypad will start
transmitting data to all slaves. The words
SENDING
are displayed
as the keypad cycles through the database (which is displayed on
the LCD during this process). At short intervals, the words
“
SENDING STOPPED…PLEASE WAIT
” will display. Similarly, the slave
keypads receiving data will display”
RECEIVING
”.
10. When complete, the words “
OUT OF SYSTEM
” will display. Re-
connect all wires as described previously for normal operation.
01=ACCOUNTING
02=ALARM
03=APARTMENT
04=AREA
05=ATTIC
06=BABYS
07=BACK
08=BASEMENT
09=BATH
10=BEDROOM
11=BOYS
12=CEILING
13=CLOSET
14=COMPUTER
15=CONTROL
16=DEN
17=DEPARTMENT
18=DETECTOR
19=DINING
20=DOOR
21=DOWN
22=DOWNSTAIRS
23=EAST
24=ENTRY
25=EXERCISE
26=EXIT
27=FAMILY ROOM
28=FIRE
29=FIRST
30=FLOOD
31=FLOOR
32=FOIL
33=FOYER
34=FRENCH
35=FRONT
36=GARAGE
37=GATE
38=GIRLS
39=GLASS
40=GREAT
41=GUEST
42=HALL
43=INTERIOR
44=KITCHEN
45=LAUNDRY
46=LEFT
47=LIVING
48=LOBBY
49=LOW
50=MAIDS
51=MASTER
52=MOTION
53=NORTH
54=OFFICE
55=PHONE
56=PLAY
57=PORCH
58=PROTECTION
59=REAR
60=RIGHT
61=ROOM
62=SAFE
63=SALES
64=SHED
65=SHIPPING
66=SIDE
67=SKYLIGHT
68=SLIDING
69=SMOKE
70=SOUTH
71=SPACE
72=STAIRS
73=STUDY
74=TAMPER
75=TEMPERATURE
76=UPSTAIRS
77=UTILITY
78=WAREHOUSE
79=WEST
80=WINDOW
81=WORKSHOP
82=UP
Quick Word List