background image

2

Installation

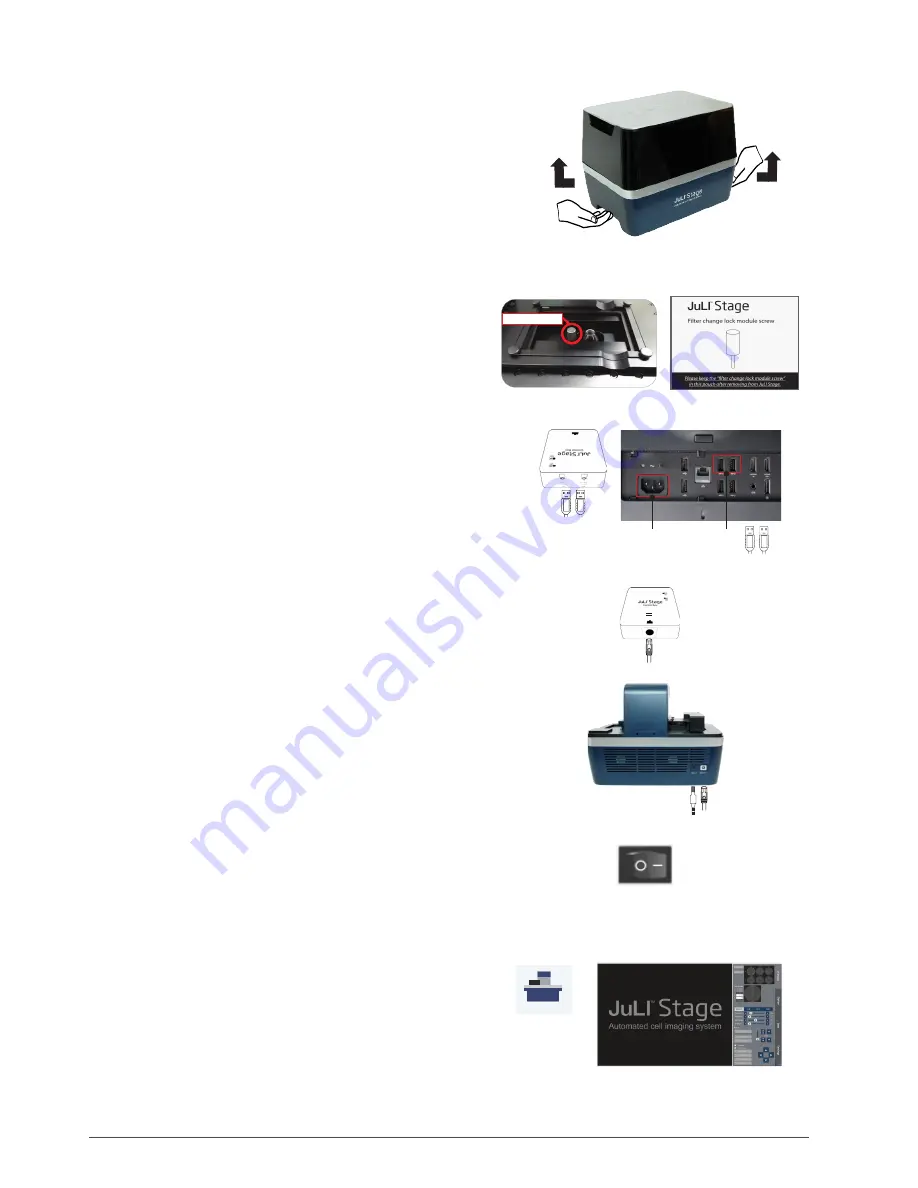
1. Open the box and remove the 

materlal foam

 in the box.

2. Carefully lift the instrument out of the box, holding it by handholds 
     in the 

bottom of the base.

3. Place the instrument on a flat, level surface (table or incubator).

4. Unscrew the 

filter change lock module screw

 until they spin freely.

5. Gently pull filter change lock module screw out, away from the 
     instrument. Put the filter in the pouch to keep.

6. Connect the PC and the Control box (Serial port, Camera port) 
     using two 

USB cables

. (PC Monitor Resolution : 1920 X 1080 pixels)

7. Connect the 

JuLI™ Stage instrument

 and the 

Control box

 and 

     using the connection cable.

☞ 

Note : Make sure for connection port direction of control box before 

                    connecting.

8. Plug the power cord of PC and instrument into the electrical outlet.

9. Turn the PC and the Control box on by pressing the 

Power button

.

10. Double-click the JuLI™ Stage icon on desktop The JuLI™ Stage 
       software starts up.

Power port

USB port

Filter change lock module

 Filter change lock module

Summary of Contents for JuLi Stage

Page 1: ...gu Seoul 152 740 Korea Tel 82 2 6220 7940 Fax 82 2 6220 7721 NanoEnTek USA Inc 5627 Stoneridge Drive Suite 304 Pleasanton CA 94588 USA Tel 1 925 0108 Fax 1 925 225 0109 www nanoentek com sales nanoen...

Page 2: ...the pouch to keep 6 Connect the PC and the Control box Serial port Camera port using two USB cables PC Monitor Resolution 1920 X 1080 pixels 7 Connect the JuLI Stage instrument and the Control box and...

Page 3: ...he mouse function in Default setting Type 1 If necessary you can change the mouse setting type in the Setting menu 1 Moving Move the X Y stage to wells or positions Moving among wells Inter well Movin...

Page 4: ...4 Check the Selected vessel type and press Vessel button again to finish setting 5 Move to the well and position you want using the Right button of the mouse You can check the vessel image and the mov...

Page 5: ...storing path and file type and press the Save button to confirm 12 Select Other LED channels If necessary to capture additional images in different channel Follow Step 6 10 repeatedly and save images...

Page 6: ...l type according to your sample when well type list appears 4 Check the selected vessel type and press Vessel button again to finish setting 5 Select the LED channel 6 Adjust the Exposure Brightness a...

Page 7: ...on to complete setting that the green square is changed to Red 12 Press the OK button when pop up window appears 13 Once the wells are finally confirmed they are changed to Red color 14 Turn on the Au...

Page 8: ...se button and check where you moved to within the navigation window 3 Turn on the Manual Focus toggle button 4 Select the LED channel 5 Adjust the Exposure Brightness and LED power and D Phase if nece...

Page 9: ...ly and save images for each channel 9 After adjusting focus and assigning position press the Position Set button 10 Press the OK button when the pop up window appears 11 Once the wells are finally con...

Page 10: ...10 Memo...

Page 11: ...JuLI Stage New paradigm for cell based assay 11 Memo...

Page 12: ...a NanoEnTek USA Inc 5627 Stoneridge Drive Suite 304 Pleasanton CA 94588 USA Email Website Tel 82 2 6220 7940 Fax 82 2 6220 7721 Tel 1 925 225 0108 1 888 988 0108 Toll free Fax 1 925 225 0109 sales nan...

Reviews: