background image

٨

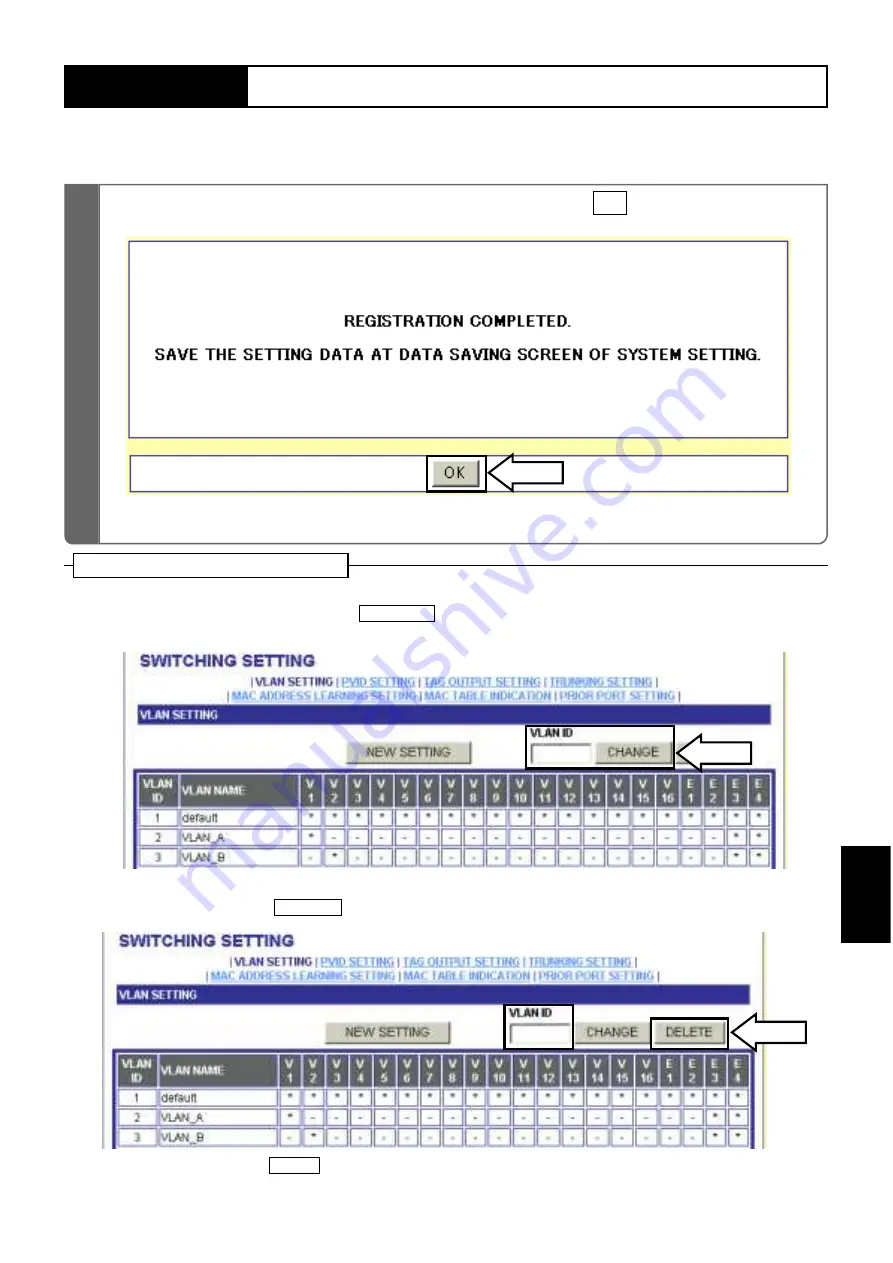
To change the VLAN setting, enter [VLAN ID] you want to change in the VLAN Setting

screen in Step 2, and click on 

.The specified VLAN Setting screen appears.

Change the setting to register.

٨

To delete the VLAN setting, enter [VLAN ID] you want to delete in the VLAN Setting screen

in Step 2, and click on 

.The specified VLAN setting may be deleted.

٨

In Step 5, clicking on 

takes you back to the VLAN Setting screen.  The setting data

is not registered.

BACK

DELETE

CHANGE

Supplemental Explanation

73

9

SETTING EXAMPLES

VLAN CONFIGURATION

SE

TT

ING

EX

AM

PLE

S

9

ޟ

REGISTRATION COMPLETED.

ޠ

appears.  Click on 

.

OK

7

• 

You are taken back to the VLAN Setting screen.

Summary of Contents for NYC-16VDSL-B

Page 1: ...Prior to using it read and understand the Instruction and Installation Manual thoroughly After reading it always keep it at hand for your reference F 5243 1 D D D De e e em m m mo o o on n n ns s s s...

Page 2: ...ISDN CIRCUIT CONNECTION Page 17 A 10 100BASE port corresponds to the 10BASE T 100BASE TX Flow control may be also accommodated See 10 100BASE CONNECTION Page 15 Connect the Equipment and NYC VDSL T16...

Page 3: ...g immediately from the plug socket and contact our dealer Neglect of this may result in a fire electric shock or trouble Do not insert any metal or combustible substance into the Equipment If any fore...

Page 4: ...s or shocks Note that you may be injured by carelessly touching projecting portions such as the body case frame or cover and connectors Be sure to connect an earthing conductor to the Equipment Neglec...

Page 5: ...thin neutral detergent wring it tightly to wipe off contamination and then wipe with soft dry cloth Do not touch the connector pins of the Equipment They may be corroded and have a contact failure ind...

Page 6: ...ONNECTION 7 SERIAL AND TELNET SETTING LIST OF SERIAL AND TELNET SETTING ITEMS CONNECTION TO PC Serial Connection TELNET Connection LOG IN User Command Menu SYSTEM ADMINISTRATION Setting the IP Address...

Page 7: ...ag Output TRUNKING SETTING Setting Trunking 10 MAINTENANCE FUNCTIONS LIST OF MAINTENANCE FUNCTIONS WEB SETTING TEST WEB SETTING Confirming Terminal Conection Sending Test Mail Ping Test LINE INFORMATI...

Page 8: ...Note Compliant with the ITU T G 993 1 G vdsl f Annex A frequency plan See the figure below Built in POTS ISDN splitter required for using existing wiring Capable of mounting various types of horizont...

Page 9: ...lable Installation in Condominium Hotel Room 301 In line Filter 2 branch Modular MJ Router Media Converter PBX Internet Telephone Network 3 2 1 0 6 5 4 9 8 7 Room 201 Room 101 Cascade Connection Room...

Page 10: ...cs M5 Setscrews 4 Pcs Main Body Accessories NYC 16VDSL B INSTRUCTION INSTALLATION MANUAL Thank you so much for your purchasing our equipment Prior to using it read and understand the Instruction and I...

Page 11: ...unit apparatus Connect to a downstream apparatus terminal side apparatus Connect to an upstream apparatus network side apparatus Connect to a PC with a RS 232C cable POTS ISDN Port VDSL Port 10 100BAS...

Page 12: ...10 4 CONSTRUCTION COMPONENT PARTS Rear View Connect to the 230 V AC 50 60 Hz power Warning Label FG Terminal Connect to the earth Power Cable Product Name Label Fan Cools down inside the equipment...

Page 13: ...ed Blinking Red OFF ON Green Fast blinking Green Slow blinking Green OFF ON Green OFF Blinking Green ON Green OFF Green Description 1 When the equipment has high internal temperature When the NYC VDSL...

Page 14: ...5 6 7 8 9 10 11 12 13 14 15 16 NYC 16VDSL B 5 6 7 8 9 10 11 12 13 14 15 16 NYC 16VDSL B 5 6 7 8 9 10 11 12 13 14 15 16 NYC 16VDSL B 5 6 7 8 9 10 11 12 13 14 15 16 NYC 16VDSL B 5 6 7 8 9 10 11 12 13 1...

Page 15: ...nt in the 19 inch rack with a door the door may not be closed because of the protruding connector or cable of the VDSL circuit and POTS ISDN circuit Check it beforehand or use the 19 inch rack with no...

Page 16: ...rposed The actual connection method may differ from this figure because it is necessary to meet the working conditions such as the devices used and installation place Supplemental Explanation Connect...

Page 17: ...al side Apparatus and Connection MDI Network side Apparatus and Connection Do not connect any unused cable to the 10 100BASE port Neglect of this produces noise resulting in malfunctioning Remove dust...

Page 18: ...he VDSL circuit should not be connected to the VDSL circuit interface section because the Equipment malfunctions due to noise When disconnecting reconnecting the VDSL circuit wait for 10 seconds or mo...

Page 19: ...S5 ISDN5 POTS4 ISDN4 POTS3 ISDN3 POTS2 ISDN2 POTS1 ISDN1 After inserting the connector lock the lock springs at its both ends The VDSL Port 1 is superposed on the telephone circuit connected to the PO...

Page 20: ...ter 1 6 mm Twisted pair wire Sectional area 2mm2 If turned off contact our dealer Power Cable 3 pole Insertion Plug Front of NYC 16VDSL B Back of NYC 16VDSL B POWER Lamp Earth FG Terminal AC230V Never...

Page 21: ...ializes all the setting data of the Equipment S Sa av ve es s t th he e s se et t d da at ta a IIf f t th he e s se et tt tiin ng g iis s c ch ha an ng ge ed d b be e s su ur re e t to o s sa av ve e...

Page 22: ...heck 10 100BASE Setting Description Page VDSL Setting Setting by Ports Selection of VDSL Port VDSL Speed Setting Set Valid Invalid for all the ports of the VDSL circuit An initial value is Valid for a...

Page 23: ...to Invalid Valid Other VDSL settings are all initial values Description Page Transmission Distance m 100 300 500 700 900 45 1 27 0 45 1 24 6 42 6 18 8 30 1 5 7 20 2 4 8 Transmission Speed Mbps NotchFi...

Page 24: ...for up to 2 groups When trunking is to be set check the following In the VLAN configuration all the ports of the identical trunking group should have the same VLAN setting In tag setting all the ports...

Page 25: ...such as the administrator name of the Equipment Sets the system name of the Equipment Sets the information such as the installation site of the Equipment Sets the IP address of SNMP Manager which tran...

Page 26: ...emale 9 pin connector is to be procured by the installer Connect the cable correctly according to the Instruction Manual for the PC Connect the RS 232C cable paying heed to the connector s direction a...

Page 27: ...CP IP setting 3 Click on Start Program MS DOS Prompt of WindowsR The following log in menu appears 5 If not press the Enter key If you cannot log in with TELNET check the IP address subnet mask of the...

Page 28: ...d password are changed enter new ones and press the Enter key Page 27 Notes Call the following User Command Menu 3 1 Enter a user name and press the Enter key An initial value is vdsl lowercase 2 Ente...

Page 29: ...TELNET and Web browser is allowed through the set IP address An initial value is 192 168 1 1 Enter 3 IP ADDRESS SETTING and press the Enter key 3 2 1 Select 1 SYSTEM ADMINISTRATION in the User Comman...

Page 30: ...ot the Equipment The changed IP address is validated after rebooting If an entry of the subnet mask is omitted it will be automatically set by IP address classes If the subnet mask is unknown inquire...

Page 31: ...bes how to save various setting data in the Equipment When the setting is changed be sure to operate the procedure below to save the new data Otherwise the pre change condition is restored at reboot o...

Page 32: ...as been connected with TELNET communication will be disrupted Connect with TELNET again Notes Reboot The following describes how to reboot reset the Equipment If the data has not been saved the pre ch...

Page 33: ...hen closing the setting screen be sure to log out If it is closed without logging out you may not be able to log in next time If there is no key entry for about 10 minutes you are automatically logged...

Page 34: ...lly set to Auto auto negotiation Make the communication speed setting consistent with the network apparatus to be connected If inconsistent the Equipment may not work properly Flow control This functi...

Page 35: ...it unused This may reduce an effect on amateur radio communication Notch Filter can be set dividing the VDSL working frequency into 4 bands For Notch Filter set an effective frequency band depending o...

Page 36: ...ed from 2 to 4094 Trunking is a function to improve the transmission speed by using multiple 10 100BASE ports Trunking may be set for up to 2 groups When trunking is to be set check the following In t...

Page 37: ...dministration information request from SNMP Manager on the administration station the Equipment notifies the administration information accumulated in MIB II to SNMP Manager sysContact Setting Sets th...

Page 38: ...rowser through the PC enter http 192 168 1 1 in the URL field and press the Ether key 192 168 1 1 is the initial value of the IP address for accessing the Equipment If the IP address is changed enter...

Page 39: ...the pre registration screen If this is the case bring the cursor to the center of the setting screen right click the mouse and click on Update Information etc in the displayed short cut menu If the br...

Page 40: ...en If this is the case enter the user name and password again and click on OK Notes Both initial values are vdsl lowercase When changing the user name and password enter the new ones and click on OK E...

Page 41: ...screen for Web setting SYSTEM ADMINISTRATION 2 Click on IP ADDRESS SETTING The IP Address Setting screen appears The following describes how to set the IP address of the Equipment The set IP address...

Page 42: ...tting the IP address save the data and then reboot the Equipment Rebooting makes the changed IP address valid If an entry of the subnet mask is omitted it will be automatically set by IP address class...

Page 43: ...to set the IP address of the default gateway used by the Equipment No initial value has been set 1 Click on in the TOP screen for Web setting SYSTEM ADMINISTRATION 2 Click on IP ADDRESS SETTING The D...

Page 44: ...ve Data under System Setting If not saved the pre change condition will be restored at reboot or power failure If the default gateway is unknown inquire our dealer or network administrator Notes 5 You...

Page 45: ...describes how to set the DNS server used by the Equipment No initial value has been set 1 Click on in the TOP screen for Web setting SYSTEM ADMINISTRATION 2 Click on IP ADDRESS SETTING The DNS Server...

Page 46: ...ve Data under System Setting If not saved the pre change condition will be restored at reboot or power failure If the DNS server is unknown inquire our dealer or network administrator Notes 5 You are...

Page 47: ...wing describes how to set the user name for accessing the Equipment An initial value is vdsl lowercase 1 Click on in the TOP screen for Web setting SYSTEM ADMINISTRATION 2 Click on PASSWORD SETTING Th...

Page 48: ...er System Setting If not saved the pre change condition will be restored at reboot or power failure The new user name is made valid by saving the set value with Save Data under System Setting and rebo...

Page 49: ...ASSWORD SETTING 4 Click on REGISTRATION The Log in Password Change screen appears The following describes how to set the password for accessing the Equipment An initial value is vdsl lower case 3 Ente...

Page 50: ...lf em alphanumerals upper case and lower case When the setting is changed save the set value with Save Data under System Setting If not saved the pre change condition will be restored at reboot or pow...

Page 51: ...ime WEB SETTING 8 2 The Time Setting screen appears 1 Click on in the TOP screen for Web setting SYSTEM SETTING 4 Click on REGISTRATION 3 Click on ADJUST TO TIME PC You can adjust to the PC setting ti...

Page 52: ...2035 23 59 The time of the Equipment is initialized when the Equipment is rebooted or the power fails Set the time again after rebooting or power failure The time can be also directly entered Bring t...

Page 53: ...e TOP screen for Web setting SYSTEM SETTING 2 The Time Setting screen appears 4 Enter the IP address or domain name of the timer server in the field TIME SERVER ADDRESS 5 Click on REGISTRATION The fol...

Page 54: ...etry the history information Time Setting Failed is recorded The Equipment corresponds to the SNTP Simple Network Time Protocol USE When the setting is changed save the set value with Save Data under...

Page 55: ...ETTING 1 Click in the TOP screen for Web setting SYSTEM SETTING 3 Click on INITIALIZE SETTING 4 The confirmation screen appears asking you whether you want to initialize the data The following describ...

Page 56: ...Notes DATA WAS INITIALIZED AND WAS REBOOTED AUTOMATICALLY appears Wait for about 30 seconds enter http 192 168 1 1 in the URL field for the browser and press the Enter key 6 5 Click on INITIALIZE SETT...

Page 57: ...the TOP screen for Web setting SYSTEM SETTING 2 Click on SAVE DATA The following describes how to save the various setting data into the Equipment If the setting has been changed be sure to go through...

Page 58: ...TTING When the setting is changed be sure to save the data If not saved the pre change condition will be restored at reboot or power failure Notes SAVED THE DATA appears Click on OK 4 You are taken ba...

Page 59: ...boot WEB SETTING 8 1 Click on in the TOP screen for Web setting SYSTEM SETTING 2 3 Click on REBOOT The following describes how to reboot reset the Equipment If the data is not saved the pre change con...

Page 60: ...rupts communication If you want to continue setting the data connect through the Web again Notes 4 5 Click on REBOOT Clicking on takes you back to the Reboot screen CANCEL REBOOT COMPLETED appears Wai...

Page 61: ...for Web setting 10 100BASE SETTING 2 The 10 100BASE Setting screen appears 3 Select the communication speed in a pull down menu The following describes how to set various data for the 10 100BASE port...

Page 62: ...restored at reboot or power failure The communication speed of the Equipment should match that of the PC connected to it or the network apparatus router HUB etc If not the Equipment may not be able to...

Page 63: ...DSL SETTING 3 In selection of the VDSL ports select INVALID or VALID for the VDSL ports used The following describes how to select Valid Invalid for the VDSL ports used Valid has been initially select...

Page 64: ...port where the NYC VDSL T16 single unit apparatus has not been connected may blink When the setting is changed save the set value with Save Data under System Setting If not saved the pre change condi...

Page 65: ...Sets the name of the configured VLAN Sets the VLAN ports you want to configure Sets the VLAN ID per port Shows an example of cascading the Equipment Sets a connection between 2 apparatuses with multip...

Page 66: ...connect to the VDSL ports VDSL Port Circuit Name Circuit A CircuitD CircuitJ CircuitI CircuitF CircuitC CircuitB CircuitE CircuitG CircuitH 850m 700m 650m 600m 500m 450m 300m 200m 100m 100m Line Lengt...

Page 67: ...rgin setting from 9 dB to 1 dB The following lists the circuit conditions and transmission speeds when setting the S N ratio margin The transmission speed may differ depending on the installation envi...

Page 68: ...N RATIO MARGIN SETTING Setting the S N Ratio Margin 1 Click on in the TOP screen for Web setting followed by SETTING FOR EACH PORT VDSL SETTING 2 Click on DETAIL 3 Change the S N ratio margin setting...

Page 69: ...il Setting screen Set the S N ratio margin with the NYC VDSL T16 single unit apparatus connected If not connected clicking on the button results in an error disabling data setting When the setting is...

Page 70: ...D T appears for tag output setting For a default VLAN group all the VDSL ports and all the 10 100BASE ports are of the same group Selecting this group allows the data to flow among all the ports For t...

Page 71: ...the set VLAN group It is used for connecting multiple equipments to configure a VLAN group among them It is necessary to set the VLAN ID even if multiple equipments are not used 3 PVID ID of the port...

Page 72: ...NYC VDSL T16 VLAN ID1000 10 100BASE Port 1 10 100BASE Port 2 10 100BASE Port 3 10 100BASE Port 4 Configuraing the VLAN The following shows a setting example of VLAN configuration This configuration ex...

Page 73: ...een for Web setting SWITCHING SETTING 2 The VLAN Setting screen appears 3 Click on NEW SETTING appears if no tag has been set and T if it has been set respectively Up to 255 VLANs may be registered 18...

Page 74: ...ION 4 Enter the data newly in the VLAN ID and VLAN Name fields in the VLAN Setting screen you want to newly register 5 Click in the check box for the VLAN port you want to newly set The following show...

Page 75: ...r VLAN ID you want to delete in the VLAN Setting screen in Step 2 and click on The specified VLAN setting may be deleted In Step 5 clicking on takes you back to the VLAN Setting screen The setting dat...

Page 76: ...he Equipment The setting data of VLAN ID 1 may not be changed or deleted When deleting VLAN ID firstly change the setting of PVID used When the setting is changed save the set value with Save Data und...

Page 77: ...GURATION Setting PVID SETTING EXAMPLES 9 1 Click on in the TOP screen for Web setting SWITCHING SETTING 2 Click on PVID SETTING The following describes how to set PVID port base VLAN Apply the set VLA...

Page 78: ...s changed save the set value with Save Data under System Setting If not saved the pre change condition will be restored at reboot or power failure Notes 4 Click on REGISTRATION REGISTRATION COMPLETED...

Page 79: ...agged frame The tagged frame is not sent out between the ports where the same PVID has been set as shown in Fig 1 it is sent out between the ports where different PVIDs have been set as shown in Fig 2...

Page 80: ...lowed from the 10 100 BASE Port 1 to all the VDSL ports Add the VLAN ID1 tag to the frame sent out from the 10 100BASE Port 1 PVID to be set for the 10 100BASE Port 1 needs to be set to other than 1 T...

Page 81: ...TAG OUTPUT SETTING EXAMPLES 9 4 Click on REGISTRATION REGISTRATION COMPLETED appears Click on OK 5 You are taken back to the VLAN Setting screen Click on and set as follows for each of the VDSL and 10...

Page 82: ...80 9 SETTINGEXAMPLES SETTING TAG OUTPUT 7 Click on REGISTRATION 8 REGISTRATION COMPLETED appears Click on OK 9 Click on and set as follows TAG OUTPUT SETTING...

Page 83: ...81 9 SETTINGEXAMPLES SETTING TAG OUTPUT SETTING EXAMPLES 9 10 Click on REGISTRATION 11 REGISTRATION COMPLETED appears Click on OK You are taken back to the Tag Output Setting screen...

Page 84: ...onnection etc When tag output is set in the VLAN Setting screen is replaced by T Setting tag output may result in a packet error or communication failure at another device connected to the port where...

Page 85: ...should be another unit of this equipment or have a trunking function Configuration Diagram Trunking uses multiple 10 100BASE circuits to improve the speed If there is only one 10 100BASE circuit with...

Page 86: ...ng 1 Click on in the TOP screen for Web setting SWITCHING SETTING 2 Click on TRUNKING SETTING 3 Select the 10 100BASE ports where you want to set trunking The following describes the setting method fo...

Page 87: ...runking groups should be of the same tag setting When setting 3 or 4 circuit trunking delete all the VLANs other than those you want to set When the setting is changed save the set value with Save Dat...

Page 88: ...ount of unicast frames and multi cast frames received by the Equipment 97 Information Display Web Setting 97 Allows you to check the product version MAC address and VDSL chip firmware version of the E...

Page 89: ...nt to confirm its connection 1 Click on in the TOP screen for Web setting TEST Confirmation of terminal connection allows you to confirm a connection from the Equipment to the NYC VDSL T16 single unit...

Page 90: ...ING 3 At Confirmation of Terminal Connection click on TO CONFIRM Test a connection to the NC VDSL T16 single unit apparatus connected to the selected VDSL port and present the test result 4 Execution...

Page 91: ...rminal Connection allows you to confirm the link condition between the Equipment and NYC VDSL T16 single unit apparatus Confirm terminal connection with the NYC VDSL T16 single unit apparatus connecte...

Page 92: ...mail to 1 Click on in the TOP screen for Web setting TEST Sending Test Mail allows you to check whether mail setting Pages 98 and 100 is valid This test sends a fixed message to the set mail address T...

Page 93: ...91 10 MAINTENANCEFUNCTIONS TEST WEB SETTING MAINTENANCE FUNCTIONS 10 3 At Sending Test Mail click on TO SEND 4 Execution Result When successful When unsuccessful...

Page 94: ...TRANSMISSION OF VDSL TEST E MAIL Set mail for each user Page 100 Test mail does not function properly unless mail has been registered for each user To limit the access address it is necessary to set t...

Page 95: ...100BASE port of the Equipment The initial IP address of the Equipment is 192 168 1 1 Prior to conducting the Ping test check the address A Ping test is to test a connection to the network apparatus r...

Page 96: ...94 10 MAINTENANCEFUNCTIONS TEST WEB SETTING Click on BACK You are taken back to the Test screen 5 4 Execution Result When the Ping test is successful When the Ping test is unsuccessful...

Page 97: ...ddress of the PC connected to the NYC VDSL T16 single unit apparatus and press the Enter key The IP address and subnet mask registered with the Equipment should be identical with those of the network...

Page 98: ...Selection of VDSL Port RENEWAL Notes DisplayingtheVDSLCircuitStatusandSettings 1 Click on in the TOP screen for Web setting LINE INFORMATION Displaying the VDSL Circuit Status and Settings The Circui...

Page 99: ...he latest Up to 1 000 history information is saved the rest of it is overwritten starting from the oldest If the history information appears while the ALM lamp is ON the lamp will be turned off Notes...

Page 100: ...VER ADDRESS field The mail server address may be entered by up to 32 characters in half em alphanumerals 2 Enter the sender e mail address in the SETTING OF A SENDER E MAIL ADDRESS field The sender e...

Page 101: ...setting is changed save the set value with Save Data under System Setting If not saved the pre change condition is restored at reboot or power failure At power on e mail is notified in about 5 minutes...

Page 102: ...value is NO NOTICE E mail setting for each user may be registered for up to 4 users 3 Enter the sender e mail address in the SETTING E MAIL ADDRESS OF A DESTINATION field The destination e mail addres...

Page 103: ...d to the upstream side is running e mail may not be notified The date and time of sent out e mail are those set in the mail server Note that they may differ from the actual alarm occurrence date and t...

Page 104: ...ts of the concentrated apparatus Do not use the Equipment with its cover removed There are high voltage parts inside which may induce an electric shock When replacing the fans particularly be sure to...

Page 105: ...hone set or ISDN device or when the in line filter is out of order 1 Purchase as an option 2 Accessory of an option When Extending 3 2 1 0 6 5 4 9 8 7 Modular Jack 2 branch Modular In line Filter NYC...

Page 106: ...e the data OFF Indicates that it is not ready to send receive the data 5 SG Signal Group Gives the reference potential to the mutual connection circuit 6 DR Data Set Ready Indicates whether the Equipm...

Page 107: ...uipment is determined out of order contact our dealer System Fault Power on YES NO Power fault See Fig 11 2 System not working POWER lamp not turned ON Telephone unable to send receive signal POTS ISD...

Page 108: ...ERENCE TROUBLESHOOTING Power Fault POWER lamp OFF Power turned ON Power on Normal input power POWER lamp ON Recovered Equipment fault Power fault at user site YES NO NO YES NO YES Fig 11 2 Fault Ident...

Page 109: ...able to send receive signal Cable snapped Telephone able to send receive signal Telephone able to send receive signal Telephone able to send receive signal Telephone able to send receive signal YES Y...

Page 110: ...p ON Replace cable Connect it Connect it Opposing apparatus fault Recovered Connect it properly to anphenol connector A A Cable connected to VDSL port Connect it Cableproperly connectedtoanphenol conn...

Page 111: ...paratus powered on 10 100BASE LINK ACT lamp ON 10 100BASE LINK ACT lamp ON 10 100BASE LINK ACT lamp ON 10 100BASE LINK ACT lamp ON Communication mode consistent with network apparatus YES YES YES YES...

Page 112: ...X MDI UTP Category 5 Transmission speed 1 Transmission distance 2 0 4mm Transmission medium Transmission system Connector type No of ports Applicable ties Transmission medium Connector type Applicable...

Page 113: ...cStMacAddrPort 2 nycStMacAddrTable 5 nycStMacAddrEntry 1 nycStMacAddrStringInfo 3 2 Temperature Rise VDSL Chip Version VDSL 10 100BASE LearningMACAddress Status Related 2 nycStSwCountTable 6 nycStSwCo...

Page 114: ...EstDsSetLgUserAccount 1 nycEstDsSetLgUserPasswd 2 nycEstDsSetLogin 3 Setting Related 3 nycEstVdsl 2 nycEstVdslTable 1 nycEstVdslEntry 1 nycEstVdslPort 1 nycEstVdslPortPermit 2 nycEstVdslSpeed 3 nycEst...

Page 115: ...mmUser 1 nycEstSnmpCommPermit 2 nycEstSnmpCommHost 3 nycEstSnmpCommName 4 nycEstSnmpCommAccess 5 nycEstSnmpTrapTable 2 nycEstSwVLANTable 1 nycEstSwVLANEntry 1 nycEstSnmpTrapEntry 1 nycEstSnmpTrapUser...

Page 116: ...tFrmRcvHi nycStSwCntBcastFrmRcvLow nycStSwCntBcastFrmRcvHi VDSL port status entry list VDSL port status entry Index to identify the interface Port VDSL circuit link status Link Down Link Up VDSL circu...

Page 117: ...setting 1 Reference to the MIB definition on the time server Time server selection Enable Disable Reference to the MIB definition on log in General users account Index to identify the interface Acces...

Page 118: ...entry list VLAN setting related entry Index to identify the interface VLAN ID VLAN NAME Tag port setting PVID setting related entry list PVID setting related entry Index to identify the interface Por...

Page 119: ...Where to Contact for Service and Maintenance About Maintenance Service See the following for where to contact for service and maintenance Dealer Name...

Reviews: