


E1
Introduction
Naim Audio products are conceived with performance as the top priority. Careful installation
will help ensure that their full potential is achieved. This manual covers all integrated
amplifiers. It begins with some general installation notes. Product specific information begins
in Section 4.
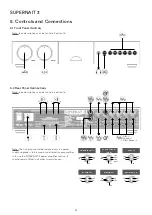
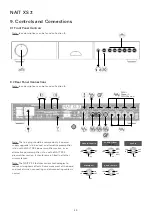
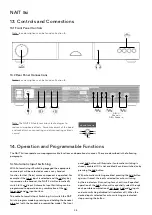
1. Connections
It is important for both safety and performance that the
standard cables supplied are not modified.
1.1 Interconnect Cables
If options are available with your equipment and installation,
DIN interconnect sockets should be used in preference to
RCA Phono sockets. One end of each Naim interconnect
cable is marked with a band to establish its correct
orientation. The band denotes the end that connects to the
signal source. Naim Hi-Line interconnect cable will provide
the best results.
Interconnect plugs and sockets should be kept clean
and free from corrosion. The easiest way to clean them
is to switch off the equipment, pull the plugs out of their
sockets, and push them back in again. Contact cleaners and
“enhancers” should not be used as the film they deposit may
degrade the sound.
1.2 Loudspeaker Cables
Loudspeaker cables are vitally important. They should
each be at least 3.5 metres long and of equal length. The
recommended maximum is normally 20 metres although
longer cables may be viable with some Naim amplifiers.
Some Naim amplifiers are designed only to work with Naim
loudspeaker cable and using alternatives may degrade the
performance or even damage the amplifier. Other Naim
amplifiers can be used with any high quality loudspeaker
cable although we recommend that Naim loudspeaker cable
is used. Naim loudspeaker cable is directional and should
be oriented so that the printed arrow points towards the
speakers. The Naim loudspeaker connectors supplied are
designed to comply with European safety legislation and
must be used.
Contact your local retailer or distributor for further advice
on loudspeaker cables and connectors.
2. Mains Power
Use only the mains leads and plugs supplied or the Naim
PowerLine mains cable.
Where fused plugs are used 13 amp fuses should be fitted.
Fuses of a lower rating will fail after a period of use. Do not
wire voltage dependent resistors or noise suppressors into
mains plugs. They degrade the mains supply and the sound.
2.1 Mains Plug Wiring
In some territories a mains plug may need to be fitted to
the supplied mains lead. As the colours of the wires in the
mains lead may not correspond with the coloured markings
identifying the terminals in the plug proceed as follows:
The wire coloured
GREEN-AND-YELLOW
must be connected
to the terminal in the plug marked by the letter
E
or by
the safety earth symbol or coloured
GREEN
or
GREEN
and
YELLOW
.
The wire coloured
BLUE
must be connected to the terminal
in the plug marked with the letter
N
or coloured
BLACK
.
The wire coloured
BROWN
must be connected to the
terminal in the plug marked with the letter
L
or coloured
RED
.
2.2 Equipment Fuses
Mains powered Naim Audio equipment is fitted with a mains
fuse on the rear panel adjacent to the mains input socket.
Replace it if necessary only with the spare fuse supplied or
with an identical fuse. Repeated failure of the fuse points to
a fault that should be investigated by your retailer or Naim
itself.
2.3 Non-rewirable Mains Plugs
If a non-rewirable plug is cut from a mains lead (for
whatever purpose) the plug MUST be disposed of in a way
to render it totally useless. Considerable shock hazard exists
if the cut-off plug is inserted into a mains outlet.
2.4 Mains Circuits and Cables
A hi-fi system usually shares a mains circuit with other
household equipment some of which can cause distortion
of the mains waveform. This distortion can in turn lead
to mechanical hum from mains transformers. Some Naim
transformers are large in size, making them relatively
sensitive to such distortion, and it may be necessary to take
account of transformer hum when siting your equipment.
Transformer hum is not transmitted through the speakers
and has no effect on the performance of the system;
however, a separate mains circuit may reduce it. Such a
circuit (ideally with a 30 or 45 Amp rating) will also generally
improve system performance. Advice on the installation of
a separate mains circuit should be sought from a qualified
electrician.
Note: Please read
the Statutory Safety
Warnings found at the
end of this manual.


