background image

13

Turning On with the PWR/SET Key

Press and hold the PWR/SET key for over 3 seconds to turn the unit on/off. The unit
will “beep” when turning the unit on/off and the LCD screen will light when unit is on.

Setting Volume level with the UP and DOWN Keys

Press either the UP or DOWN keys once momentarily to enter volume setting mode.
Press the UP key or DOWN key again to increase or decrease volume level from 1 to
6 as shown on the volume icon of the LCD display. Press the PWR/SET key
momentarily to set or it will automatically set in 15 seconds. A beep will sound to
confirm this setting.

Receiving an Incoming Call (Standby Mode)

In standby mode (not programming or selecting functions), the unit automatically will
receive incoming calls from any other unit on the same channel and CTCSS code
whenever you are not talking/transmitting.  When you receive a signal, the (    ) icon
appears on the display.

Transmitting a Signal Using the PTT Key

Check the channel activity by pressing and holding the SCAN button. You will hear
static if the channel is unoccupied. Do not TRANSMIT if someone is talking on the
channel. Press and hold the PTT button to TRANSMIT. The (    ) icon is displayed. The
TX LED indicator will light up in red. Hold the unit in a vertical position with the
MICROPHONE 1 to 2 inches from the mouth. While holding the PTT button, speak
into the unit using a normal tone of voice. Release the PTT button when you have
finished transmitting. The automatic end-of-message “Roger” tone will sound and
you can then listen for another party’s response.

NOTE: In order for other people to receive your transmission, they must also be on
the same channel you are currently using. Refer to the Changing Channels section for
more information.

After you hold down the TALK key continuously for about 80 seconds, the unit will
automatically stop your transmission to save power. If necessary to continue
transmitting, wait a few seconds before proceeding.

Calling Another Party with the CALL Key

Use the CALL key to alert another party you wish to communicate with them. Both
units must be set to the same channel and CTCSS code. Momentarily press and
release the CALL key to call the other party with a 3-second calling alert tone. Wait
for the party’s response or proceed to “Talking to Another Party using the PTT Key”.
See pg. 17 for instructions on how to select one of 6 different call tones for individual
paging when using your unit with a group. You can also use the CALL Tones to signal
the beginning or the end of a transmission.

Dual Channels Receiver and Transmit (Dual Watch Mode)

Dual channels reception:

 If the dual channels setting is OFF, the (          ) icon

appears on the display and you only have the basic single channel reception.  If the

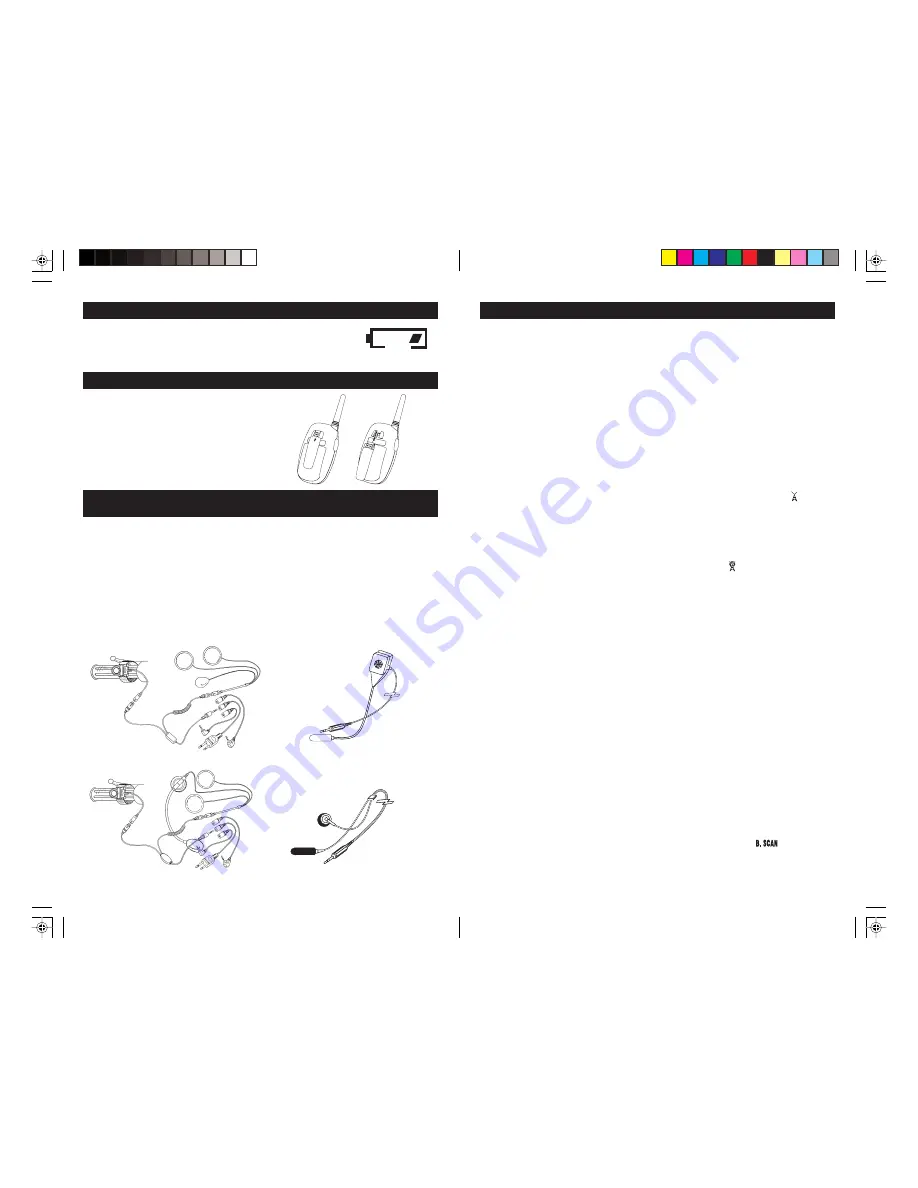
LOW BATTERIES POWER INDICATION

OPERATION MANUAL

12

LOW BATTERIES POWER INDICATION

As you use the unit, the battery icon’s elements will disappear
one by one to show the remaining power. When only one
element remains, replace alkaline batteries or recharge NiCad or
Ni-MH batteries as soon as possible.

USING THE BELT CLIP

To use the supplied belt clip, insert the clip fully
into the slot at the back of the radio unit. To
remove the clip, press the top of the clip and slide
it out. The belt clip needs to be removed before
changing/installing the batteries for full access to
the battery compartment.

USING EXTERNAL MICROPHONE/SPEAKER
HEADSETS

The MRC-11X is supplied with an MHS-11XO headset for the driver. If the unit will
also be used for driver/passenger communications, an optional second headset can
be purchased for the passenger (see the Optional Accessories Ordering Form
enclosed for more info re the choice of the premium MHS-11XC/O or the standard
MO-1/MC-1 headsets). When the driver headset is plugged into the DRV jack on the
unit’s top panel, it automatically disables the MRC-11X’s built-in Mic and speaker,
and the headset must be used for all communication.

(Note: Always make sure the unit is off or the volume at minimum before plugging in
the headsets and placing them on the head.)

MHS-11XC

MHS-11XO

MO-1

MC-1

Summary of Contents for MRC-11X

Page 1: ...MRC 11X Motorcycle Radio Communicator OWNER S MANUAL ...

Page 2: ...ty and user friendly features With special features for use with motorcycles the MRC 11X is designed to maximize your on the road communications The two way radio can be voice operated by either the driver or passenger VOX or operated manually by either a remote PTT button mounted on the handlebar or the large push to talk button PTT on the unit The radio operates simplex one way at a time mode fo...

Page 3: ...complies with part 15 of the FCC Rules Operation is subject to the following two conditions This device may not cause harmful interference This device must accept any interference received including interference that may cause undesired operation 4 ADVANCED FEATURES SUMMARY FRS GMRS shared FRS GMRS 22 channels total 462 467MHz Choice of 6 distinct Call tones for calling each of 6 other parties ind...

Page 4: ...g national and international standards and guidelines FCC Report and Order FCC 96 326 August 1996 American National Standards Institute C95 1 1992 National Council on Radiation Protection and Measurements NCRP 1986 International Commission on Non lonizing Radiation Protection ICNRP 1986 To ensure optimal unit performance and to ensure that exposure to RF energy is within the guidelines in the abov...

Page 5: ...geable batteries If you use rechargeable Ni CAD or Ni MH batteries you can recharge them between uses externally in any appropriate commercially available charger or you can recharge them internally in the unit using the optional BC 11X adapter see Optional Accessories Ordering Form included Please note 1 Do not attempt to use any other adapter than the optional BC 11X for charging the batteries a...

Page 6: ... 2 Press momentarily to set data selected and to exit to standby after setting mode DOWN key 1 Press key momentarily to set channel when in the channel set mode 2 Press and hold key for over 2 seconds in standby to turn VOX on off 3 Press key momentarily in standby to turn volume level down UP key 1 Press key momentarily to set channel when in the channel set mode 2 Press and hold key for over 2 s...

Page 7: ...e proceeding Calling Another Party with the CALL Key Use the CALL key to alert another party you wish to communicate with them Both units must be set to the same channel and CTCSS code Momentarily press and release the CALL key to call the other party with a 3 second calling alert tone Wait for the party s response or proceed to Talking to Another Party using the PTT Key See pg 17 for instructions...

Page 8: ...e batteries internally For charging instruction see pg 8 Recharging Ni CAD or Ni MH Batteries 14 OPERATION MANUAL dual channels setting is selected ON the icon appears on the display and the unit will receive one either of the dual channel selected basic channel and second channel This Dual Watch monitor mode is especially useful when the signal you want to hear is consistently weak Dual channels ...

Page 9: ...othing is often more convenient and should provide sufficient range for most bike to bike communications If maximum range is needed experiment with the unit placement for best performance Note This unit cannot ensure privacy in communications OPERATION MANUAL 16 OPERATION MANUAL Setting Functions For all the function set modes Press the MODE key to save the set number selected and enter the next s...

Page 10: ... receiving lower the VOLUME to a comfortable level Radios may be too close Radios must be at least 5 feet apart Increase your separation distance Radios too far apart Obstacles may be interfering with transmission Shorten your operating distance TROUBLESHOOTING 18 Operating Frequency Range 462 563MHz 467 713MHz Number of Channels 22 total GMRS FRS Effective Radiated Power GMRS channels 3W 6 0VDC F...

Page 11: ... 17 118 8 30 186 2 5 79 7 18 123 0 31 192 8 6 82 5 19 127 0 32 203 5 7 85 4 20 131 8 33 210 7 8 88 5 21 136 5 34 218 1 9 91 5 22 141 3 35 225 7 10 94 8 23 146 2 36 233 6 11 97 4 24 151 4 37 241 8 12 100 0 25 156 7 38 250 3 CODE NO CODE NO ASSIGNMENT FREQ HZ ASSIGNMENT FREQ HZ ASSIGNMENT FREQ HZ FRS GMRS 22 CHANNEL CHART NO 1 462 563 9 467 588 17 462 600 2 462 588 10 467 613 18 462 625 3 462 613 11...

Page 12: ... contact the Nady MRC 11X motorcycle accessories distributor in your country through the dealer from whom you purchased this product FRS Family Radio Service channels operation none required GMRS General Mobile Radio Service channels operation requires operator licensing call sign etc For further information contact the FCC at www fcc gov GMRS Licensing Eligibility An individual 18 years of age or...

Page 13: ...NADY SYSTEMS INC nady com ...

Reviews: