background image


4-2. SEARCH window   

ress SEARCH in live mode to enter the Search screen. 

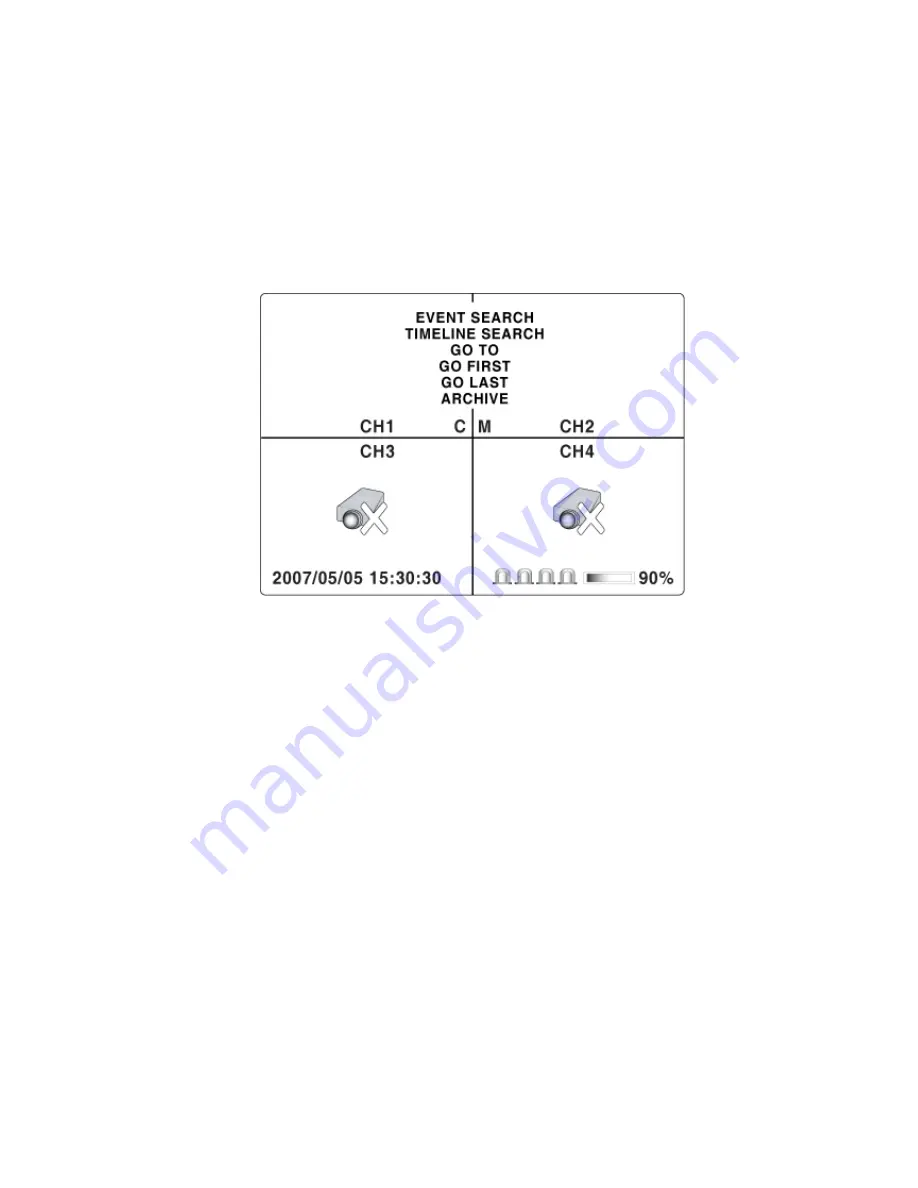
hen you press the Search button, DVR asks for a password as in Figure 4-2-1. 

rrow controls. 

ENT, GO TO FIRST TIME, GO TO LAST TIME, GO 

P

W

Enter the password using the a

There are 7 ways of search menu such as TIMELINE, EV

TO SPECIFIC TIME, LOG, and ARCHIVE on the screen. 


Figure 4.2.1. Search window   


4-2-1. EVENT Search 

The Event Search window is used 

ories of search filters can be applied: 

DATE, CHANNEL and TYPE. Press SEL to select

lue and move down to the next category and use 

n to move up to the categories you have previously entered. The ESC button will 

ress SEL to move to the CHANNEL selector. 

r CONTINUOUS. 

ce a list of instances 


to find stored video. Three categ

 a va

the UP arrow butto

return the user to the previous screen. 

1.  Select the date of the video to begin searching. Use the LEFT, RIGHT, UP, and DOWN buttons to 

navigate through the days. 

2.  Once you have selected the date, p

3.  Use LEFT and RIGHT buttons to change the channel selection from ALL to any of the available 

channels. 

4.  Once you have selected the channel, press SEL to move to the TYPE selector. 

5.  Use the LEFT and RIGHT buttons to change the type of recording to ALL, MOTION, SENSOR, 

MANUAL, o

6.  Once you have selected the type of recording to search for, press SEL to produ

that fit your search criteria. 


30

Summary of Contents for SDVR-4300

Page 1: ...riplex Digital Video Recorder Ver 1 1 About this user guide Before installing and using this unit please read this user guide carefully The specifications and information are subject to change without notice for quality improvement ...

Page 2: ...f electric shock to persons Cautions This product has multiple rated voltages 110v and 220v See installation instructions before connecting to the power supply This product uses a Lithium battery To avoid of risk of explosion do not replace the battery on the main board by anything other than a Lithium battery Dispose of used batteries according to the manufacturer s instructions This equipment an...

Page 3: ... not responsible for any damage caused by improper use of the product or failure to follow instructions for the product The manufacturer is not responsible for any problems caused by or resulting from the user physically opening the DVR for examination or attempting to fix the unit The manufacturer may not be held liable for any issues with the unit if the warranty seal is removed 3 ...

Page 4: ...ponents as specified below When you purchase the unit please check to ensure the components specified below are included DVR Set Client Software CD Including Manual Remote Controller Battery1 5V AAA x 2EA Adaptor and Power cable IDE HDD Cable HDD Screws and Rubber rings 4 ...

Page 5: ...P0822N 80 GB 7200 RPM 2 M E IDE SAMSUNG SP1604N 160 GB 7200 RPM 2 M E IDE WD1600BB 22GUA0 160 GB 7200 RPM 2 M E IDE WD2000BB 00GUA0 200 GB 7200 RPM 8 M E IDE WD2500BB 00KEA0 250 GB 7200 RPM 8 M E IDE Western Digital WD5000AAKB 500 GB 7200 RPM 16 M E IDE ST3400 15ACE 40 GB 7200 RPM 2 M E IDE ST3800 12ACE 80 GB 7200 RPM 2 M E IDE ST31200 25ACE 120 GB 7200 RPM 2 M E IDE ST31600 22ACE 160 GB 7200 RPM ...

Page 6: ...sor and Schedule RECORD METHOD By Resolution fps Quality MULTI TASK TRIPLEX Record playback and transfer CONTROL UNIT IR Type Remote Control and Front keys SERIAL PORT CONSOLE 1 RS 232C DYNAMIC IP Supported by DDNS LAN PORT 1 10 100 base T Ethernet NETWORK FUNCTIONS Live Search P T Z F HDD CAPACITY 1EA Max 750GB NETWORK Still Image Video data BACKUP USB STICK Still Image Video data ADAPTOR Input A...

Page 7: ... Mode 16 3 3 1 Motion Zones 17 3 3 2 Recording Schedules 18 3 4 System 19 3 5 Network 22 3 5 1 Ports 23 3 5 2 Network types 24 3 5 2 1 LAN 24 3 5 2 2 DHCP 24 3 5 2 3 ADSL PPPOE 25 3 6 Storage 26 4 LIVE SEARCH 28 4 1 Live Window 28 4 2 SEARCH window 30 4 2 1 EVENT Search 30 4 2 2 TIME LINE Search 31 4 2 3 GO TO 32 4 2 4 GO FIRST 32 4 2 5 GO LAST 32 4 2 6 LOG List 32 7 ...

Page 8: ...VE VIEWER 37 6 1 Overview 37 6 2 Minimum PC requirements 38 6 3 Installing the program 38 6 4 Live viewer 39 6 5 Search and Playback Viewer 41 6 5 1 Backup 42 6 6 PC System configuration 42 6 6 1 General 42 9 6 2 Site 43 9 6 3 Event 43 9 6 4 Record 44 9 6 5 Disk 44 7 NETWORK BY AN WEB BROWSER VIEWER 45 7 1 Download Web Brower Viewer and Connection 45 7 2 Main Features 46 7 2 1 Live 46 7 2 2 Search...

Page 9: ... register DDNS Dynamic Domain Name Server 48 1 1 Setting of NETWORK Setup menu 48 1 2 Checking Mac address on the rear panel of DVR and Registration No 48 1 3 Registration at DDNS 49 2 Network access using Domain name 51 9 ...

Page 10: ...anel Table 1 1 Front LED and Port Name Description POWER LED light is on when power is applied to the system HDD LED light is on when the system is recording video data USB port There is a USB port located on the left side of the front panel This USB port is used to archive footage into a USB storage device USB 2 0 connector 10 ...

Page 11: ...d SETUP Setup menu screen SEQ Sequence of Full or Quad view RECORD Manual recording SEARCH Search menu screen DIRECTION SELECT Direction or number 1 to 4 Enter ID DVR ID ID Button DVR ID number ESC Esc NUMBER Channel 0 to 9 Figure 1 2 Remote controller Table 1 2 Description of remote controller 11 ...

Page 12: ...or each sensor Simple On Off switching Connect two signal lines of sensor infrared rays sensor heat perception sensor magnetic sensor to the desired sensor number You can set the type NC or NO of sensor at Setup mode NOTICE SENSOR inputs need dried contact only Do not input any electric signal Connector for alarm device connection ALARM OUT Provides simple On Off switching using relay 0 5A 125V 1A...

Page 13: ...Screen When you press the SETUP button the DVR will ask for a password The default password is 1111 which can be entered by pressing the up button 4 times and then pressing the SEL button We recommend you protect the system by assigning a new password immediately Figure 3 1 1 Setup menu screen 13 ...

Page 14: ...vity Sensor type Pre Record Post Event Record Alarm Alarm Duration Schedule SYSTEM DVR ID DESCRIPTION LOAD DEFAULT ADMIN PASSWORD NETWORK PASSWORD DATE FORMAT SET DATE TIME LANGUAGE REMOTE CONTROLLER ID DLS NETWORK PORT CLIENT ACCESS BANDWIDTH SAVING NE TWORK TYPE DDNS SEND E MAIL STORAGE OVERWRITE FORMAT USB UPGRADE SAVE SETUP TO A USB LOAD SETUP FROM A USB VDEO DELETE DELETE VIDEO AFTER Table 3 ...

Page 15: ...e following settings DISPLAY Enable disable display of the video channel in live display mode SEQ LIST Enable disable the specified channel to be included in sequential display mode BRIGHTNESS Change the brightness value for the specified channel CONTRAST Change the contrast value for the specified channel HUE Change the hue value for the specified channel SATURATION Change the saturation value fo...

Page 16: ... each channel Recording modes Continuous Motion Sensor Schedule and Disable MOTION ZONE Select Full Zone or Partial Zone for motion sensing If the Partial Zone is selected screen will be change as shown in figure 3 3 2 Set the motion sensitivity for the specified channel Control the motion sensitivity from 1 to 9 MOTION SENSITIVITY SENSOR TYPE Set the type of sensor for the specified channel from ...

Page 17: ...ones in the screen shown in figure 3 3 2 Move around each rectangular zone using 4 direction key buttons and press SEL button to include the rectangular region as part of the motion sensing zone The rectangular blocks included as part of the motion zone are indicated by changing the color of the blocks Figure 3 3 2 Motion Zone selection screen 17 ...

Page 18: ...zone for the specified channel Vertical Bar Selected recording mode using the SEL button is applied to the entire channel for the selected time zone Each vertical bar corresponds to one hour Individual Block of Time Selected recording mode using the SEL button is applied to the selected 1 hour increment for the selected channel SEL The recording mode can be selected using the SEL button COPY FROM ...

Page 19: ...nd new password The DVR will guide you through the entire process of setting up the user password The password numbers 1 2 3 4 can be input by using direction keys The default password is 1111 DATE FORMAT Select the preferred date and time display SET DATE TIME Set the present date and time If DLS function is ON user can not enter into this menu and change data and time LANGUAGE Select a language ...

Page 20: ...Figure 3 4 1 System setup screen Figure 3 4 2 DVR ID setup screen Figure 3 4 3 DVR information display screen 20 ...

Page 21: ...Figure 3 4 4 Date Time setup screen 21 ...

Page 22: ... ID Registered ID is necessary for ADSL connection Password Registered pasword is necessary for ADSL connection LAN IP Register IP address that is assigned for DVR Gateway Register Gateway that is assigned for DVR Subnet Mask Register Subnet Mask that is assigned for DVR DDNS Enable disable using domain name address through DDNS server ON mode DDNS server name appears for domain registration The D...

Page 23: ...ce it will forward to the appropriate DVR Note This port number is listed next to the Port menu option in the Network Setup screen If you plan to access the DVR units only from within the same LAN the TCP port does not have to be changed Network access beyond Router In order to access beyond Router Firewall user must open 1 TCP port for Command level Live channels and Storage channels If this port...

Page 24: ...or Subnet Mask DNS address input relevant values in IP sharer Figure 3 5 2 Network setup screen LAN Table 3 5 2 LAN Item Description IP The fixed IP address of the DVR unit GATEWAY The IP address of the Gateway SUBNET MASK The subnet mask for the LAN The address for the DNS server DNS 3 5 2 2 DHCP An IP address is automatically assigned by the DHCP server which automatically assigns IP address and...

Page 25: ...PPPoE method If ADSL type is not using inputting IP and Password like VDSL or DVR is installed in IP sharer a user can not select this function In this case a user should select DHCP or LAN Figure 3 5 4 Network setup screen ADSL Table 3 5 3 ADSL Item Description ID The user ID for ADSL connection PASSWORD The password for ADSL connection 25 ...

Page 26: ... do the following 1 Connect USB memory stick onto the USB port 2 Go to the STORAGE USB UPGRADE 3 Select CONFIRM and then the upgrading will start automatically 4 After the upgrade is completed DVR will reboot automatically SAVE SETUP TO A USB User can save the current configuration of DVR to the USB memory stick Put the USB stick on the front panel and press SEL to start the saving process LOAD SE...

Page 27: ...Figure 3 6 1 Storage setup screen Figure 3 6 2 Storage setup USB UPGRADE Figure 3 6 3 Storage setup SAVE SETUP TO A USB LOAD SETUP FROM A USB 27 ...

Page 28: ...dow Indicator Description Continuous recording in progress Manual recording in progress Sensor alarm recording in progress Motion alarm recording in progress Indicates no alarm event Alarm indicator When there is an alarm sensor alarm or motion alarm in the video channel this icon will be highlighted in bright red Indicates that alarm output is activated Indicates that a network client is connecte...

Page 29: ...he screen in full screen mode Toggle P Press to start and stop manual recording RECORD SEARCH Press to go to the search menu Event search Time line search Log Archive search ARCH Press to capture a still image The still image will be stored into hard drive It can be transferred to the USB device SETUP Press to launch SETUP menu ESC Press for temporal storage of the changed value or to return to th...

Page 30: ...ries you have previously entered The ESC button will ress SEL to move to the CHANNEL selector r CONTINUOUS ce a list of instances to find stored video Three categ a va the UP arrow butto return the user to the previous screen 1 Select the date of the video to begin searching Use the LEFT RIGHT UP and DOWN buttons to navigate through the days 2 Once you have selected the date p 3 Use LEFT and RIGHT...

Page 31: ...GHT UP and DOWN buttons to days indow No dicated on the screen as below cted the time zone press the SEL button to move to the 60 minutes time table ecific channel to search by using the UP and DOWN arrow buttons the channel use the LEFT F ADV or RIGHT F REW arrow buttons to move the by navigate through the 2 Once you have selected the date press the SEL button to move to the time line search w 3 ...

Page 32: ...he UP or DOWN button to set the date and time to move from le Figure 4 2 5 GO TO search screen 4 2 4 GO FIRST ou can access to the first data which has been recorded into the HDD disk by pressing this menu ou can access to the last data which has been recorded into the HDD disk by pressing this menu ser can see the log list by selecting this item Y 4 2 5 GO LAST Y 4 2 6 LOG List U 32 ...

Page 33: ... RIGHT button 2 Once you have selected the date press the SEL button to move to the list of recording data 3 Use the UP or DOWN button to scroll through the onscreen listings 4 Once the desired event has been selected press the SEL button to see the selected video in paused mode 5 Press the ARCH button to archive the video into USB memory stick Figure 4 2 7 Archive search screen 33 ...

Page 34: ...ewind the footage at 1x 2x and 4x speeds Reverse playback speed is shown as 1x normal 2x 2 times normal and 4x 4 times normal at the bottom right of the screen Jump Step backward The playback position moves 60 seconds backward PLAY PAUSE Press to play or pause recorded video Jump Step forward Playback position moves 60 seconds forward Press to fast forward the footage at 1x 2x and 4x speeds Playba...

Page 35: ...ack 1 In live mode press ARCH button to capture and archive the still image Once you press the ARCH button the screen will be displayed as shown in Figure 5 1 1 Figure 5 1 1 Archive screen in Live mode 2 In playback mode the DVR will ask whether to store still image or video If the user selects still image or video it will store captured image or video into the HDD User can find the list of archiv...

Page 36: ...ct and display one of the files on the screen in the archived list by using the UP or DOWN button 5 And then press the ARCH button to transfer the data into the USB memory stick 6 If there is NO enough space in the USB memory stick the DVR will popup the message that there is no space in the USB memory stick 5 3 Playing backup file If there is proper COCDEC installed in PC it is possible that the ...

Page 37: ...ccess the DVR at a time For remote viewing the frame rate is limited to 1 frame sec when there is no recording operation in the DVR When the DVR is recording the video frame rate for remote live monitoring will follow the recording frame rate on the DVR Figure 6 1 Main user interface 6 1 Overview The remote software supports remote live viewing search playback and system configurations By installi...

Page 38: ...XP Vista Network 10 100Base T 10 100Base T Others Direct X 8 1 Direct X 9 0 or Higher Before installing the program check the PC specifications The Network Client Viewer may not perform correctly if the PC does not meet the minimum requirements 6 3 Installing the program 1 Insert the provided CD into the CD ROM drive of your PC 2 Run to start the installation process 3 Follow the on screen directi...

Page 39: ...nt date and time 2 CONNECT Click this icon to connect to the DVR 3 SEARCH Click this icon to search for recorded video 4 Click this icon to lock unlock all operations of the client software Once the lock or unlock icon is clicked this pop up window appears Remember the password and enter it when you operate the client software LOCK UNLOCK 5 PAN TILT Use these buttons to control the PAN TILT featur...

Page 40: ... video 9 RECORD Enable or disable recording of live video to local disk 10 SETUP Click this icon to setup configuration of client software 11 EXIT Click this icon to exit the client software 12 DISPLAY MODE Click these icons to select display mode 13 Use the volume control bar to set the audio level The audio can be turned on or off by clicking the audio icon AUDIO 14 HDD USAGE DVR HDD storage Ind...

Page 41: ...e the capture icon is clicked this pop up window appears The still image is captured in either jpeg or bmp file format CAPTURE 4 MARK IN Click this icon to set the start time for video backup 5 MARK OUT Click this icon to set the ending time for video backup 6 BACKUP Click this icon to backup the selected recorded video in AVI format 7 SEARCH CALENDAR The calendar shows dates with recorded video i...

Page 42: ...k the setup icon to setup the configuration of PC that the network client S W is installed 6 6 1 General Once you click the setup icon this pop up window appears Select security options and set a password When you access any of the selected functions you will need to enter the password You can also set the save path for capturing and backup Security Option Set a password for security options Save ...

Page 43: ... can set event items the amount of local disk space you want to allow and the save path for the log file z LOG Select to save event log into log file z ICON Select to display the event on live video z EVENT LIST Select to show the event in the Event List window of live mode You can search and check the recorded log data 43 ...

Page 44: ...he recording condition to Event you can set event for motion or alarm with duration You can also set each or all channels to record 9 6 5 Disk You can select which local disk to use and the amount of disk space you want to allow the program to use for recording You can also choose to overwrite data or stop recording when the maximum amount of disk space is full 44 ...

Page 45: ...to access http ns standalone4ch com webview2 to get a web browser viewer Then the window will appear as bellow Click YES to download Web Browser Viewer from the server run by the manufacturer 2 Web Browser Viewer will be downloaded and installed 3 Click button and enter IP address or Domain name using DDNS the password and Port number 4 Then user can access DVR 45 ...

Page 46: ...s to select display mode 5 PAUSE Click this icon to pause the display screen 6 CAPTURE Click this icon to capture the image from live display 7 SETUP Click this icon to control remotely the setting of DVR 8 PAN TILT Use these buttons to control the PAN TILT features on the remote camera 9 ZOOM FOCUS Use these buttons to control the ZOOM FOCUS features on the remote camera 10 AUDIO The audio can be...

Page 47: ...SPLAY MODE Click these icons to select display mode 5 BACKUP Click this icon to pause the display screen 6 CAPTURE Click this icon to capture the image from playback 7 SETUP Click this icon to control remotely the setting of DVR 8 PLAYBACK BUTTONS Use these buttons to control the PAN TILT features on the remote camera 9 SEARCH CALENDAR Use these buttons to control the ZOOM FOCUS features on the re...

Page 48: ...signed by the DHCP server LAN Select when DVR is installed in Local Area Network with router or IP sharer and IP address is static and private IP address ADSL PPPoE To use this ADSL PPPoE function when the network type connecting the DVR is using PPPoE method If ADSL type is not using inputting IP and Password like VDSL or DVR is installed in IP sharer a user can not select this function In this c...

Page 49: ...e check your ID with the check button to make sure the ID you choose is available Choose your Password which also must be more than 4 and less than 12 characters alpha and or numerical Confirm your Password Enter your Name and E Mail address The DDNS Service Administer will send a confirmation e mail to the Subscriber s e mail address so please enter your e mail address correctly B Press Registrat...

Page 50: ... as hyphens for your Domain name i e A Z a z 0 9 or for your domain name and it is case sensitive C Press List and check the status of registration Status Specification Elapsed time since last update is Less than 5 minutes Elapsed time since last update is more than 5 minutes and less then 20 minutes Elapsed time since last update is more than 20 minutes No update history 50 ...

Page 51: ... your DVR via the provided Network Client S W A Run Network Client S W program and click the connect button B Enter your domain name instead of IP address in the IP Address field C Enter the Port no Protocol and Password in each filed D Press OK then you can access to the remote DVR 51 ...

Reviews: