background image

GB

Introduction

9

IDENTIFICATION OF CONTROLS

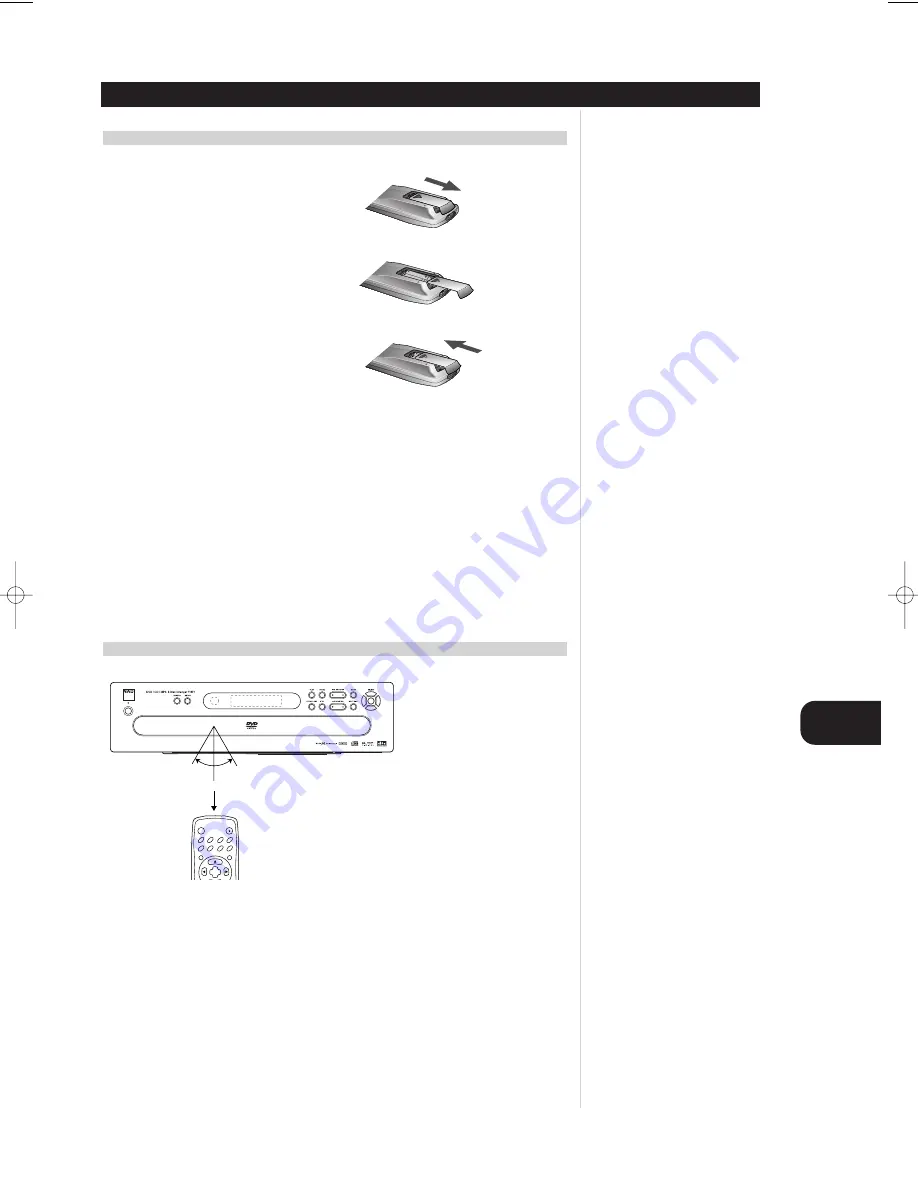
PREPARING THE REMOTE CONTROL

Insert the batteries into the remote control so you can use it to operate the DVD player.

1 Open the battery cover.

2 Insert batteries (AAA size).

Make sure to match the + and - on the batteries to
the marks inside the battery compartment.

3 Close the cover.

NOTES ON BATTERIES

• Improper use of batteries may cause battery leakage and corrosion.
• To operate the remote control correctly, follow the instructions.
• Do not insert the batteries into the remote control in the wrong direction.
• Do not charge, heat, open, or short-circuit the batteries.
• Do not throw the batteries into fire.
• Do not leave dead or exhausted batteries in the remote control.
• Do not use different types of batteries together, or mix old and new batteries.
• If you do not use the remote control for a long period of time, remove the batteries to avoid possible

damage from battery corrosion.

• If the remote control does not function correctly or if the operating range becomes reduced, replace

all batteries with new ones.

• If battery leakage occurs, wipe the battery liquid from the battery compartment, then insert new batteries.
• The batteries should last about one year with normal use.

OPERATING WITH THE REMOTE CONTROL

This section shows you how to use the remote control.

Point the remote control at the remote sensor and press the buttons.

Distance: About 23 ft (7 m) from the front of the remote sensor
Angle:

About 30° in each direction of the front of the remote sensor

• Do not expose the remote sensor of the DVD player to a strong light source such as direct sunlight or

illumination. If you do so, you may not be able to operate the DVD player with the remote control.

NOTES ON THE REMOTE CONTROL

• Point the remote control at the remote sensor on the DVD player.
• Do not drop or give the remote control a shock.
• Do not leave the remote control near an extremely hot or humid place.
• Do not spill water or put anything wet on the remote control.
• Do not disassemble the remote control.

30

°

30

°

23 ft (7m)

SELECT

ENTER

TITLE

MENU

AUDIO

SUBTITLE

SOUND

ANGLE

SETUP

REPEAT

RANDOM

POWER

OPEN/CLOSE

A-B

T571 manual (GB)  19/11/01  2:14 pm  Page 9

Summary of Contents for T 571

Page 1: ...T571 DVD CD MP3 5 Disc Changer Owner s Manual GB ...

Page 2: ...EXPOSURE TO PREVENT DIRECT EXPOSURE TO LASER BEAM DO NOT TRY TO OPEN THE ENCLOSURE VISIBLE LASER RADIATION WHEN OPEN THE ENCLOSURE DO NOT STARE INTO BEAM THE APPARATUS SHALL NOT BE EXPOSED TO DRIPPING OR SPLASHING AND THAT NO OBJECTS FILLED WITH LIQUIDS SUCH AS VASES SHALL BE PLACED ON THE APPARATUS WARNING CHANGES OR MODIFICATIONS NOT EXPRESSLY APPROVED BY THE PARTY RESPONSIBLE FOR COMPLIANCE COU...

Page 3: ...nd Their Codes 23 BASIC OPERATIONS Basic Playback 24 27 Stopping Play 26 Resume Play 26 Last Scene Memory 26 Screen Saver 26 Skipping Discs 27 Exchanging the Disc and Starting Playback 27 Special Playback 28 29 Still Picture 28 Frame Advance 28 Skipping Chapters and Tracks Forward or Back 28 HDCD Playback 28 To Scan at Fast Forward or Fast Reverse Playback 29 Playing in Slow Motion 29 OPERATION US...

Page 4: ...unit follow that product s instructions WARNING Cleaning and adjustment of lenses and or other components of playback mechanism should be performed by a qualified service technician NOTES ON MOISTURE CONDENSATION Moisture condensation damages the DVD player Please read the following carefully Moisture condensation occurs for example when you pour a cold drink into a glass on a warm day Drops of wa...

Page 5: ...CS Do not store discs in a place subject to direct sunlight or near heat sources Do not store discs in places subject to moisture and dust such as a bathroom or near a humidifier Store discs vertically in a case Stacking or placing objects on discs outside of their case may cause warping ABOUT THIS OWNER S MANUAL This owner s manual explains the basic instructions of this DVD player Some DVD video...

Page 6: ...ow Disc tray Remote sensor STOP button POWER indicator POWER button NEXT DISC button TITLE PROG RANDOM ALL A B CHP TRK 1 2 3 4 5 MP3 HD CD DVD DVD indicator CD indicator HDCD indicator RANDOM indicator PROGRAM indicator Repeat playback mode indicators Operating status indicator Chapter Track number indicator Title number indicator Angle icon indicator Disc 1 5 indicator Total playing time elapsed ...

Page 7: ... PAL DVD disc NTSC NTSC NTSC PAL DVD disc AUTO MULTI system TV NTSC PAL DVD disc S VIDEO OUT jack VIDEO OUTPUT SELECT switch SCART RGB OUT jack AUDIO OUT L R jacks VIDEO OUT jack 12V TRIGGER INPUT jack By connecting this DVD player to another NAD audio component or system controller equipped with a 12V trigger output you can remotely operate the T571 power ON OFF POWER CORD Connect to an AC 110 24...

Page 8: ...on PLAY button FWD REV SKIP button SLOW buttons PROGRAM button REPEAT button SETUP button SUBTITLE button AUDIO button TITLE button SELECT ENTER button DISPLAY button ZOOM button FWD REV SCAN button STOP button PAUSE STEP button Number buttons CLEAR button MENU BUTTON Use the MENU button to display the menu screen included on DVD video discs To operate a menu screen follow the instructions in Usin...

Page 9: ...ion correctly or if the operating range becomes reduced replace all batteries with new ones If battery leakage occurs wipe the battery liquid from the battery compartment then insert new batteries The batteries should last about one year with normal use OPERATING WITH THE REMOTE CONTROL This section shows you how to use the remote control Point the remote control at the remote sensor and press the...

Page 10: ... effect in the home You can enjoy motion picture and live concert DVD video discs with this dynamic realistic sound by connecting the DVD player to a 5 1 channel receiver equipped with a Dolby Digital decoder or Dolby Digital processor To DIGITAL OUT COAXIAL or OPTICAL 75 ohm coaxial cable or Optical cable To S VIDEO OUT or VIDEO OUT S Video cable or Video cable Receiver equipped with a Dolby Digi...

Page 11: ...ound may damage your hearing as well as the speakers Refer to Selecting Digital Audio Output on page 21 ENJOYING DOLBY PRO LOGIC SURROUND SOUND You can still enjoy the excitement of Surround Sound even if your A V receiver does not offer Dolby Digital decoding If your A V receiver has a Dolby Pro Logic decoder refer to the following connection diagram Connect one or two rear speakers Note The surr...

Page 12: ...ker left Center speaker Front speaker right Sub woofer Rear speaker left surround Rear speaker right surround NOTES Refer to the owner s manual of your audio system for operating instructions Before you connect the DVD player to other equipment be sure to turn off the power and unplug all of the equipment from the wall outlet before making any connections The output sound of the DVD player has a w...

Page 13: ...igh volume sound Turn off the receiver before you connect or disconnect the DVD player s power cord If you leave the receiver power on the speakers may be damaged WARNING Do not set the Digital Audio Output of this DVD player to Dolby Digital unless you are connecting the DIGITAL OUT jack of this DVD player to an AV decoder that has the Dolby Digital decoding function High volume sound may damage ...

Page 14: ...tal Audio Output of this DVD player to Dolby Digital unless you are connecting the DIGITAL OUT jack of this DVD player to an AV decoder that has the Dolby Digital decoding function High volume sound may damage your hearing as wellas the speakers Refer to Selecting Digital Audio Output on page 21 CONNECTING TO A TV VIDEO OUTPUT SELECT switch 21 pin SCART Cable Not supplied To VIDEO OUT To AUDIO OUT...

Page 15: ...he desired item The screen will show the current setting for the selected item and the alternate setting s Disc Audio see page 16 Disc Subtitle see page 16 Disc Menu see page 16 Rating see page 17 Password see page 18 TV Aspect see page 19 Menu Language see page 20 Digital Audio Output see page 21 Others see page 22 3 Press and then to select the desired setting and press SELECT ENTER Some items r...

Page 16: ...e 23 The Disc Subtitle and Disc Menu are selected by the same method NOTE If the language selected is not available on the disc the original language designated by each disc will be selected CLEAR PROGRAM DISPLAY RETURN SELECT ENTER TITLE MENU AUDIO SUBTITLE SOUND ANGLE SETUP REPEAT RANDOM POWER OPEN CLOSE A B 1 2 3 4 5 6 7 8 0 9 SLOW ZOOM MARKER SEARCH PAUSE STEP NEXT DISC STOP PLAY SCAN SKIP SEL...

Page 17: ...Level 3 PG Level 1 G Some titles do not match with the rating level described as above If you change the level and enter a password playback of all DVDs with ratings higher than your selection will be blocked unless the correct password is entered again For example if you change the level to 5 the DVD player will not play discs with ratings of 6 7 or 8 unless the correct password is entered on the...

Page 18: ... ENTER To change the rating level password follow the steps on page 17 18 again SELECTING RATING LEVEL AND PASSWORD CLEAR PROGRAM DISPLAY RETURN SELECT ENTER TITLE MENU AUDIO SUBTITLE SOUND ANGLE SETUP REPEAT RANDOM POWER OPEN CLOSE A B 1 2 3 4 5 6 7 8 0 9 SLOW ZOOM MARKER SEARCH PAUSE STEP NEXT DISC STOP PLAY SCAN SKIP 1 2 3 2 3 Disc Subtitle Disc Menu Rating Password TV Aspect Menu Language Prog...

Page 19: ... in FULL size Setting the wide screen TV to FULL mode is also necessary Each screen shows an example when the video material for a wide screen is played This setting does not affect the video material for conventional size SELECTING TV ASPECT CLEAR PROGRAM DISPLAY RETURN SELECT ENTER TITLE MENU AUDIO SUBTITLE SOUND ANGLE SETUP REPEAT RANDOM POWER OPEN CLOSE A B 1 2 3 4 5 6 7 8 0 9 SLOW ZOOM MARKER...

Page 20: ...ogressive Scan Digital Audio Output 5 1 Speaker Setup Others Disc Audio English Spanish French German Italian Disc Subtitle Disc Menu Rating Password TV Aspect Menu Language Progressive Scan Digital Audio Output 5 1 Speaker Setup Others Disc Audio English Spanish French German Italian CLEAR PROGRAM DISPLAY RETURN SELECT ENTER TITLE MENU AUDIO SUBTITLE SOUND ANGLE SETUP REPEAT RANDOM POWER OPEN CLO...

Page 21: ...e is made this unit will pass each type of signal through without any further processing 21 GB Initial Settings Each DVD disc has a variety of audio output options Set the player s Digital Audio Output according to the type of audio system you use SELECTING DIGITAL AUDIO OUTPUT DISPLAY RETURN SELECT ENTER TITLE MENU AUDIO SUBTITLE SOUND ANGLE SETUP REPEAT RANDOM POWER OPEN CLOSE A B ZOOM MARKER SE...

Page 22: ... ENTER The setting of the selected item are changed between On and Off DRC DYNAMIC RANGE COMPRESSION ON OFF On Select this option to turn on the Dynamic Range Compression circuitry so that the dialogue remains clear even at low volume levels Off Select this option to turn off the Dynamic Range Compression and have the soundtrack presented exactly as it was created NOTES The DRC function works only...

Page 23: ...8 Bengali Bangla 7289 Armenian 7784 Maltese 8471 Tajik 6679 Tibetan 7365 Interlingua 7789 Burmese 8472 Thai 6682 Breton 7378 Indonesian 7865 Nauru 8473 Tigrinya 6765 Catalan 7383 Icelandic 7869 Nepali 8475 Turkmen 6779 Corsican 7384 Italian 7876 Dutch 8476 Tagalog 6783 Czech 7387 Hebrew 7879 Norwegian 8479 Tonga 6789 Welsh 7465 Japanese 7982 Oriya 8482 Turkish 6865 Danish 7473 Yiddish 8065 Panjabi...

Page 24: ...e correct guide on the disc tray If the disc is out of the guide it may damage the disc and cause the DVD player to malfunction Do not place anything except 3 discs or 5 discs on the disc tray Discs can be loaded one at a time by pressing NEXT DISC to rotate the carousel 4 Press OPEN CLOSE or PLAY to close the loading drawer The disc on the tray 1 is ready to be played back Playback may begin auto...

Page 25: ...S Do not move the DVD player during playback Doing so may damage the disc and the DVD player Use the OPEN CLOSE button on the remote control or DVD player to open and close the disc tray Do not push the disc tray while it is moving Doing so may cause the DVD player to malfunction Do not push up the disc tray or put any objects other than discs on the disc tray Doing so may cause the DVD video play...

Page 26: ...s LAST SCENE MEMORY This player memorizes last scene for the last disc you have watched Settings remain in memory even if you remove the disc from the player or switch off the player If you load a disc that has its settings memorized Latest Stop Position is automatically recalled NOTES Settings are stored in memory for use any time Switching of the audio mode etc is automatic on some discs This pl...

Page 27: ...opped if pressed during playback the loading drawer opens and the disc tray which was in the play position comes to the center position 2 Exchange the disc in the center position Center position 3 Press OPEN CLOSE or PLAY again The loading drawer closes the disc tray returns to the play position and playback begins from the new disc BASIC PLAYBACK Basic Operations GB CLEAR PROGRAM DISPLAY RETURN S...

Page 28: ...k press PLAY SKIPPING CHAPTERS AND TRACKS FORWARD OR BACK Skipping forward Press SKIP during playback A chapter DVD or a track CD is skipped each time the button is pressed Skipping back Press SKIP during playback When the button is pressed once midway through a chapter track the player returns to the start of that chapter track When it is pressed again a chapter track is skipped each time the but...

Page 29: ...NLY Press SLOW or during playback The playback speed becomes 1 16 of the normal speed TV screen The speed of slow motion is slow at first When the button is pressed again the speed becomes faster Each time the button is pressed the speed increase up to 4 steps The speed will be retained even after the button is released To return to normal playback press PLAY NOTES The sound is muted during slow m...

Page 30: ...ess to select the desired setting When numbers are displayed e g title number the numeric buttons can also be used for setting instead of For some functions the setting will be registered immediately for others SELECT ENTER must be pressed To clear the GUI Menu Icons press DISPLAY again EXAMPLES OF GUI MENU ICONS The screens may differ depending on the disc contents 30 GB Operation Using Menu Icon...

Page 31: ...ber and to change the setting AUDIO To show the current subtitles language and to change the setting SUBTITLE To show the current angle number and to change the angle ANGLE To show the current sound NORMAL or 3D SURROUND and to change the setting To show the current track number and to jump to the desired track number or Numeric SELECT ENTER SKIP To show the elapsed time Display only To show the c...

Page 32: ...tents provide guide menus and those recorded with various languages provide menus for audio and subtitle language Although the DVD menu s contents and operation differ from disc to disc the following explains the basic operation when this feature is used 1 Press MENU during play The DVD menu available on the disc is now displayed Pressing MENU again resumes play from the scene when MENU was first ...

Page 33: ...select OFF at step 2 It is possible to change the audio soundtrack language to a different language from the one selected at the initial settings in case of DVD disc See page 16 for further info This operation works only with discs on which multiple audio soundtrack languages are recorded And it is possible to change the audio channel in case of audio CD NOTES When the desired language is not sele...

Page 34: ...conventional stereo speakers instead of the five or more speakers normally required to listen to multi channel audio from a home theater This feature works with DVD discs encoded with Dolby Pro Logic and Dolby Digital audio tracks 1 Press SOUND during playback Each time this button is pressed the TV screen displays changes 2 Press SOUND repeatedly until the desired sound is selected NOTES This 3D ...

Page 35: ... return to normal play Press REPEAT several times until OFF is displayed REPEATING SECTIONS BETWEEN TWO SPECIFIC POINTS A B REPEAT 1 Press A B during play at the point where repeat play is to start A You can select OFF at this step by pressing CLEAR 2 Press A B during play at the point where repeat play is to be concluded B Repeat play of the selection between points A and B starts To return to no...

Page 36: ...s from the point corresponding to the selected marker or the selected marker is cleared NOTES These operations work only with discs for which the elapsed playing time appears in the DVD display window during playback or stop Some subtitles recorded around the marker may fail to appear DVD All the markers are cleared when the power is turned off or the disc is removed The marker is not stored when ...

Page 37: ...ingle disc in random order and then stops RANDOM2 Plays all the tracks on current disc in random order and then plays all the tracks on each succeeding disc in random order and then stops RANDOM3 Plays 2 tracks randomly from a disc and then plays 2 tracks randomly from a different disc until all tracks on all discs have been played 2 To return to normal playback press RANDOM repeatedly until NORMA...

Page 38: ...lected tracks are stored in the player memory and playback begins with the first programmed sequence After playback of all tracks programmed Play is stopped CLEARING THE PROGRAM To clear the programmed tracks one by one Press to select the unwanted number and then press CLEAR To clear all the programmed tracks Press to select Clear All and then press SELECT ENTER Press PROGRAM or RETURN to exit th...

Page 39: ...the desired MP3 file and then press PLAY to start playback of the file FOR YOUR REFERENCE Press SKIP or SKIP to play the next file or previous file during playback Press DISPLAY to move to the next page Press PAUSE STEP to enter the pause mode press PLAY or PAUSE STEP again to return to normal playback Press STOP to stop the playback TO PLAY AN MP3 FILE REPEATEDLY If you press REPEAT once during p...

Page 40: ...1 MP3 Clear All TRACK 2 mp3 TRACK 2 mp3 TRACK 3 mp3 TRACK 4 mp3 TRACK 6 mp3 TRACK 6 mp3 TRACK 7 mp3 TRACK 7 mp3 TRACK 8 mp3 TRACK 9 mp3 TRACK 9 mp3 TRACK 5 mp3 E TRACK 1 mp3 Program Clear All TRACK_2 TRACK_7 TRACK_6 TRACK_9 Program Clear All TRACK_2 TRACK_7 TRACK_6 TRACK_9 CLEAR PROGRAM DISPLAY RETURN SELECT ENTER TITLE MENU 1 2 3 4 5 6 7 8 0 9 SLOW ZOOM MARKER SEARCH PAUSE STEP NEXT DISC STOP PLA...

Page 41: ...NAGEMENT INFORMATION Region Management Information This DVD Player is designed and manufactured to respond to the Region Management Information that is recorded on a DVD disc If the Region number described on the DVD disc does not correspond to the Region number of this DVD player this DVD player cannot play that disc The Region number of this DVD player is 2 NOTES ON UNAUTHORIZED DISCS You may no...

Page 42: ...nected with the audio cable The Digital Audio Output is set to the wrong position Set the Digital Audio Output to the correct position then turn on the DVD player again by pressing the POWER button The playback picture is poor The disc is dirty Clean the disc The DVD player does not start playback No disc is inserted Insert a disc Check that the DVD or audio CD indicator in the DVD display is lit ...

Page 43: ...audio 0 008 Operating conditions Temperature 5 C to 35 C Operation status Horizontal OUTPUTS Video output 1 0 V p p 75Ω negative sync RCA jack x 1 SCART S video output Y 1 0 V p p 75Ω negative sync Mini DIN 4 pin x 1 C 0 286 V p p 75Ω Audio output digital audio 0 5 V p p 75Ω RCA jack x 1 Audio output optical audio Optical connector x 1 Audio output analog audio 1 0 Vrms 1 KHz 6 dB 330Ω RCA jack L ...

Page 44: ... NAD ELECTRONICS INTERNATIONAL All rights reserved No part of this publication may be reproduced stored or transmitted in any form without the written permission of NAD Electronics International T571 Manual 11 01 Printed in Korea ...

Reviews: