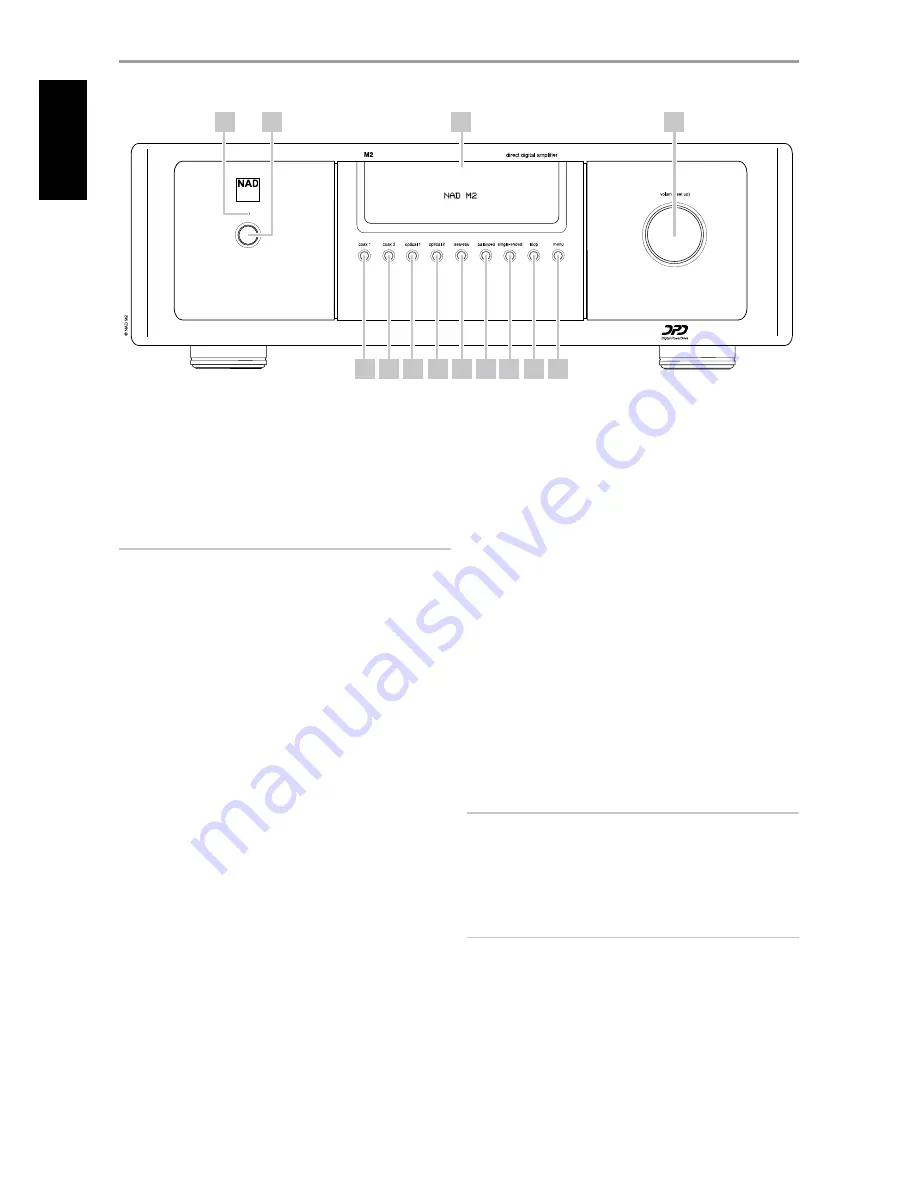
IDENTIFICATION OF CONTROLS
front panel
1 StandbY led:
This indicator will light up amber when M2 is in
standby state. When M2 is at ON state, this indicator will illuminate blue.
2 StandbY button:
Press this button to switch ON the M2. The
Standby LED indicator will turn from amber to blue and illuminate the
VFD. Pressing the STANDBY button again turns the unit back to standby
mode.
IMPORTANT NOTICE
The rear panel POWER switch must be set to ON position for the
STANDBY button to activate. After pressing the STANDBY button, there
will be a delay before the M2 will be completely enabled. Please wait
until the initial “NAD M2” display in the VFD is extinguished before you
select any of the source input or features of your M2.
3 vacuum fluoreScent diSplaY (vfd):
Display visual information
about the selected source input, menu options, volume level and other
related information and settings.
4 volume:
Use this control to adjust M2’s overall amplification or volume
level. Turn clockwise to increase the volume setting; counter clockwise
to lower it. The M2 features a “velocity sensing” volume control; rapid
movement changes the volume in large steps, slow movement increments
the volume in 0.5dB steps. The VOLUME knob is also used to select options
or adjust settings when MENU button is activated.
5 coax 1:
Select the source connected to the COAX 1 rear panel
terminal as the active input.
6 coax 2:
Select the source connected to the COAX 2 rear panel
terminal as the active input.
7 optical 1:
Select the source connected to the OPTICAL 1 rear panel
terminal as the active input.
8 optical 2:
Select source connected to the OPTICAL 2 rear panel
terminal as the active input.
9 aeS/ebu:
Select the source connected to the AES/EBU IN rear panel
connector as the active input.
10 balanced:
Select the source connected to the BALANCED L and
BALANCED R rear panel connectors as the active input.
11 Single-ended:
Select the source connected to the SINGLE-ENDED L
and SINGLE-ENDED R rear panel terminals as the active input.
12 loop (digital proceSSor loop):
Allow the insertion of external
digital filters into the signal path. This is the digital equivalent of the
analog “Tape Monitor Loop”. An example on how to take advantage of
this feature is illustrated below.
a
Connect a digital input to the rear panel’s OPTICAL 1 TosLink optical
terminal.
b
Connect the rear panel’s OPTICAL LOOP OUT to a compatible
OPTICAL IN of a Mac or any processor where the signal can be
subjected to a wide library of crossover filters, equalization or room
correction programs (Check if your Mac or processor has these
feature capabilities).
c
Send out the processed signal from your Mac or processor’s
corresponding Optical Out port into M2’s OPTICAL LOOP IN thereby
completing the signal loop path.
d
Press front panel’s “loop” button to select your OPTICAL 1’s
“processed” input signal. When “loop” feature is engaged, “LOOP” will
be continuously displayed at the lower left corner of the VFD after a
brief display of sample rate setting of the source.
IMPORTANT NOTICE
With “loop” button enabled, there will be no audio output if any
connection from the above “loop” setup example is “broken” (i.e., no
connection to OPTICAL OUT, not looped to “OPTICAL LOOP IN”, etc). Press
“loop” button again to deactivate or turn off the “loop” feature (“LOOP”
is extinguished in the VFD) thus returning to normal audio listening of a
selected source input.
NOTE
This digital processor loop feature can be applied to all analog and
digital audio input signal sources (Optical 1-2, Coax 1-2, AES/EBU,
BALANCED and SINGLE-ENDED).
1
7
6
5
8
4
3
2
9
10 11 12 13
6
EN
G
LIS
H
FR
A
N
Ç
A
IS
ES
PA
Ñ
O
L
IT
A
LIA
N
O
D
EU
TS
CH
N
ED
ER
LA
N
D
S
SV
EN
SK
A
РУ
СС
К
И
Й


