background image

o

 (STANDBY)


Press 

o


(Standby)


button for the M17 to be switched ON from 

standby mode. The Power indicator will turn from amber to bright/
white color. 


Pressing 

o


(Standby)


button again switches back M17 to standby 

mode. The Power indicator will illuminate to amber color at standby 
mode. 


The 

o


(Standby) button cannot activate the M17 with the rear 

panel POWER switched off.

IMPORTANT NOTES

•  Refer also to +12V TRIGGER IN (OFF/AUTO) of IDENTIFICATION OF 

CONTROLS - REAR PANEL. 

•  For the 

o

 (Standby) button to activate, two conditions must be 

completed.
a  Plug-in the supplied mains power cord to a mains power source. 

Connect corresponding end of the mains power cord to the AC mains 
input of M17 and the plug connected to a mains power source.

b  The rear panel POWER switch must be set to ON position.
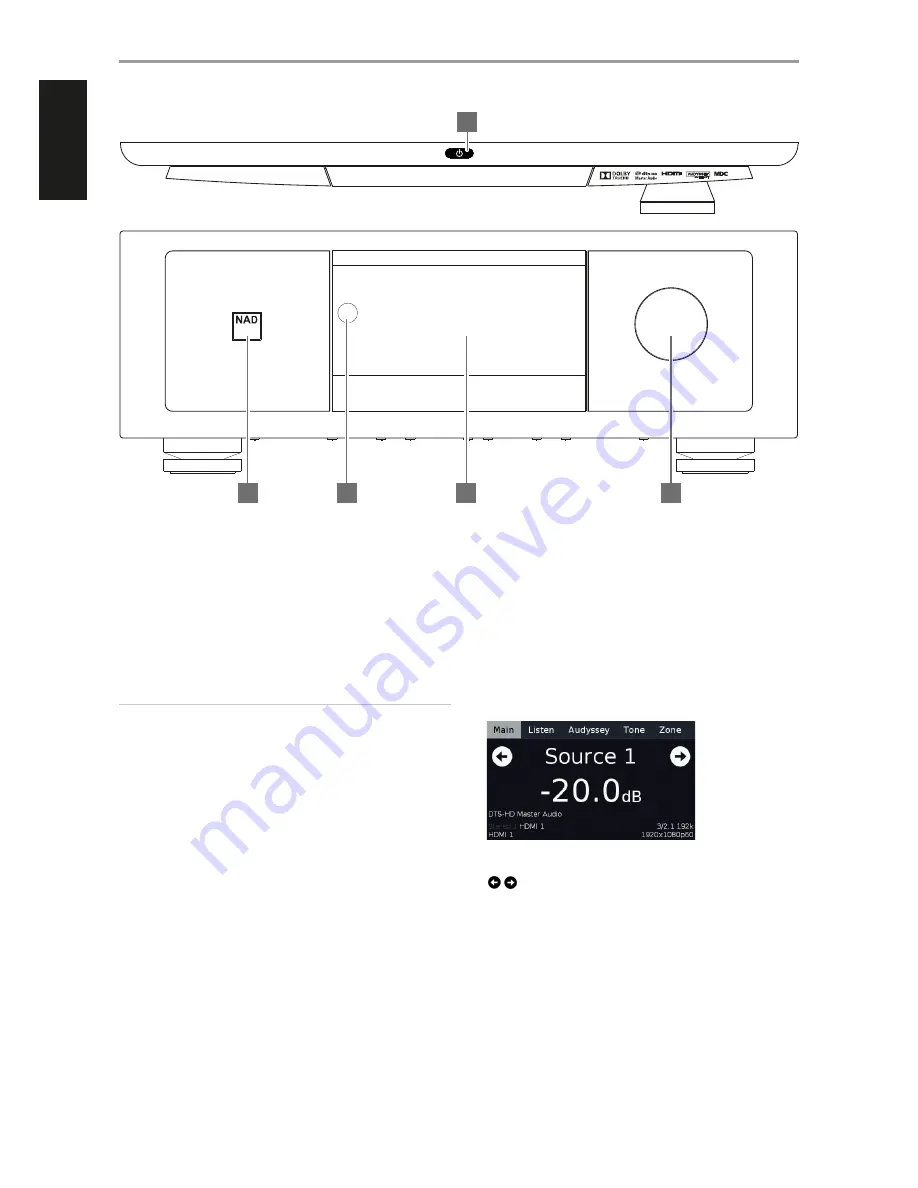
2  POWER INDICATOR 


This indicator will light up amber when the M17 is at standby mode.


When the M17 is powered up from standby mode, this indicator will 
turn from amber to bright/white color.

3  REMOTE SENSOR 


Point the HTRM 2 remote control at the remote sensor and press the 
buttons.


Do not expose the remote sensor of the M17 to a strong light 
source such as direct sunlight or illumination. If you do so, you may 
not be able to operate the M17 with the remote control.  

Distance:

 About 23ft (7m) from the front of the remote sensor.

Angle:

 About 30

o

 in each direction of the front of the remote sensor.

4 DISPLAY


Show visual and menu information according to the display settings 
selected.  


There are four display options – Main, Listen, Audyssey, Tone and 
Zone. 


Use your finger to press and select any of these display options to 
show their corresponding menu options or settings.  

The following are sample screenshots of the four display options with 
corresponding description of the information shown.

MAIN

Source 1:

 Current Source.

-20.0 dB:

 Volume level.


 :

 Go to previous or next Source. 

DTS-HD Master Audio:

 Audio Codec - Detected audio stream format.

HDMI 1/HDMI 1:

 Audio and video input source.

3/2.1 192k:

 Audio Source format; sample rate.

1920x1080p60:

 Video mode - Video resolution of current source with 

frame rate. 

IDENTIFICATION OF CONTROLS

FRONT PANEL

© NAD  M17

M17

av surround sound preamp processor

4

5

2

3

1

6

ENGLISH

FR

ANÇ

AIS

ESP
AÑOL

IT

ALIANO

DEUT

SCH

NEDERL

ANDS

SVENSK

A

РУ

ССКИЙ

Summary of Contents for M17

Page 1: ...ENGLISH FRANÇAIS ESPAÑOL ITALIANO DEUTSCH NEDERLANDS SVENSKA РУССКИЙ Owner s Manual M17 AV Surround Sound Preamp Processor ...

Page 2: ...le 810 of the National Electrical Code ANSI NFPA 70 provides information with regard to proper grounding of the mast and supporting structure grounding of the lead in wire to an antenna discharge unit size of grounding conductors location of antenna discharge unit connection to grounding electrodes and requirements for the grounding electrode NOTE TO CATV SYSTEM INSTALLER Thisreminderisprovidedtoc...

Page 3: ...onnected Consult the dealer or an experienced radio TV technician for help CAUTION Changes or modifications to this equipment not expressly approved by NAD Electronics for compliance could void the user s authority to operate this equipment CAUTION To prevent electric shock match wide blade of plug to wide slot fully insert CAUTION Marking and rating plate can be found at the rear panel of the app...

Page 4: ...NTENTS IMPORTANT SAFETY INSTRUCTIONS 2 INTRODUCTION GETTING STARTED 5 WHAT S IN THE BOX 5 CHOOSING A LOCATION 5 DEFAULT SOURCE SETTINGS 5 RESTORING M17 TO ITS FACTORY DEFAULT SETTINGS 5 IDENTIFICATION OF CONTROLS FRONT PANEL 6 REAR PANEL 8 OPERATION USING THE M17 MAIN MENU 11 ABOUT THE ON SCREEN DISPLAY OSD 11 MAIN MENU 11 LISTENING MODE 11 ADJUSTING LISTENING MODES 12 DSP OPTIONS 13 TONE CONTROLS...

Page 5: ...7 on top of other components but the reverse usually should be avoided DEFAULT SOURCE SETTINGS The following table lists the default SOURCE settings Note that the Audio input settings show both digital and analog audio input Digital input will always take precedence over analog audio input even if both are present Source Audio Input Video Input Source 1 HDMI 1 Audio 1 IN HDMI 1 Source 2 HDMI 2 Aud...

Page 6: ...at the remote sensor and press the buttons Do not expose the remote sensor of the M17 to a strong light source such as direct sunlight or illumination If you do so you may not be able to operate the M17 with the remote control Distance About 23ft 7m from the front of the remote sensor Angle About 30o in each direction of the front of the remote sensor 4 DISPLAY Show visual and menu information acc...

Page 7: ...Slide to turn ON or OFF Tone Controls At OFF setting tone controls are disabled or defeated h Slide to adjust treble bass or dialog level ZONE Slide to turn ON or OFF Zone 2 Go to previous or next Source 5 VOLUME Use this control to adjust the overall loudness of the signal output at AUDIO PRE OUT The default volume level is 20dB IDENTIFICATION OF CONTROLS FRONT PANEL 7 ENGLISH FRANÇAIS ESPAÑOL IT...

Page 8: ...r HTRM 2 s ON OFF button cannot switch ON the M17 from standby mode and vice versa Both control buttons are effectively disabled thereby handling the function of powering up the M17 to an external controller If 12V TRIGGER IN OFF AUTO is set to AUTO powering up the M17 is dependent upon the Auto Trigger In setting at the Trigger Setup menu as well as the absence or presence of 12V at 12V TRIGGER I...

Page 9: ...0V when the unit is either OFF or in standby mode 12V TRIGGER IN With this input triggered by a 12V DC supply the M17 can be switched ON remotely from standby mode by compatible devices such as amplifiers preamplifiers receivers etc If the 12V DC supply is cut off the M17 will return to standby mode Connect this 12V TRIGGER INPUT to the remote device s corresponding 12V DC output jack using a mono...

Page 10: ...he internet connection due to communication errors or malfunctions associated with your broadband internet connection or other connected equipment Contact your Internet Service Provider ISP for assistance or the service bureau of your other equipment Contact your ISP for policies charges content restrictions service limitations bandwidth repair and other related issues pertinent to internet connec...

Page 11: ...STEREO All output is directed to the front left right channels Low frequencies are directed to the subwoofer if one is present in the Speaker settings Select Stereo when you wish to listen to a stereo or monaural production such as music CD or FM broadcast without surround enhancement Stereo recordings whether in PCM digital or analog form and whether surround encoded or not encoded are reproduced...

Page 12: ...s and broadcasts EARS produces a subtle but highly natural and believable ambience from nearly all natural acoustic stereo recordings Typically these include classical jazz and folk genres as well as numerous examples from others Its virtues include realistic stable front stage sonic imaging and spacious but unexaggerated ambient virtual acoustics that remain faithful to the original recording ENH...

Page 13: ...is designed to work in conjunction with Audyssey MultEQ Dynamic EQ determines the proper loudness compensation based on the sound pressure level measurements MultEQ provides Audyssey Dynamic EQ working in tandem with Audyssey MultEQ provides the right listening conditions for every listener at any volume level On Activate Audyssey Dynamic EQ function Off Defeat Audyssey Dynamic EQ function Offset ...

Page 14: ...ls Press TONE again to save the settings and at the same time move on to the next parameter or exit the parameter setting altogether ZONE CONTROLS Depending on the settings made at the separate Zone Setup menu under the Setup Menu section discussion the applicable Zone can be configured and managed via this Zone Controls window Select On to activate the applicable Zone When activated the Source in...

Page 15: ...e external device using any of the device s remote control Off Applies to all CEC options below At Off setting particular CEC feature is defeated Power At On setting the M17 will automatically go to standby mode if it receives a CEC standby command On the other hand if the M17 receives a CEC power up command the M17 will correspondingly switch ON from standby mode Source Switch At On setting the M...

Page 16: ... can be as long as twelve characters The new Name will be shown in the VFD as well as on the OSD ANALOG AUDIO All available analog audio input can be variably assigned to any of the Sources Scroll to Analog Audio press E and then R T to select and assign an analog audio input to the particular Source There are two choices Audio or Off When Audio is chosen press E and then R T to select and assign ...

Page 17: ...an be assigned a stored Preset The parameters set up in the selected Preset number will be adopted into the particular Source it is assigned Please refer to the separate section on A V Presets for further understanding of Preset settings Scrolling to A V Preset and by pressing E and then R T a Source could be assigned a Preset number ranging from Preset 1 to 5 If it is desired not to assign the pa...

Page 18: ... tonal balance of the system Professional Acoustical Engineers often add wall treatments and even move walls and relocate speakers to improve system performance but for the average Home Theatre this is either too expensive or just not a practical solution Audyssey MultEQ XT features adaptive low frequency correction and uses 16x high resolution equalization filters for satellites and subwoofers Us...

Page 19: ...on Filter calculated by NAD M17 Corrected Room Response Flat EQ is a third option but not one that we recommend for listening it is useful for verifying system performance when using external instrumentation Select the Target Curve you find to be most satisfactory by pressing the Audyssey key of the remote The MultEQ XT corrected response can also be bypassed if you wish It is recommended that you...

Page 20: ...s setting You can set Subwoofer to On even with Large front speakers in which case bass content from any channels set to Small will be routed to both the subwoofer and to the front speakers LFE channel signal will pass only to the sub In most subwoofer equipped systems setting front speakers to Small is usually the better option All the speakers low frequency content can be directly adjusted withi...

Page 21: ...aker to listener dimensions of each speaker automatically imposes the correct delays optimizing imaging intelligibility and surround sound ambience Enter your dimensions with precision within about 1 foot 30 cm SETTING SPEAKER DISTANCE While at Speaker Distance menu use the R T keys to individually set Front Left Center Front Right Surround Right Back Right Back Left Surround Left and Subwoofer to...

Page 22: ...s The M17 has three configurable Zones Zone 2 Zone 3 and Zone 4 Use a combination of W E R T and ENTER keys to navigate through the Zone Setup menu parameters VOLUME Zone 2 have Fixed and Variable volume control When set to Variable and while at the Zone Controls menu OSD the Zone 2 Volume level can be adjusted using the HTRM 2 s R T or directly via ZR 7 s VOL d f On the other hand if Volume is se...

Page 23: ... 3 Zone 4 Applicable Zone is turned ON whenever 12V DC is present at Trigger IN All Main Zone 2 Zone 3 and Zone 4 as described above will all be activated given a 12V DC input at Trigger IN WARNING If Auto Trigger In at Trigger Setup menu is assigned to Main or All and the 12V TRIGGER IN switch is set to AUTO mode the Standby button in the front panel as well as the corresponding ON OFF function k...

Page 24: ...bol recorded in Dolby Digital Surround EX With this additional channel you will experience improved dynamics and a better sensation of movement within the sound field If media sources recorded in Dolby Digital EX are decoded with a Digital EX decoder the format is detected automatically and the Dolby Digital EX mode is selected However some media sources recorded in Dolby Digital EX can be detecte...

Page 25: ...s an irreplaceable technology that can reproduce sound faithfully as intended by the creator of music or movies DTS ES EXTENDED SURROUND DTS ES This is a new multi channel digital format which greatly improves the 360 spatial sensation of the Surround impression thanks to the greater space expansion of the surround signals providing high compatibility with the conventional DTS format In addition t...

Page 26: ...e key press The parameters Listening Mode DSP Options and Tone Controls accessible via the Main Menu together with Speaker Setup and Display Setup configurable through Setup Menu are stored together as a single A V Preset You might create one A V Preset optimized for pop music and another for classical One more A V Preset can be set up to recall each family member s favorite setting or one for ful...

Page 27: ...trols Tone Defeat On Display Setup Set Brightness to 3 Speaker Setup from the Speaker Setup menu go to Speaker Configuration sub menu and change Subwoofer from On to Off Front becomes Large 2 With the above settings scroll to A V Presets from the SETUP MENU page Use E to access A V Presets menu OPERATION USING THE M17 SETUP MENU 27 ENGLISH FRANÇAIS ESPAÑOL ITALIANO DEUTSCH NEDERLANDS SVENSKA РУССК...

Page 28: ...control for HTRM 2 A V PSET 1 the above preset values allocated at Preset 1 preset settings as shown in the OSD captures at Step 1 will be recalled and implemented at the current source 4 Now repeat again Step 1 above but this time with the following settings Listening Mode PLIIx Music DSP Options 0ms Tone Controls Tone Defeat Off Display Setup Set Temp Disp to Off 5 With the above settings scroll...

Page 29: ...re the same Speaker Setup settings shown above in Step 1 7 You can setup up to 5 A V Presets These same A V Presets can also be associated defaulted to each Source in the Source Setup Normal View window as below In the above example Preset 1 settings are allocated for Source 1 Whenever Source 1 is accessed the Preset 1 settings will be applied to Source 1 You can still manually override the assign...

Page 30: ...rder for the HTRM 2 to control your specific NAD brand components you may need to load one or more different code libraries see Loading Code Libraries below CONTROLLING THE M17 The HTRM 2 is divided into two main sections Eight Device Selector keys at the top AMP MP TV and so on set the handset s remaining keys to a page of commands to control a particular component A Device Select key determines ...

Page 31: ...h through AMP SURR MODE key to the BD page On the HTRM 2 simultaneously press and hold BD and RES the Learn LED turns steady green Press SURR MODE the Learn LED turns amber Press AMP twice the Learn LED turns green Press BD again to exit the learning mode COPY A COMMAND FROM ANOTHER KEY You may copy a command from any HTRM 2 key to any other To copy a key function after entering the Learning Mode ...

Page 32: ...gthen it still further CONFIGURING KEY ILLUMINATION Keys to Press for 3 seconds Mode DISP Digit Key 0 9 Set key illumination timeout to number of seconds corresponding to digit key Zero turns off the key illumination entirely DISP OFF Disable light sensor Key illumination will turn on with any key press DISP ON Enable light sensor DISP ENTER Set the light sensor threshold to the current light leve...

Page 33: ...25 604 L56 204 5060 605 T513 T514 T515 T517 T524 T533 T534 205 M5 606 L53 BD SEARCH MODE If none of the codes from the table when entered turns on the component and if you are quite sure you have followed the above procedure completely and carefully you may want to try the search method as follows Enter Library Mode by simultaneously pressing and holding for 3 seconds both the desired Device Selec...

Page 34: ... The ZR 7 is a discrete compact remote for controlling the Zone 2 feature of the M17 Irrespective of the main room zone settings the ZR 7 allows full separate control of the Zone 2 source selection among other applicable features 1 ON OFF Switch ON OFF the Zone feature 2 SOURCE d f Select the active input of the NAD M17 that will be sent out to the corresponding rear panel ZONE 2 output port 3 MUT...

Page 35: ...mproperly connected Power up subwoofer check Sub s AC outlet or check connections Subwoofer set to OFF on Speaker Configuration menu Correct Speaker Configuration or Speaker Levels settings Sub level set too low on Speaker Levels menu No sound from Center channel Source is a 2 0 etc Dolby Digital or DTS recording without center channel Play a known 5 1 channel recording or select Dolby Pro Logic I...

Page 36: ...ut M17 Manufactured under license under U S Patent s 5 451 942 5 956 674 5 974 380 5 978 762 6 226 616 6 487 535 7 212 872 7 333 929 7 392 195 7 272 567 other U S and worldwide patents issued pending DTS is a registered trademark and the DTS logos Symbol DTS HD and DTS HD Master Audio are trademarks of DTS Inc 1996 2008 DTS Inc All Rights Reserved Manufactured under license from Dolby Laboratories...

Page 37: ...37 ENGLISH FRANÇAIS ESPAÑOL ITALIANO DEUTSCH NEDERLANDS SVENSKA РУССКИЙ ...

Page 38: ...ional a division of Lenbrook Industries Limited No part of this publication may be reproduced stored or transmitted in any form without the written permission of NAD Electronics International While every effort has been made to ensure the contents are accurate at the time of publication features and specifications may be subject to change without prior notice M17_eng_OM_v07 Jun 2014 ...

Reviews: