


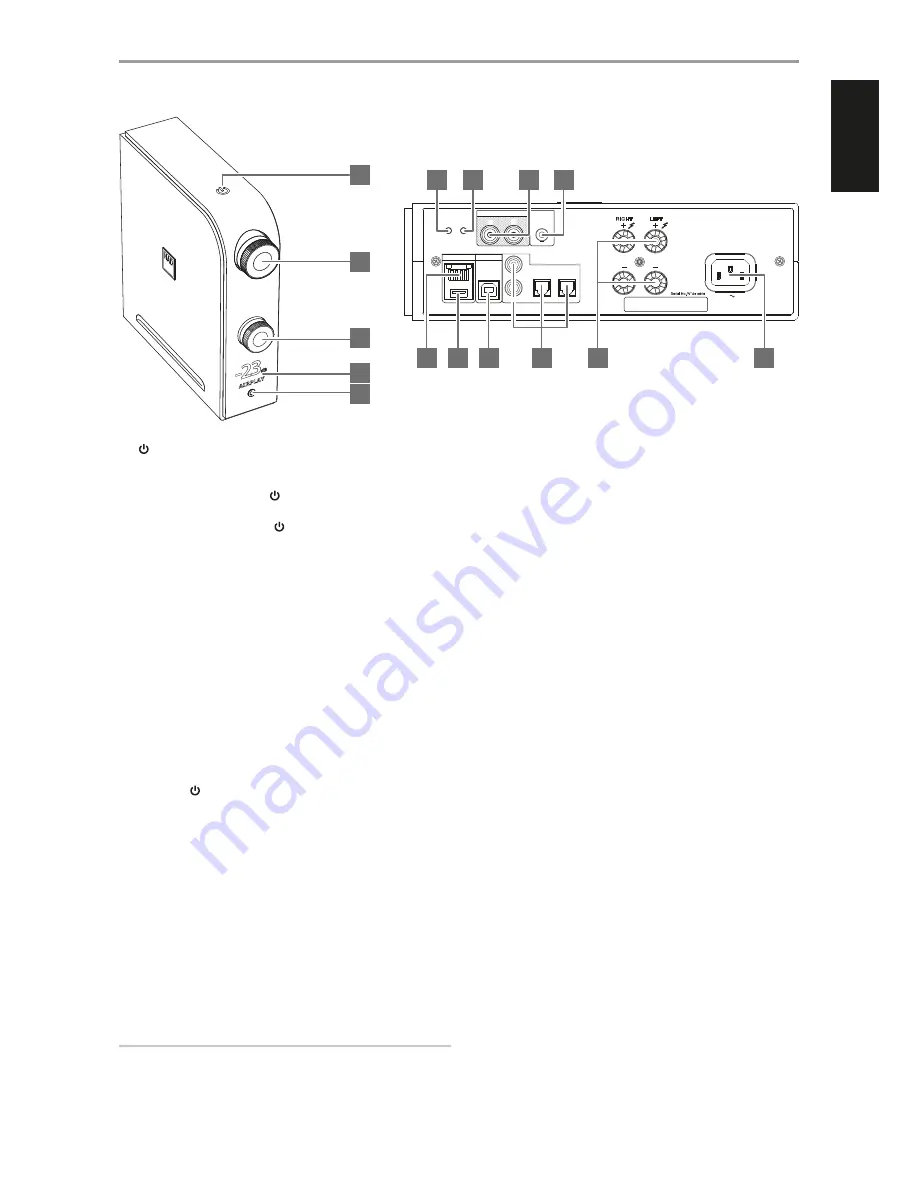
IDENTIFICATION OF CONTROLS
1
(STANDBY)
•
With the corresponding end of the mains power cord connected
to the AC mains input of the D 7050 and the plug connected to a
mains power source, press (Standby) to switch ON the D 7050
from standby mode. The Standby indicator will turn from amber to
bright/white color. Pressing (Standby) again turns the unit back
to standby mode.
IMPORTANT NOTES ABOUT STANDBY MODE
The following conditions describe Standby Mode response with respect
to AUTO SHUTOFF as configured in the D 7050 app. Refer to section below
about "NAD D 7050 APP" for further information.
Condition 1
AUTO SHUTOFF in the D 7050 app is set to “ON”
•
D 7050 will automatically go to standby mode if there are no user
interface interaction and no active source within 30 minutes.
Condition 2
AUTO SHUTOFF in the D 7050 app is set to “OFF” or no D 7050 app is used
to control the D 7050
•
D 7050 will not go to standby mode at any time unless directly initiated
by pressing (Standby) switch or OFF from the remote control.
•
The default setting of AUTO SHUTOFF is OFF.
2 VOLUME
•
Adjust audio level by turning clockwise or counterclockwise.
3 S (SOURCE)
•
Rotate to select desired Source.
4 DISPLAY
•
Illuminate the selected or active Source (COAXIAL1, COAXIAL2,
OPTICAL1, OPTICAL2, COMPUTER, AIRPLAY, DOCK, BT) and current
audio level.
•
Display follows the orientation of the unit - vertical or horizontal
view as shown on the front cover.
IMPORTANT NOTE
Display shall temporarily turn off if there is no user interface interaction
within 5 minutes. Restore display by sending a remote control
command or rotating any of the controls.
5 PHONES
•
A 3.5 mm stereo jack socket is supplied for headphone listening.
•
Specially designed low noise headphone circuitry can accommodate a
wide range of phones, even 600 Ohm studio models.
•
Ensure that the volume control is turned to minimum (fully
counterclockwise) before connecting or disconnecting
headphones. Listening at high levels can damage your hearing.
•
Inserting a headphone jack into this socket automatically switches
off the loudspeakers.
6 RESET
•
Restore factory default settings.
7 WPS/JB
•
Use to setup wireless network connection.
8 AUDIO OUT
•
These output terminals have dual function. They are used either as
PRE OUT or SUBWOOFER terminals.
•
Always turn OFF the D 7050 and associated external devices before
connecting or disconnecting anything to the AUDIO OUT sockets.
PRE OUT
•
The AUDIO OUT sockets can be used to drive an additional amplifier.
Use a dual RCA cable to connect AUDIO OUT to the corresponding
analog audio input of compatible devices such as amplifiers,
receivers or other applicable devices.
•
AUDIO OUT will be affected by the D 7050’s volume control settings.
Rotate the VOLUME control to adjust the output level of the AUDIO
OUT sockets.
SUBWOOFER
•
Use a dual RCA cable to connect AUDIO OUT to the low level input
of a powered subwoofer.
•
Low frequency information up to 200Hz is sent to the connected
subwoofer via AUDIO OUT.
9 +12V TRIGGER IN
•
Connect this +12V Trigger input to the remote device’s
corresp12V DC output jack using a mono cable with
3.5mm male plug. The controlling device must be equipped with a
+12V trigger output to use this feature.
AUDIO OUT
+12V
TRIGGER
IN
OPTICAL
COMPUTER
DIGITAL AUDIO INPUT
LAN
100-240V 50/60Hz
SPEAKERS
RIGHT
LEFT
WPS/JB
RESET
2
1
1
2
L
R
COAXIAL
6
7
8
9
10
11
12
13
14
15
2
1
3
4
5
5
ENGLISH
POR
TUGUÊS
FR
ANÇ
AIS
ESP
AÑOL
IT
ALIANO
DEUT
SCH
NEDERL
ANDS
SVENSK
A
РУ
ССКИЙ


