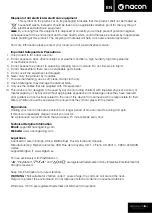
Nacon Revolution Pro User Manual Download Page 16

Image 4

1

2

3

4

5

n

EN

4. PC COMPANION APP

The main screen (Image 4) of the PC companion app will allow you to switch between the different settings. 

1. 

PROFILE BAR:

 switch between the settings of the profiles from 1 to 4. 

    The GENERAL SETTINGS tab allows you to set some settings applied on all the profiles (Backlights, Vibration etc.). 

    You will also have the possibility to check if new firmware is available. 

2. 

PROFILE MANAGEMENT:


a. 

Controller Profiles:

 displays the profiles you already have in your controller. 

b. 

My Profiles:

 displays the profiles you have created and saved on your computer.

c. 

Download:

 displays the available profiles that you can download from the NACON website. 

d. 

Nacon Profiles:

 displays the profiles you have downloaded from the NACON website.  

3. 

CREATE YOUR PROFILE:

 by pressing the “NEW” button you will create a new profile 

    which is stored on your computer. 

4. 

FEATURE SETTINGS:

 configure different settings of your controller: 

a. 

Right Joystick:

 set the response curve of the right analogue stick and also the static dead zone. 

b. 

Mapping:

 this feature allows you to remap buttons on the controller and assign macros 

                     to the 4x shortcut buttons. 

c. 

Triggers:

 personalise the response of the triggers.

d. 

Macros:

 create macros - sequences of buttons or actions that you can assign to a single button press. 

5. 

QUICK SETTINGS

 and 

ACTIVATE PROFILES:


a. The 

Quick settings

 are there to allow a quick configuration of your controller.

b. 

Activate Profiles:

 this button will load the 4x current profiles used on the PC companion app 

                                  into your controller.

To switch between the profiles, (in Advanced mode), press the “Profile” button on the back of the controller. 

The “Profile” LED will light up to show which profile is selected.

Summary of Contents for Revolution Pro

Page 1: ...BB4431...

Page 2: ...n DE...

Page 3: ...vexer rechter Dual Analog Stick mit R3 Taste Amplitude 46 9 8 Wege Steuerkreuz 10 LED Spielerstatus Anzeige 11 Gewichtsf cher 12 Profil Anzeige LEDs 13 Headset Anschluss 3 5 mm Klinkenbuchse 14 R1 Tas...

Page 4: ...wicht Ihres Controllers zu ndern m ssen Sie 1 Den beiliegenden Schl ssel in den Schlitz des Gewichtsfachs am Ende jedes Handgriffs stecken 2 90 in Richtung des u eren Randes des Handgriffs drehen 3 Da...

Page 5: ...s kostenlos durch ein gleiches oder hnliches Modell unserer Wahl ersetzt Diese Garantie gilt nicht f r M ngel die durch zuf llige Besch digung unsachgem e Verwendung oder Verschlei entstehen und steht...

Page 6: ...tecken Sie den Controller in einen freien USB Anschluss Ihres PlayStation 4 Systems und stellen Sie sicher dass Sie die Sticks oder Trigger nicht ber hren Dr cken Sie die PS Taste Die LED Spielerstatu...

Page 7: ...e die PC Software heruntergeladen und gestartet haben folgen Sie den Anweisungen auf dem Bildschirm f r die Installation Nach Installation der Software k nnen Sie Folgendes tun Die Einstellungen des r...

Page 8: ...r cken der Schaltfl che NEU erstellen Sie ein neues Profil das auf Ihrem Computer gespeichert wird 4 ALLGEMEINE EINSTELLUNGEN Konfigurieren Sie verschiedene Einstellungen Ihres Controllers a Rechter S...

Page 9: ...ichen Position f r eine l ngere Zeit kann Schmerzen verursachen Wenn diese Schmerzen h ufig auftreten unterbrechen Sie sofort Ihr Spiel und sprechen Sie mit Ihrem Arzt Wir empfehlen eine Pause von 15...

Page 10: ...n EN...

Page 11: ...and 46 degrees of amplitude 9 Directional pad 10 LED player status indicator 11 Weight compartment 12 Profile LEDs 13 Headset connector 3 5mm jack 14 R1 Shoulder button 15 R2 Analogue trigger 16 L1 Sh...

Page 12: ...weight of your controller you need to 1 Insert the key provided into the slot of the weight compartment located at the end of each hand grip 2 Turn through 90 towards the outside edge of the hand gri...

Page 13: ...ame or a similar model at our option free of charge if there is a defect due to faulty material or workmanship This guarantee does not cover defects arising from accidental damage misuse or wear and t...

Page 14: ...use damage see Image 3 Plug the controller into a free USB port on any PlayStation 4 system ensuring that you do not touch the analogue sticks or triggers Press the PS button The LED player status ind...

Page 15: ...ou have downloaded the PC companion app and launched it follow the onscreen instructions for the installation After installing the PC companion app you will be able to do the following Adjust the sett...

Page 16: ...e 3 CREATE YOUR PROFILE by pressing the NEW button you will create a new profile which is stored on your computer 4 FEATURE SETTINGS configure different settings of your controller a Right Joystick se...

Page 17: ...d with this equipment This device is not designed to be used by anyone including children with impaired physical sensory or mental capacity or by anyone without appropriate experience or knowledge unl...

Page 18: ...http nacongaming com...

Reviews: