Nac EMR-9 Quick Start Manual Download Page 20


EMR-9 Quick Start Guide 

__________________________________________________________________________________________________________________________  


20


(00175)D 

2

2

.

.

7

7


M

M

e

e

a

a

s

s

u

u

r

r

e

e

m

m

e

e

n

n

t

t


a

a

n

n

d

d


R

R

e

e

c

c

o

o

r

r

d

d

i

i

n

n

g

g


(

(

D

D

a

a

t

t

a

a


S

S

t

t

o

o

r

r

a

a

g

g

e

e

)

)


1.  Eye Mark Mode 

Immediately after the calibration, the eye mark (the gazing point of the subject) appears on 

the view image. This state is called as Eye Mark mode (but the data recording is not made in this 

mode). In the Eye Mark mode, you can display eye marks (a left, a right and/or a compensated 

eye mark(s)), trajectory of eye mark, real time fixation points.   


2. Recording 

Then (in the Eye Mark Mode), push the REC Key 

  to start the recording. The data is 

recorded on the SD card. 


Note: 

You can record the eye marks which are superimposed on the view image. However, there 

is a time rag up to 3/29.97sec between the eye marks and the view image. 


You cannot record the trajectory of the eye marks and the fixation points superimposed on 

the view image to the SD card. But you can display those on view image using optional 

EMR-dFactory software. 


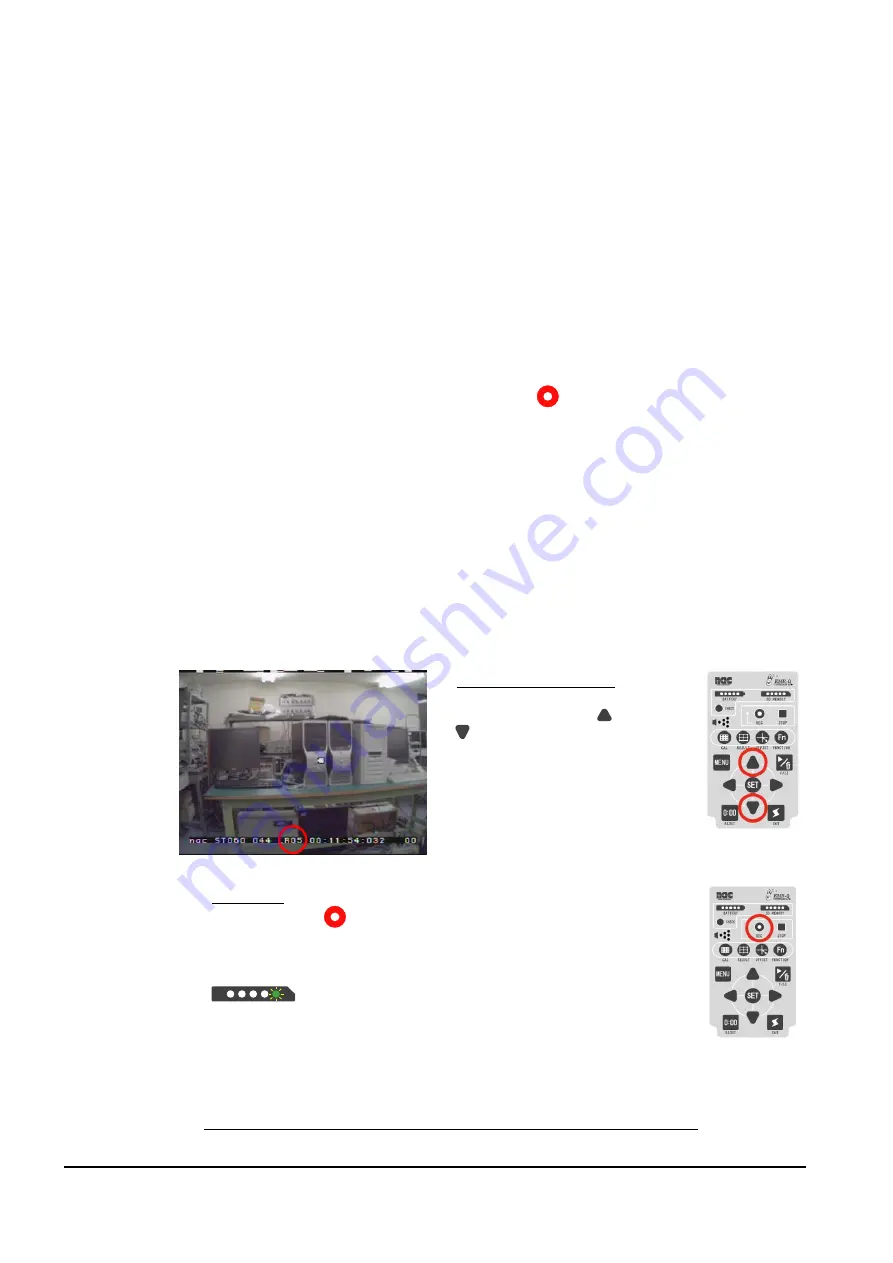
1) Scene Number Setting 

You can change the scene 
number by the UP 

 or DOWN 

 keys. 


2) Recording 

Push the REC 

  key to start the recording. The data is recorded 

on the SD card. 

 
During the recording, an access lamp of SD indicator LED flashes. 


During the recording, the trajectory or fixation points are not 
displayed. 
 
Remarks: During the recording, the recording is stopped if you push 
either [CAL] or [RESULT]


or [OFFSET] or [MENU] or [FILE] key. 


Summary of Contents for EMR-9

Page 1: ..._______________________________________________________________ 00175 D 1 N NA AC C E Ey ye e M Ma ar rk k R Re ec co or rd de er r E EM MR R 9 9 Q Qu ui ic ck k S St ta ar rt t G Gu ui id de e M Ma a...

Page 2: ...er ra at ti io on ns s 2 2 1 1 C Co on nn ne ec ct ti io on n 2 2 2 2 C Co on nt tr ro ol ll le er r k ke ey y f fu un nc ct ti io on ns s 2 2 3 3 H He ea ad d u un ni it t a ad dj ju us st tm me en n...

Page 3: ...______________________________________________________ 00175 D 3 1 1 S Sy ys st te em m C Co on nf fi ig gu ur ra at ti io on ns s 1 1 Standard Configuration Head Unit Cap Type Glasses Type see 1 2 Co...

Page 4: ...ye Detector 1 x Left Eye Detector 1 x Head Unit 1 x Right Eye Detector 1 x Left Eye Detector Cap Type Right Eye Detection Glasses Type Right Eye Detection 1 x Head Unit 1 x Right Eye Detector 1 x Head...

Page 5: ...______________________________ 00175 D 5 1 3 Optional Items LCD Viewfinder Battery Charger View Lens 44deg 62deg 92deg 121deg Pointer Serial Cable Cue Switch Event Reset Cable Head Unit Extension Cabl...

Page 6: ...o an AV out of the Controller by the AV cable 4 Insert a SD card specified one to a SD slot of the Controller 5 Connect the AC adapter to the Controller You can use a battery pack instead of the AC Ad...

Page 7: ...g out in 5min it indicates in red Battery SD Card Check Key Push this key check the amount of the battery and SD Card REC LED It turns on during the recording CAL Key It enters exits the calibration m...

Page 8: ...ns Set the parameters regarding configuration according to system configuration Following shows the path of essential parameters Push the key to enter exit Menu mode Go to and or change the parameters...

Page 9: ...___ 00175 D 9 3 View Lens Menu System Lens 44 62 92 121 4 Eye to be detected Menu User Eye L R RL 2 Head Unit Adjustments in case of the Cap Type 1 Push the key to enter Menu mode In Menu mode a LED o...

Page 10: ...__________________________________________ 10 00175 D 2 Wear the Head Unit as shown in the following pictures 3 Push the key to get back the view image 4 Adjust the view camera position so that an obj...

Page 11: ..._______________ 00175 D 11 3 Head Unit Adjustments in case of the Glasses Type 1 Push the key to enter Menu mode In Menu mode a LED of eye detector is off and a subject can ware the Head Unit safely O...

Page 12: ..._______________________________________________________________________ 12 00175 D 3 Push the key to get back the view image 4 Adjust a view camera position so that an object in the view image becomes...

Page 13: ...u us st tm me en nt ts s 1 Display an eye image on the monitor You can change the monitor image by pushing the LEFT or RIGHT keys Ex View image Right Eye Left Eye Quad image View image 2 Verify if an...

Page 14: ...binary image adjustment enter Menu and go to Menu User Pupil THR AUTO Binary image adjustment automatically starts when you enter the calibration mode then goes back to the calibration mode upon comp...

Page 15: ...je by pushing the UP or DOWN keys Note The key will not be used for parameter settings 2 Display an eye image to be adjusted on the monitor You can change the monitor image by pushing the LEFT or RIGH...

Page 16: ...ameter may be measured bit smaller than actual OK Fine OK Acceptable though bit strong OK Acceptable though bit strong NG Strong NG Too strong 4 Adjust the binary image level by pushing the UP or DOWN...

Page 17: ...image by pushing the LEFT or RIGHT keys Ex View image Right Eye Left Eye Quad image View image Note To show the cross lines go to Menu System Algorism When you select STD or PUPIL the cross lines of b...

Page 18: ...subject see the pointed CAL mark calibration target point push the CUE key or the Cue switch Then the calibration target point moves to next CAL mark 4 Repeat seeing the pointed CAL mark and pushing...

Page 19: ...K or NG as follows If the lines are on all of 9 CAL marks the calibration went well On the other hand if the lines are not on or are away from one some of 9 CAL marks the calibration was NG OK 1 Push...

Page 20: ...ode push the REC Key to start the recording The data is recorded on the SD card Note You can record the eye marks which are superimposed on the view image However there is a time rag up to 3 29 97sec...

Reviews: