


Chapter 7 Maintenance and Inspection
30
Lubricant replacement procedure
7.4.3.
This section describes how to replace lubricants.
Perform steps 1 to 11 by taking care regarding the following precautions.
• When handling the lubricant, be sure to wear protective goggles and rubber gloves.
When replacing the lubricant, turn OFF the power source (e.g., power supply) and execute
lock-out/tag-out so that the power will not be turned ON by accident. Otherwise, you could be caught
by the rotation section, which will result in injury.
If the lubricant gets in your eyes or touches your skin, it could cause inflammation.
When the safety cover near the reduction gear has been removed for replacement/maintenance of
lubricant, be sure to return them to their original positions after the procedure.
If the lubricant is overfilled, there is a possibility of high internal pressure and that an oil seal could
fall off, the lip could be reversed, or lubricant could leak. If the lubricant is insufficient, a lubrication
failure could occur and the reduction gear could be damaged.
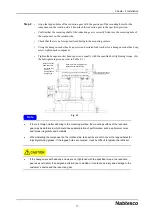
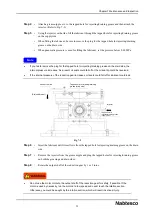
Step 1
• Rotate the output shaft of the reduction gear so that the tapped holes for injecting/draining grease
are positioned diagonally.
(When rotating the output shaft using electric power, do not approach the equipment and reduction
gear. When rotating the output shaft without using electric power, perform step 2 first.)
Step 2
• Turn OFF the power to the device and confirm that the device is completely stopped.
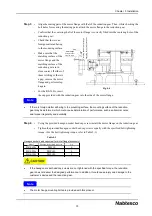
Step 3
• Remove both of the plugs for the tapped holes for injecting/draining grease, and drain the lubricant
from the upper tapped hole for injecting/draining grease.
• Always drain the lubricant while the reduction gear is cool.
• Check the amount of drained lubricant by catching it with a container, etc., in order to control the
same amount of lubricant to be drained and filled.
If a tapped hole for injecting/draining grease is unplugged while the reduction gear is still hot,
high-temperature lubricant sprays out, which could cause burns.
Note