05
04
5.0 Controls
KICKSPACE
®
500E ECO & 600E ECO
KICKSPACE
®
500E ECO & 600E ECO
5.0 Controls
(continued...)
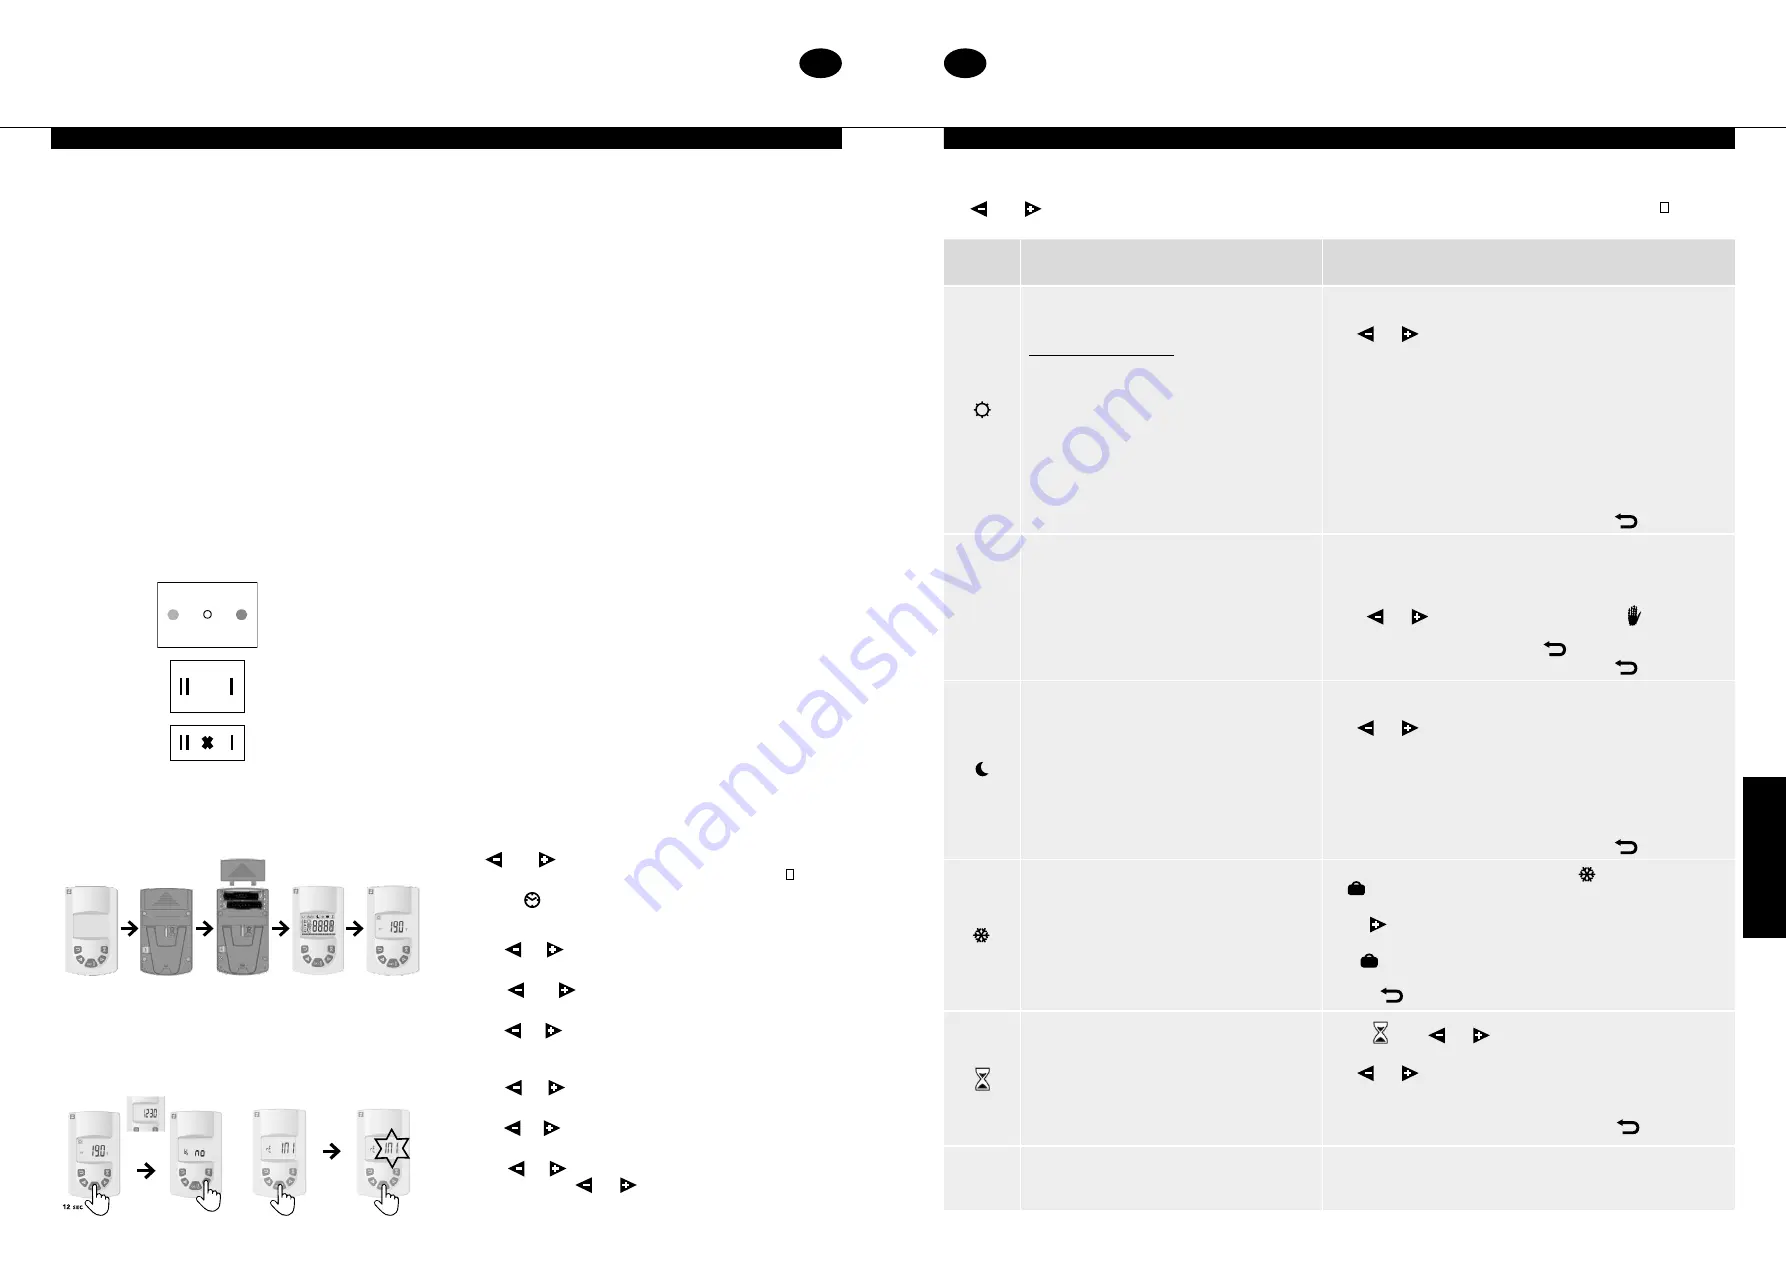
This unit is controlled by the switches on the front of the unit
(see Fig. 3) and a wireless programmable thermostat.
The wireless programmable thermostat includes many features
and also ensures the electric KICKSPACE
®
products comply with
the
Commision Regulation (EU) 2015/1188
. These features
can be identified on the display of the wireless programmable
thermostat (see Fig. 4).
Locating the Wireless Programmable Thermostat
The wireless programmable thermostat includes a flip out stand
and can be freestanding in a suitable location. Alternatively it
can be wall mounted, fitting instructions can be seen in Fig. 5.
Wherever the wireless programmable thermostat is mounted/
used it should be out of direct sunlight, away from draughty
areas and clear of any potential heat sources. For optimum use
the thermostat should be fitted at a height of 1.5m from the
floor (see Fig. 6).
First use of the Wireless Programmable Thermostat
The KICKSPACE
®
unit will only run in ‘Fan Only’ mode without
pairing the remote control unit. Once paired, the KICKSPACE
®
will be able to operate in ‘Heating’ mode, also.
To pair the remote to the KICKSPACE
®
; ensure that the
KICKSPACE
®
unit is energised and the ‘Heating System’ switch
on the unit is switched to ‘Heating’ mode (red dot).
Remove the plastic insulator in the battery compartment to
activate the remote control. The remote will show the software
version number briefly and then show the ‘Comfort Mode’
factory default setting of 19°C.
Note:
Leave the remote unit in ‘Comfort Mode’ to access the
menu for pairing.
Pairing is done by accessing “rF ini” in the ‘Installer Parameters’
menu. To access the Parameters menu, press and hold the ‘OK’
button for approx. 12 seconds.
After 3 seconds of pressing the ‘OK’ button, the screen will
display the time, continue to press ‘OK’ for a further 7-8 seconds
until “bl no” is displayed. Release the ‘OK’ button. Click the (+)
arrow to bring up “rF ini”.
Click ‘OK’ on “rF ini” and it will begin to flash while connecting
to the KICKSPACE
®
. Once connected it will automatically
redirect you to the main display.
Note:
If no connection is made after approx.. 1min, “rF ini” will
stop flashing.
Once the KICKSPACE
®
and remote control unit have paired you
will notice the following changes:
1. The parameters menu has changed to a reduced KICKSPACE
®
only menu as detailed in section 5.0.
2. The remote default set temperatures change, so for example in
‘Comfort Mode’ the initial default of 19 °C changes to 21 °C.
Please Note:
The room temperature sensor is in the remote
control and handling of the remote control during the pairing
process can increase the sensor temperature, preventing
the KICKSPACE
®
from operating if the standard ‘Comfort’
temperature is still set at 21°C.
If the KICKSPACE
®
is either switched off or into ‘Fan Only’
mode, the pairing between with KICKSPACE
®
is temporarily lost.
However, provided that the remote control remains active the
pairing will automatically be re-established if the KICKSPACE
®
is
subsequently switched back into ‘Heating’ mode. Reconnection
may take up to 5 minutes.
If No Connection Is Made?
If the remote control unit and the KICKSPACE
®
do not pair there
a few things you may want to try:
1. Repeat the pairing procedure.
2. Double check that the KICKSPACE
®
has the Heating System
Switch set to ‘Heating’ (red dot).
3. Isolate the power supply to the KICKSPACE
®
for at least 30
secs to clear any ‘bugs’, and remove the batteries from the
remote control unit for the same period, then repeat the
pairing procedure.
Setting the date and time
Use
and
keys to choose from the following parameters.
A function is selected when the icon is surrounded by .
1. Select
and press OK.
2. Press
(OK)
the hours will begin to blink.
3. Use or to change the hour and press
(OK)
to confirm,
the minutes will then begin to blink.
4. Use or to change the minutes and press
(OK)
to
confirm, the day number will then display.
5. Use or to change the day number, with Monday being
1 and press
(OK)
to confirm, the date and month will then
display and the day will begin to blink.
6. Use or to change the day and press
(OK)
to confirm,
the month will then begin to blink.
7. Use or to change the month and press
(OK)
to confirm,
the year will then display and begin to blink.
8. Use
or
to change the year and press
(OK)
to confirm,
and then scrolll
or
to go back to the main menu.
5.0
Operating Modes
Use
and
keys to choose from the following parameters. A function is selected when the icon is surrounded by .
Function
Description
Adjustment
Comfort Mode
Provides room temperature control for when
the room is occupied (see Fig. 3).
Heating mode – Electric
To enter this mode:
• Set the fan only/off/heating switch to
heating (red dot)
• Set the output switch to position I
• Select the fan speed switch to position I
The unit will now run on low speed.
To operate the 500E ECO at 2kW or the 600E
ECO at 3kW:
• Set the output switch to position II
The unit will now run on high output.
The display will show the ambient temperature.
Press OK, set temperature will begin to blink.
Use
or
to adjust the required room temperature.
Press OK to confirm.
The ambient room temperature will then display.
Default s21°C
Max temp s30°C
Min temp s5.5°C
Note: The thermostat has a LED indicator that will change colour
depending on the following:
≤
21.0°C = Green
21.5°C - 24.0°C = Orange
≥
24.5°C = Red
Note: To see the set temperature simply press
.
Auto
Automatic Setting
The unit will run according to one of the 9
preset timed programmes, or one of the 4 user
defined programmes.
See page 6 for ‘Programme Mode’ setup.
Note: When in AUTO mode it is possible to override by selecting
a new temperature. To do this while in AUTO mode, press (OK),
the temperature will begin to blink, change the temperature
using
or
and press (OK) to confirm. The
symbol will
display showing the override and this will last for 2 hours. To
remove the override you can press
.
Note: To see the set temperature simply press
again.
Night Set-back Setting
Provides room temperature controls for when
the room is not occupied.
The display will show the ambient temperature.
Press (OK), set temperature will begin to blink.
Use
or
to adjust the required room temperature.
Press (OK) to confirm.
The ambient room temperature will then display.
Default s19°C
Max temp s19°C - night set back temperature can not be
higher than comfort mode set point.
Min temp s5.5°C
Note: To see the set temperature simply press
.
Holiday Function
Provides frost protection or overheat
protection during periods of absence (holiday).
• For permanent frost protection select
and press (OK).
is shown in permanent frost protection.
• For holiday frost protection press (OK) again, ‘no’ will blink.
Press
button to increase number of hours (1-24)/days (1-99),
and press (OK) to confirm. Thermostat is now in holiday mode.
The
will blink and will continue to blink until the timer ends.
It is possible to exit the holiday function by pressing and
holding
for 2 seconds.
Boost Function
Brings the unit on irrespective of the
programme or temperature setting for a
predefined period.
Default is 30 minutes.
Can be used in Comfort, Auto,
Night Set-Back mode.
Select using or or directly using button 20.
The time period in minutes will blink.
Use
or
to adjust time by increments of 10 minutes.
Press (OK) to confirm, the hourglass will begin to blink
and countdown.
It is possible to exit boost function by pressing
.
P
Programme Menu
Provides choice from 9 pre-programmed and
4 user defined timed programmes.
Refer to following page.
Heating System
Switch
Fan only / Off / Heating
Blue dot (B) / O / Red dot (R)
Boost / Low
II / I
Boost / Normal
II / I
Heating Selector
Switch
Fan Only Speed
Switch
(B)
(OFF)
(R)
EN
EN


