


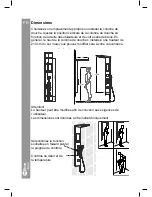

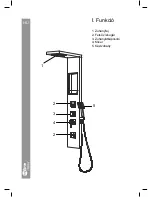


Select the shower function
Volume and temperature control
required by rotating the control knobs.
175cm
160cm
22cm
54cm
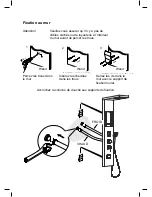
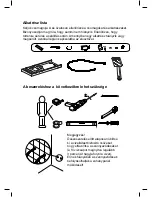
N o t e !
Before drilling any holes for fixing your shower panel ensure that
there are no hidden cables or pipework within the wall.
COLD
HOT
Wall-mounting
Insert the wall plugs inside
the holes
Tighten the screws to the wall
with wall mounting brackets
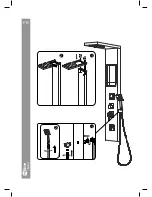
Note!
The height can be altered to suidt individual requirements.
The dimensions are for reference only.
1
2
3
wall
Drill the holes in the wall
Hang the shower panel on the mounting bracket
wall
wall
6mm Drill
25mm
Dimensions
Choose a suitable place to install the shower panel, adjust the shower panel’s
vertical position based on the user’s height and your sanitary room. Usually,
install the panels at the distance of 210cm from the top to the ground, but you
can assemble according to your preference.
10
60
m
m
14
5m
m
Select the shower function
Volume and temperature control
required by rotating the control knobs.
175cm
160cm
22cm
54cm
N o t e !
Before drilling any holes for fixing your shower panel ensure that
there are no hidden cables or pipework within the wall.
COLD
HOT
Wall-mounting
Insert the wall plugs inside
the holes
Tighten the screws to the wall
with wall mounting brackets
Note!
The height can be altered to suidt individual requirements.
The dimensions are for reference only.
1
2
3
wall
Drill the holes in the wall
Hang the shower panel on the mounting bracket
wall
wall
6mm Drill
25mm
Dimensions
Choose a suitable place to install the shower panel, adjust the shower panel’s
vertical position based on the user’s height and your sanitary room. Usually,
install the panels at the distance of 210cm from the top to the ground, but you
can assemble according to your preference.
10
60
m
m
14
5m
m
FR
Dimensions
Choisissez un emplacement approprié où installer la colonne de
douche. Ajustez la position verticale de la colonne de douche en
fonction de la taille des utilisateurs et de votre salle de bains. En
général, le haut de la colonne de douche s´installe à une hauteur de
210 cm du sol, mais vous pouvez modifier cela à votre convenance.
Attention!
La hauteur peut être modifiée afin de convenir aux exigences de
l´utilisateur.
Les dimensions sont données à titre indicatif uniquement.
Sélectionnez la fonction
souhaitée en faisant pivoter
la poignée de contrôle
Contrôle du débit et de
la température
Summary of Contents for Modica
Page 2: ......
Page 3: ...1400mm 220mm 520mm 520 220 1400 ...
Page 6: ...2 1 water ater to k open e dirt unction 2 1 EN ...
Page 9: ......
Page 12: ...2 1 water ater to k open e dirt unction 2 1 DE ...
Page 15: ......
Page 18: ...2 1 water ater to k open e dirt unction 2 1 FR ...
Page 21: ......
Page 24: ...2 1 water ater to k open e dirt unction 2 1 HU ...
Page 27: ......
Page 28: ......