background image


PREPARATION 

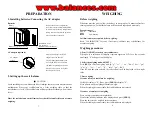
1.Installing batteries/Connecting the AC adaptor          

Batteries 

  Battery                                                                                Remove the battery compartment   
  compartment                                                                      cover and insert six batteries(R6P/LR6 
                                                                                              /AAsize) into the battery compartment, 

                                                                                              taking extreme care that the polarities   

                                                                                              plus and minus is observed. 


  R6P/LR6/AA size 

                                                                            Dry batteries. 
 Battery compartment cover               (batteries are not included) 


AC adapter (optional) 


     Plug the AC adapter to the AC 

      AC adaptor                                                           


adapter socket on the side. 

      socket                                                                     


The AC input requirement could 

                                               be 110,120,220,230 or 240Volts 

                                                                                              (50/60Hz) depending on the area 

                                                                                              where used, so please verify that 

                                                                                              the adaptor is correct 


2.Setting up the scale/balance 
 

!


CAUTION 

Avoid installing the scale/balance in direct sunlight, that may cause discoloration or 
malfunctions. Place your scale/balance on a firm weighing table so that the 
scale/balance is level. (The scale/balance will not perform accurately when it is not 
level.) 
 

Place the scale/balance on the firm surface that is flat and level for an accurate 

weighing. 


WEIGHING 


Before weighing 


Whenever possible, please allow the balance to warm up for 10 minutes after first 
turning to power on, so that the balance will function. Properly and accurately. 
 

Error messages 

EEEE:    Overload 

:     Low battery 


Calibration may be required before weighing. 

Read "CALIBRATION" first and if necessary, calibrate your scale/balance for 
accurate weighing. 
 

Weighing procedures 


1.


Press [ON/OFF] to turn on the scale/balance. 

When power is turned on, all display segments appear on LCD for a few seconds 
and finally "0" will appear on the display. 


2.


Select the weighing unit with [SET]. 

Press 

[SET]

 to select a weighing unit, eg. "g"

" ct " 

" oz "

" dwt "

"ozt"

"gn"

"n" or "g"

" ct " 

" oz "

" tl "

"tola"

"gn"

"dwt". 

Once the unit has been selected, the selected unit will be displayed to the weight 
value. 


3.


Start weighing   

If you do not use a container for weighing, 
 

Verify the reading is "0". If not, press

 [ZERO] 

to display "0". 

Place objects on the weighing platform to weigh. 
When the reading becomes stable, the stable indicator is displayed. 


If you use a container for weighing, 
 

Place an empty container on the platform. 
Wait for the stability indicator to be displayed and press 

[ZERO]

Place the objects to be weighed in the container. 
When the reading becomes stable, the stable indicator is displayed. 

Summary of Contents for iBalance i5500

Page 1: ...cedure If necessary press ZERO key to set the display to 0 3 Place a given number of samples of an item on the pan the Sample Size should be either 10 20 50 or 100 pieces The weight of these samples will show on the display 4 Press the UNIT key several times to put the scale in PCS mode 5 Select the sample size the same as you chose above by pressing the PCS key press it as many times as necessary...

Page 2: ...causes damage if inside of the scale balance is wet Matter charged static electricity could influence the weighing Discharge the static electricity As example the method is to use the electrification prevention spray to spray it to both side of weighing platform 1 SPECIFICATIONS Model number i5500 Capacity 100g Division 0 005g Platter Tray 140 165mm Net gross weight 510 620g Standard carton 29 22 ...

Page 3: ... the scale OFF Press the ON OFF key then turn it back ON and check some weight readings If calibration is still incorrect repeat calibration but try it more slowly FEATURES z Auto shut off optional Auto calibration z Auto zero tracking Auto backlight optional z Low batter indication g oz lb ozt gn dwt ct n or z Large LCD 6digits 15 mm high g ct oz tl tola gn dwt z Large square weighting pan conver...

Page 4: ... possible please allow the balance to warm up for 10 minutes after first turning to power on so that the balance will function Properly and accurately Error messages EEEE Overload Low battery Calibration may be required before weighing Read CALIBRATION first and if necessary calibrate your scale balance for accurate weighing Weighing procedures 1 Press ON OFF to turn on the scale balance When powe...

Reviews: