background image

page 4


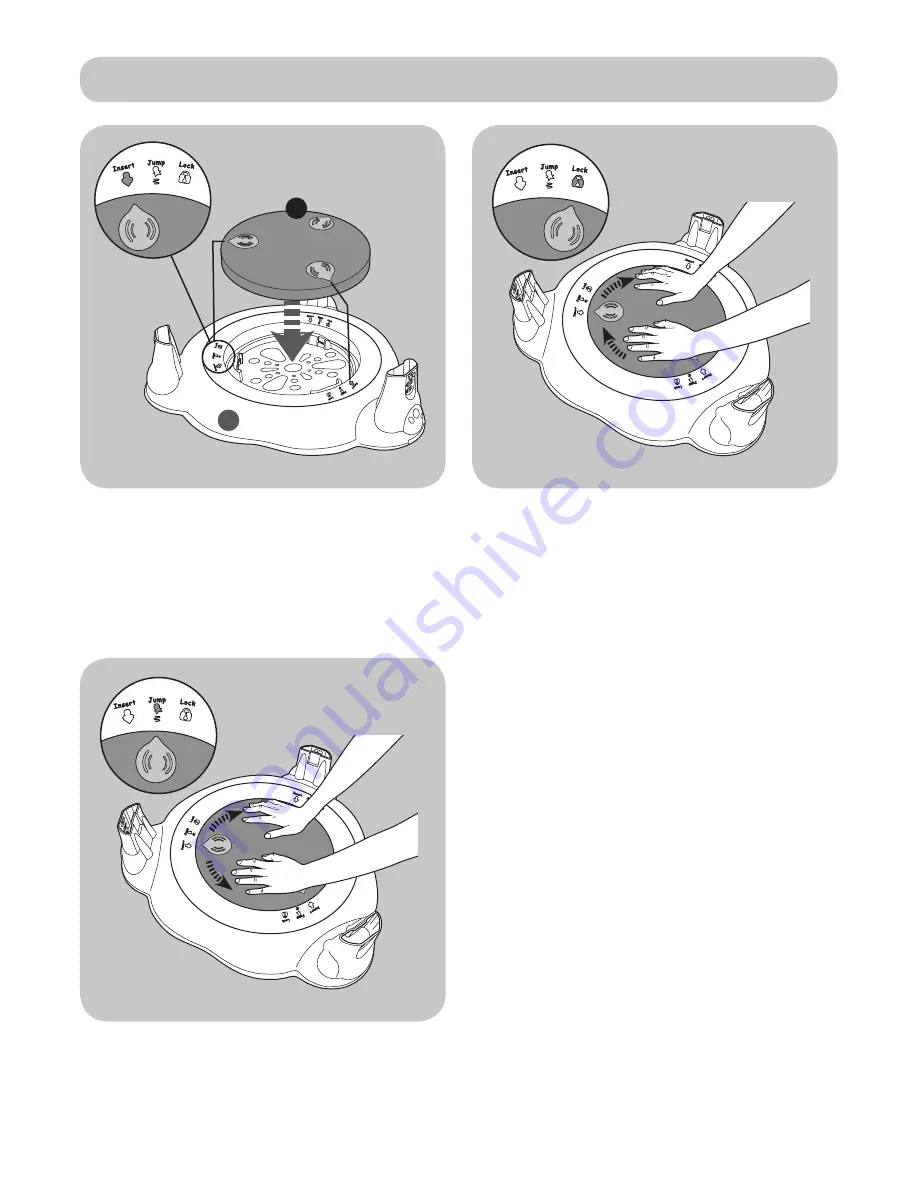
Base assembly

1. Insert the footplate (A) into base (B), 

ensuring you line up the arrows on the 

footplate with the ‘Insert’ arrow on the 

base.

2. Press down on the footplate and 

rotate it to the right, till the arrows on the 

footplate line up with the ‘Lock’ arrows 

on the base. The base is now locked into 

position.

3. Jump setting: 

The jump setting (once 

fully assembled) allows your child to 

bounce on the footplate. To prevent your 

child from bouncing on the footplate turn 

it till the arrows point to ‘Lock’ again.

NOTE: DO NOT let your child use the 

footplate on the ‘Insert‘ setting.

A

B

Summary of Contents for Twizzle

Page 1: ...o can sit up unaided approximately from 4 months It is not intended for children who can walk by themselves and weigh more than 11kg 25lbs INSTRUCTIONS Read the instructions carefully before use and k...

Page 2: ...t legs to same height so that the tray is level before placing child in the product Warning For INDOOR use only Warning Do not use the product if any of the toys seat or structural parts are damaged R...

Page 3: ...ment parts please contact the MyChild Helpline on 0161 335 2508 Lay out the parts on a soft level surface and compare to the part xings checklist below Do not discard any packaging until you are sure...

Page 4: ...Cover plates 3 5 Toy bar 1 6 Toy horse 1 7 Toy flower 1 8 Toy monkey 1 9 Toy rings 2 10 Toy bar housing 2 11 Musical toy 1 12 Seat unit 1 13 Footplate 1 14 Seat tray 1 15 Base 1 Comes attached to sea...

Page 5: ...the right till the arrows on the footplate line up with the Lock arrows on the base The base is now locked into position 3 Jump setting The jump setting once fully assembled allows your child to boun...

Page 6: ...legs at points 1 2 and 3 on the underside of the seat tray 2 Working on one leg at a time A Insert a leg B Place a cover plate on C Secure with a screw Be careful not to overtighten the screw Repeat f...

Page 7: ...d push the leg into the fixing point on the base until they click into place C Repeat on remaining legs Ensure all legs are at the same height 1 Using a Phillips screwdriver remove screw A from batter...

Page 8: ...seated in the recess locate the white plastic tabs on the underside of the seat tray Push the two plastic tabs up and rotate clockwise to lock the musical toy in place 2 Insert 2 x 1 5V AA batteries n...

Page 9: ...r housings to the right to tighten 2 Align the toys and toy bar with the mounting points on the seat tray and click them into place Pull the toy bar and 3 toys to check they are firmly attached NOTE T...

Page 10: ...he seat fabric over the seat unit 4 Hook the 8 webbing strips on the underside of the seat fabric over the tabs B on the seat unit B 1 Remove the seat unit from the seat tray by pressing the clips A o...

Page 11: ...ray pressing it down until it clicks into place Check the seat unit is able to rotate fully 1 Press the clips A on the underside of the seat unit whilst lifting and rotating the seat unit ATTENTION Ch...

Page 12: ...t whilst a child is seated in the activity centre A A Tray at correct height B Tray too high child is on tip toes C Tray too low child has bent knees WARNING An incorrect height setting is bad for you...

Page 13: ...essing it down until it clicks into place Check the play table footplate is properly installed and is able to rotate fully Removing the footplate 1 Press down on the footplate and rotate it to the lef...

Page 14: ...page 13 Play table disassembly 1 Press in the three buttons A on the underside of the play table footplate and remove A...

Page 15: ...dry clean or use bleach Non removable fabric covers and trims may be cleaned using a damp sponge with soap or mild detergent Allow it to dry completely before folding or storing it away In some climat...

Page 16: ...Customerservice kooltrade co uk Imported by MyChild M34 3QA www mychild co uk Tel 0161 335 2508...

Reviews: