Patriot Multi-Color Gelcoater Operations Manual
Page | 22
7. Rotate the ball valve on the catalyst manifold to the open position to relieve catalyst pressure
to the supply jug.
8. Close the ball valve at the quick disconnect end of the resin hose assembly.
9. Disconnect the current resin hose assembly from the gun assembly and clean the quick
disconnect fittings with solvent.
Note
It is important to keep the quick disconnect fittings clean
so that the O-ring in the female quick disconnect does not
become damaged and leak.
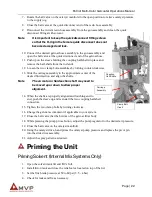
10. Connect the desired gelcoat hose assembly to the gun assembly and
open the ball valve at the quick disconnect end of the gelcoat hose.
11. Push up on the sleeve holding the coupling half-shells in place and
remove the half-shells from the rod ends.
12. Loosen the two clamp bolt assemblies by turning counterclockwise.
13. Slide the carriage assembly to the approximate center of the
desired fluid section and align the shafts.
Note
The air motor or fluid section shaft may need to
be moved up or down to allow proper
alignment.
14. When the shafts are properly aligned and touching end to
end, push the sleeve up and re-install the two coupling half-shell
connectors.
15. Tighten the two clamp bolts by turning clockwise.
16. Charge the gelcoat accumulator if applicable to your system.
17. Close the ball valve that the bottom of the gelcoat filter body.
18. While pressing the pump prime button, adjust the pump regulator to the desired air pressure.
19. Close the ball valve on the catalyst manifold.
20. Using the catalyst drive, hand prime the catalyst pump pressure and replace the pivot pin
into the slide drive assembly.
21. Adjust the spray pattern as desired.
Priming the Unit
Priming Solvent (Internal Mix Systems Only)
1. Open the solvent tank lid and fill ¾ full.
2. Install lid on tank and close the relief valve located on top of the lid.
3. Set the flush tank pressure at 50 to 60 psi (3.5 – 4 bar).
4. Check for leaks and fix as necessary.
Clamp Bolt
(front)
Coupling
Half-Shells
Carriage
Assembly

