

© MuxLab Inc. 2015
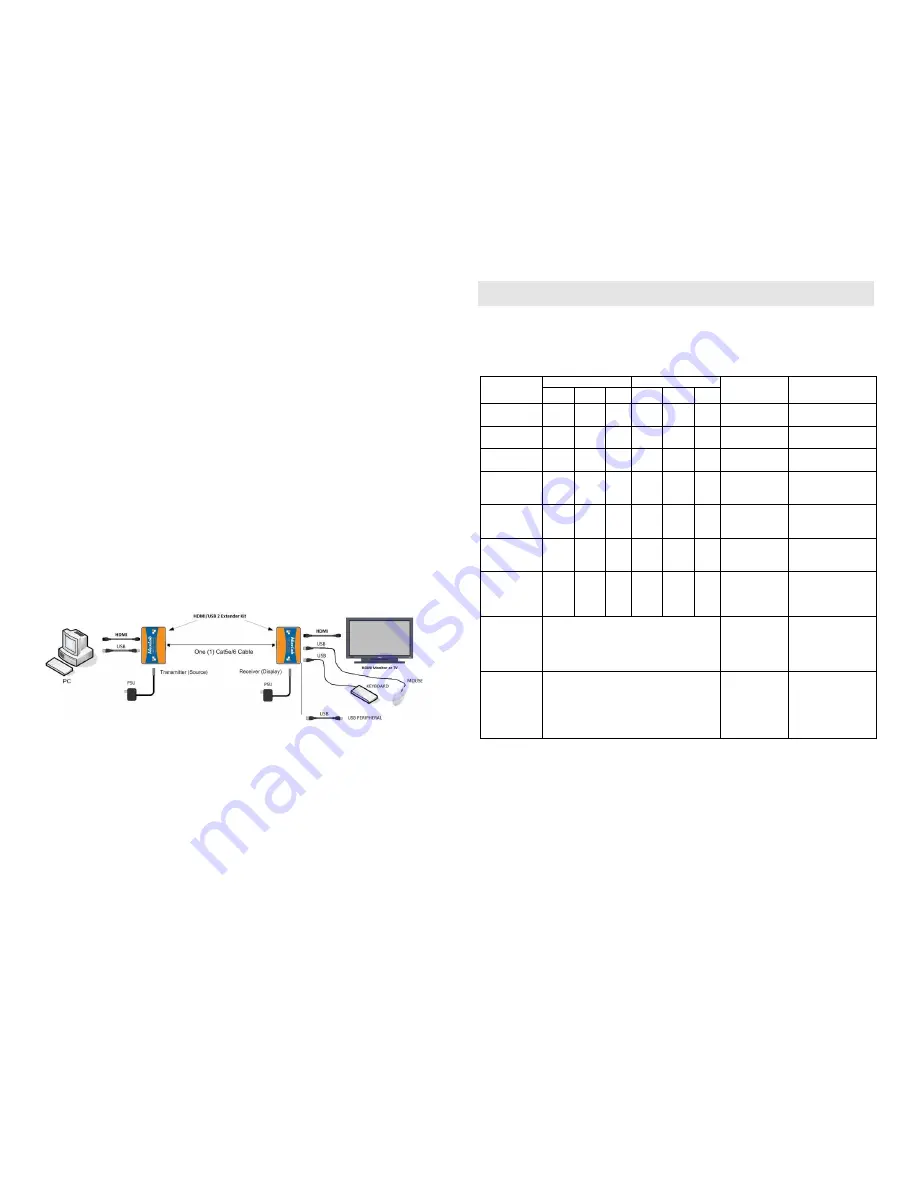
4.
To install the Receiver:
4a.
Connect the Receiver to the HDMI display equipment with a HDMI compliant
cable.
4b.
Connect the Receiver to as many as four (4) USB 2.0 peripherals with standard
USB 2.0 cables. Power is limited to 0.7A for the four (4) ports. An externally
powered four (4) port USB 2.0 hub may allow for expansion, or to support higher
power levels than 0.7A total.
4c.
Connect the Cat 5e/6 cable coming from the Transmitter to the RJ45 LINK
connector on the Receiver.
5.
Connect the 5 VDC power supply to the Receiver first, and then plug the power
supply into an AC power outlet. Next connect the 5 VDC power supply to the
Transmitter, and then plug the power supply into an AC power outlet. If power is
present, the power LED on the Transmitter and Receiver will be ON.
6.
Power the HDMI equipment and verify the image quality.
7.
This product supports unidirectional IR control. If infrared remote control is
needed to control the Source equipment from the Display, connect the IR Sensor
and/or IR Emitter to the 3.5mm Jacks of the Transmitter and Receiver.
8.
Position the IR Sensor so that it is directed to the hand-held remote control. For a
clear IR signal reception, aim the hand-held remote control at the top of the IR
Sensor enclosure.
9.
Position the IR Emitter as close as possible to the source’s IR Sensor (i.e. DVD
player). For a clear IR signal reception, the IR Emitter can be glued on the source’s
IR Sensor. The IR Emitter’s signal is transmitted from the side of the enclosure.
10.
The following diagram shows the final configuration.
(Note: IR sensor and emitter not shown in above diagram.)
Troubleshooting
The following table describes some of the symptoms, probable causes and possible solutions
with respect to issues during the installation of the HDMI/USB 2.0 Extender Kit:
Note: The
Act LED
should blink when the unit is working. The
HDMI LED
will blink if the
source contains no HDCP.
Symptom
Tx unit LEDs
Rx unit LEDs
Probable
Cause
Possible
Solutions
Power HDMI RJ45 Power HDMI RJ45
No Image
OFF
-
-
OFF
-
-
No power
Check power
connections
No Image
ON
-
OFF
ON
-
OFF UTP Cable
Check the UTP
cables.
No Image
ON
OFF
ON
ON
OFF
ON HDMI Cable
Check the HDMI
cable.
No Image
ON
ON
(or
blink)
ON
ON
ON
ON Cable length
Check cable length,
check with another
monitor.
Flickering
Image or bad
sound
ON
ON
(or
blink)
ON
ON
ON
ON Cable length
Check cable length
Check the HDMI
cable.
No sound, but
image OK
ON
ON
(or
blink)
ON
ON
ON
ON Sound at source Check if source or
monitor is PCM or
Dolby/DTS.
Image flickers
when powering
up nearby
equipment
ON
ON
(or
blink)
ON
ON
ON
ON Interference
Use STP cables
USB not
working, but
audio/video
OK
USB 2.0 cable,
or too much
power required
for USB
peripheral.
Check USB 2.0 cable,
or
try another USB
device.
Adding
multiple USB
peripherals is
causing a
problem.
Too much
power required
for USB
peripherals.
Try a different USB
peripheral.
Try using an
externally powered
USB 2.0 hub.
If you still cannot diagnose the problem, please call MuxLab Customer Technical Support at
877-689-5228 (toll-free in North America) or (+1) 514-905-0588 (International).


