background image

1

VJ1608HYE-I-00

 VJ-1608 Hybrid INSTALLATION MANUAL

Please read this manual 
before using

Thank you for purchasing a MUTOH product.

This manual explains the steps for unpacking, mount-

ing and basic installation before using the MUTOH 

Full-color inkjet printer VJ-1608 Hybrid.

This manual is intended for owners, installers, and 

users of this product.

Understand the contents and instructions in this man-

ual before installing this product.

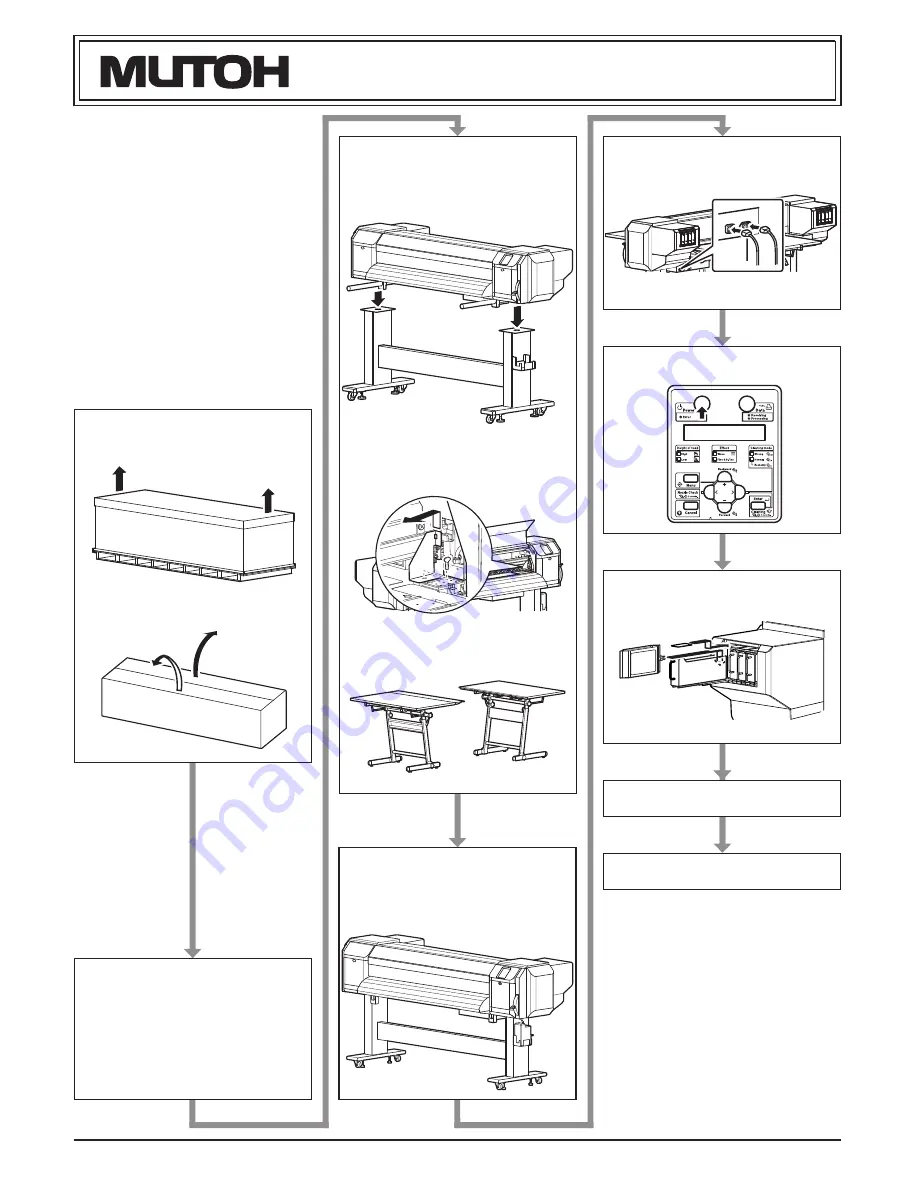
Installation flow chart

The broad steps for installation are shown below.

There are instructions for each section beginning on 

the next page.

1 Unpacking boxes

1.1 Unpacking the printer box

1.2 Unpacking the stand box and 

media-feed table boxes

2 Confirming bundled items

2.1 Items in the printer box

2.2 Items in the accessory box

2.3 Items in the stand box

2.4 Items in the media-feed table box

3 Assembling

3.1 Assembling the stand

3.2 Attaching the stand

3.3 Attaching the solenoid valve unit

3.4 Detaching fastening materials

3.5 Assembling the media-feed table

4 Installation

4.1 Installation environment

4.2 Installation procedure

5 Connecting the power cable

6 Turning the power ON/OFF

7 Installing the ink packs

8 Checking the printing condition

9 Manual composition

All manuals and user guides at all-guides.com

all-guides.com

Summary of Contents for VJ-1608 Hybrid

Page 1: ...section beginning on the next page 1 Unpacking boxes 1 1 Unpacking the printer box 1 2 Unpacking the stand box and media feed table boxes 2 Confirming bundled items 2 1 Items in the printer box 2 2 Items in the accessory box 2 3 Items in the stand box 2 4 Items in the media feed table box 3 Assembling 3 1 Assembling the stand 3 2 Attaching the stand 3 3 Attaching the solenoid valve unit 3 4 Detach...

Page 2: ...components are missing If any items are damaged or missing contact MUTOH local dealer 2 1 Items in the printer box 2 2 Items in the accessory box 2 3 Items in the stand box 2 4 Items in media feed table boxes 2 4 1 Media feed table F 2 4 2 Media feed table R No Name Q ty 1 Printer main body 1 set 2 Accessory box 1 3 Installation Manual this manual 1 No Name 1 Top board 2 Outer board 3 Side board 4...

Page 3: ...part so that four screw holes in the base part are at the front b Tighten two hexagon socket head cap screws using a hexagonal wrench 2 Assemble the left stand in the same way as in Step 1 3 Fasten the connector bar to the right stand using two hexagon socket head cap screws Attach the connector bar with the tapped holes for solenoid valve unit fastening screws facing the rear as shown below 4 Fas...

Page 4: ... materials in accordance with the following steps 1 Remove all tapes from each cover 2 Open the front cover then remove a screw from the head unit fastening material metal plate and remove the material 3 Open the left maintenance cover then place the tray 3 5 Assembling the media feed table Follow the procedure below to assemble the Media feed table 1 Loosen the knobs fastening the legs and set th...

Page 5: ...t the printer stays flat 4 Confirm that the waste fluid valve is closed 4 2 2 Installing the media feed tables Follow the procedure below to install Media feed tables 1 Installing the media feed table R 1 Attach the rear joint on the shoulder screws on the rear of the printer 2 Install media feed table R so that it rests on the rear joint 3 Adjust media feed table R using the angle lever and heigh...

Page 6: ...ow to turn OFF the printer 1 Verify the following regarding the operational con dition of the printer Printing or other operations are not in progress The operation panel is in normal status 2 Press the Power key on the operation panel to turn OFF the printer If the operation panel is in the following status the power is ON The Power key is pressed in The Power lamp lights up in green Press the ke...

Page 7: ...peration panel 2 Press the Enter key on the operation panel During Washing is displayed on the operation panel and the printer starts discharging the ship ment fluid After discharging shipment fluid is complete Wash retry No is displayed on the operation panel When cleaning the print head again before ink fill ing select Yes to press key or key on the operation panel Then press Enter key and clean...

Page 8: ...check pat tern clean the head Press and hold the Cleaning key on the operation panel for two seconds or more Cleaning is displayed on the operation panel 6 Head cleaning starts If one time of head cleaning was not enough to re move blurred or missing parts in the check pattern perform powerful cleaning If those problems above were not improved after a few times of head cleaning refer to the Operat...

Reviews: