


30
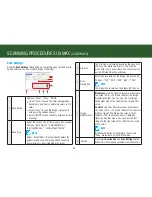
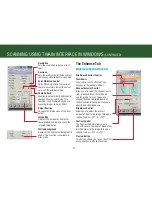
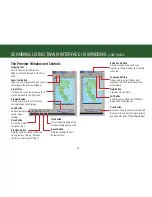
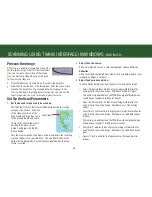
Preview Window Controls
there are several useful tools in the preview toolbar to assist you to
check the details of the preview image.
1
7
5
3
2
8
9
6
4
13
14
12
11
10
1
create a new cropping frame in the preview
Area. you can create maximum 12 cropping
frames in the preview Area.
2
click and drag to move the image when
zoomed in.
3
Zoom in on the image. the image will be
enlarged every time you click it.
4
Zoom out on the image. the image will reduce
every time you click it.
5
select all cropping frames.
this is available when two or more cropping
frames are created. All frames turns into thick
dashed lines, which allows you to change the
scan resolution to all cropping frames.
6
delete the selected cropping frame(s).
7
rotate the image 90º counterclockwise.
8
rotate the image 90º clockwise.
9
preview Area
display the preview image.
10
thin dashed lines represent the unselected cropping frame.
11
moving thick
dashed lines
represent the currently selected cropping
frame. you can enlarge or shrink the cropping
frame by dragging the corners or edges of the
cropping frame.
the change of scan resolution you made will
apply to the selected cropping frame only.
12
multi-color output
controls
click the “color”, “Gray”, or “B/W” button to
view the preview image in the preview Window
in color, grayscale, or black and white.
A thick line will appear on the button pressed
(i.e.,
).
13
close the Advanced scan window.
14
display the preview help information.
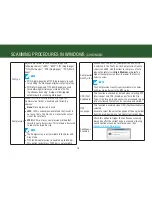
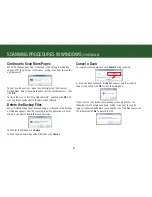
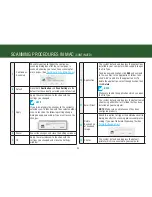
scAnnInG procedUres In WIndoWs
(contInUed)
Summary of Contents for PageExpress 4800 Pro
Page 57: ...57 ...
Page 58: ...PageExpress 4800 Pro ...