background image

Round Table record player 


- 3 - 


Unpacking And Setting Up  

Place box right way up on floor and ensure designated 
area where record player is to be used is clear, level and 
stable. Try to route any nearby significant current carrying 
(e.g. mains and speaker cables) as far away as possible. 
  
Open up top of box carefully, taking care not to damage 
contents inside. Lift out covering and top packaging block 
to allow access to plinth/tonearm assembly. Carefully lift 
this assembly out and place on the designated area. 
Ensure unit is level and placed where it cannot be 
accidently knocked. Check ON/OFF switch is in OFF 
position. 
 
Remove plinth support packaging to gain access to platter 
below. Remove from packing and locate the ‘lower portion’ 
of the spindle (longer and square-cut). Carefully locate 
lower spindle into brass ring in centre of plinth and lower 
the platter until it is fully seated. Make sure platter spins 
smoothly by pushing it gently in a clockwise direction. 
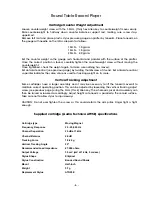
Note tonearm and cartridge are factory pre-set, so do not make any adjustments to them, unless 
fitting another cartridge! 
Please keep all packing and the box in a safe place. These may be required for moving the unit 
elsewhere, and will ensure the unit’s safe transport.  

 Fitting The Belt 

White cotton gloves are provided to wear whilst handling the belt

The belt should be handled with 

care and must not be over-stretched, nor be contaminated with grease or sweat. These will affect 
performance and lifespan of the belt.  
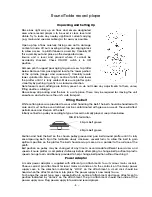
Initially set belt on pulley according to type of record normally played, see picture below. 

PULLEY information 


33rpm belt groove  


45rpm belt groove  


Position and hold the belt on the chosen pulley groove and pass belt around platter until it is fully 
encompassing both. Spin the turntable slowly clockwise, several turns, to allow the belt to gain 
optimum position on the platter. The belt should end up more or less parallel to the surface of the 
plinth. 
Belt position on pulley may be changed at any time to accommodate different record sizes and 
speeds. Ensure platter is completely stationary before attempting to change belt position! A plastic 
speed change tool is additionally provided to help change belt position without touching it. 

Power Adaptor  

A mains power adaptor is supplied with different pin attachments to suit various mains sockets. 
Choose correct pin attachment for local mains and slide on to the contacts on the mains power 
supply case, in the direction indicated by “LOCK” on the attachment. A small click should be 
heard when the attachment locks into place. The power supply is now ready to use.  
To change the socket type, press square button in centre of attachment and move attachment in 
position indicated by “unlock” on the attachment. The pin attachment should then slide off the 
power supply case. Plug power supply into wall and record player. 

Summary of Contents for ROUNDTABLE

Page 1: ...r in principle to shock protection used in high quality watches Adjustable counter weight vertical tracking height and magnetic anti skate mechanism allows different cartridges to be used as desired The Round Table plinth and platter are made from low resonance material and feet have vibration isolation properties The mass of the round table has also been carefully tuned so the centre is located a...

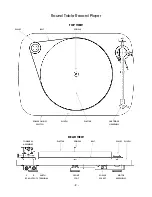
Page 2: ...yer 2 TOP VIEW PULLEY BELT SPINDLE POWER ON OFF PLINTH PLATTER CARTRIDGE SWITCH HEADSHELL REAR VIEW TONEARM PLATTER SPINDLE BELT PULLEY PLINTH ASSEMBLEY L R EARTH FRONT POWER MOTOR RCA OUTPUTS TERMINAL FOOT SOCKET ASSEMBLEY ...

Page 3: ...t should be handled with care and must not be over stretched nor be contaminated with grease or sweat These will affect performance and lifespan of the belt Initially set belt on pulley according to type of record normally played see picture below PULLEY information 33rpm belt groove 45rpm belt groove Position and hold the belt on the chosen pulley groove and pass belt around platter until it is f...

Page 4: ...left input socket regardless Keep the turntable power wires and any other mains cables present as far away from the cartridge output leads as possible The earth wire amplifier end is provided to connect to earthing post on the back of the amplifier if required Some setups will hum less with earths connected others will perform better without Some experimentation may be required to get optimal perf...

Page 5: ...inter channel phase shift distinct lack of bass Please be sure to consult cartridge manufacturers instructions for corresponding connections on the cartridge Do not remove cartridge guard until cartridge installation is complete Switch off amplifier and turntable Place tonearm into arm rest so it is secured Remove old cartridge if present carefully taking care not to pull the delicate tonearm wire...

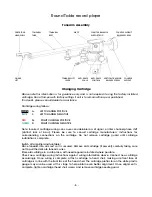
Page 6: ...tes the same value as used for tracking weight on its scale Vertical Tracking adjustment Some cartridges have a larger assembly and it may be necessary to lift the tonearm overall to maintain correct operating position This can be adjusted by loosening the vertical tracking adjust screw see previous page using the 3mm thick Allen key The whole arm pivot and assembly can then be raised or lowered a...

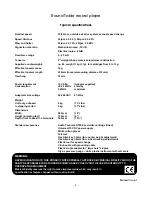
Page 7: ...1 5 lbs In shipping carton 8 kg 173 5 lbs Dimensions Width 482 mm 19 Height including feet 100 mm 4 Depth front to back Inc terminals 342 mm 13 Standard accessories Audio Technica AT95E or similar cartridge fitted Universal 15V DC power supply White cotton gloves Felt mat Hex Allen key 1 5mm for counter weight adjustment Hex Allen key 3 0mm for vertical tracking adjustment Plastic tool for speed c...

Page 8: ...HTE ENTSORGUNG Das auf der Geräterückseite angebrachte Label deutet darauf hin dass das Produkt nicht mit konventionellem Hauskehricht entsorgt werden darf Um Schäden und Verschmutzungen an Umwelt und Mensch zu vermeiden muss das Produkt fachgerecht entsorgt und von anderem Abfall getrennt werden Wenden Sie sich bei Fragen hierzu an Ihren Fachhändler oder an eine öffentliche Informationsstelle AFV...

Reviews: