Murrplastik mp-IM1 Operating Instructions Manual Download Page 26


26


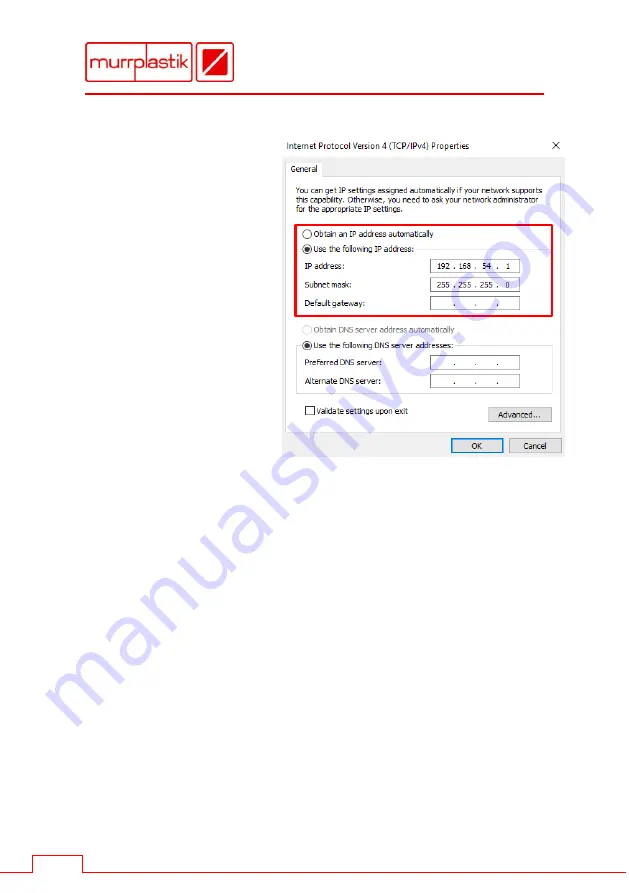
Enter the IP address 
and the subnet mask.  
 
Then close the two 
open windows with 

[OK]


9.2


Configuring network settings on the mp-IM1 

 
Set the network settings on the mp-IM1 using the touch panel in 

[Settings] - [Network]

.  

 
Enter an IP address from the same network area in which the PC  
is located, e.g. 192.168.54.50.  
 
Enter the same subnet mask as on the PC, e.g. 255.255.255.0.  
 

Restart the mp-IM1. 

 
Add the new printer in Windows® "Devices and Printers" as described 
in Chapter 8. 


Summary of Contents for mp-IM1

Page 1: ...As of May 2019 v1 6 8902865312 ACS labelling systems mp IM1 operating instructions...

Page 2: ...Radio interference 11 4 Scope of delivery 12 5 Device overview 13 6 Interactive touch display 15 7 Initial commissioning of the mp IM1 20 8 Driver installation 21 9 Direct connection via network cabl...

Page 3: ...3 13 1 Cleaning the mp IM1 printer 33 13 2 Replacing the fleece box 34 13 3 Consumed ink cartridges and fleece boxes 35 14 Contact 35 15 Technical data 36 16 Shipping instructions for return 37...

Page 4: ...rights in those marks 2 Important hints This operating instructions must be read and understood It must be kept for further use and passed on together with the device If you have any questions or prob...

Page 5: ...ded use The mp IM1 is predominantly an inscription device for polycarbonate PC labels based on inkjet technology The possibility of labelling as well as the respective durability and quality of the in...

Page 6: ...a level stable surface that is larger than the device itself The device will not operate properly if it is tipped up or tilted Avoid using locations where the printer will be exposed to extreme fluct...

Page 7: ...electrical shocks Connect all parts of the system to mains sockets that have been properly earthed No mains socket may be used if items of equipment such as photocopiers or fans are already plugged in...

Page 8: ...s suffered a fall or its housing is damaged The device is not working properly or its performance is impaired If the printer is operated within Germany please observe the following The building s elec...

Page 9: ...ening the package After opening the packaging the ink cartridge must not be shaken since otherwise ink may leak out Use the ink cartridge before the date printed on the packaging Install the ink cartr...

Page 10: ...removal of covers can lead to contact with parts conducting dangerous electrical current and other hazards as well as voiding product warranties Contact the manufacturer or a customer service point au...

Page 11: ...r repair 3 7 Radio interference This product complies with Directive EN 55022 CISPR Publication 22 Class B If you connect the equipment to a computer take care to ensure that you use a USB cable that...

Page 12: ...sported safely if necessary e g in case of service The following components are included in the scope of delivery mp IM1 printer Ink cartridge EK PC 3 1 mp IM1 carrier plate Power cable with power sup...

Page 13: ...13 service flap on off button interactive touch display 5 Device overview Press the on off button longer than 3 seconds to turn off the device...

Page 14: ...14 Opened service flap Service station Replaceable ink cartridge Absorbent fleece Power connection Service connection USB A USB B connection Ethernet connection...

Page 15: ...edge of the screen Home key Info key Settings key Cancel key Hit Home to return to the Home menu The Home menu is the menu item that is displayed after booting the device Hit Info to call up informati...

Page 16: ...e in menu items and sub menu items Symbol Lead point Subitem 1 Subitem 2 Home Info Network Ink Cartridge Printer Settings Network DHCP IP Address Netmask Gateway Hostname Language Print Job Tray Contr...

Page 17: ...fo Navigation to Network Ink cartridge and Printer possible Info Network The network settings for the present device are displayed Use DHCP IP address Netmask Gateway Hostname MAC address Info Ink car...

Page 18: ...to activate DHCP the checkbox must be filled After that save with the floppy disk symbol Settings Network IP address If DHCP is not requested you can enter a static IP address After that save with th...

Page 19: ...French Italian Portuguese Russian Settings Print job You have the option of selecting whether the printed frame should remain in the device for drying If you want the printed frame to be output immedi...

Page 20: ...stable and vibration free surface Make sure that there is enough space for the drawer to extend Remove the transport locks of the device Open the service flap and remove the adhesive tape Then insert...

Page 21: ...ernet It is not necessary that you connect the mp IM1 to the PC during driver installation Please note The driver installation is shown as an example under Windows 10 64 bit For other versions of Wind...

Page 22: ...22 Confirm the Windows query with Yes Select the desired language You can choose between German and English Click on Next...

Page 23: ...23 Click again on Next Apply the default path and click on Install Complete the installation by clicking on Finish...

Page 24: ...IP address must be provided by the customer s network administrator It is also possible to integrate the mp IM1 into an existing company network Due to the complexity and potential risks this setup i...

Page 25: ...25 Select Properties from the context menu Open the settings for the Internet Protocol Version 4 TCP IPv4 by double clicking it...

Page 26: ...1 Set the network settings on the mp IM1 using the touch panel in Settings Network Enter an IP address from the same network area in which the PC is located e g 192 168 54 50 Enter the same subnet mas...

Page 27: ...M1 is added and the calibration points are entered The settings must be made separately for each Windows user To do this start the software and click on the printer symbol Click on Add a printer In th...

Page 28: ...this field freely Type Inkjet Orientation 0 Baseplates Rows 1 Baseplates Columns 1 Distance X 0 Distance Y 0 Offset X 18 Offset Y 4 2 Open the printer properties by clicking on the printer icon and m...

Page 29: ...ftware the mp IM1 is added and the calibration points are entered The settings must be made separately for each Windows user Start the ACS software do not open a project and click Settings Output Devi...

Page 30: ...List of output devices Set a hook at As default Change the Rows Page and the Frames Row value each into 1 Enter the calibration point values X 18 8 Y 28 0 Rotation 0 Please note These values are defa...

Page 31: ...ternatively also be done in Devices and Printers Make sure that page size Large is selected Here you can optionally set the resolution to 600 dpi as well Check your settings you have done in the Outpu...

Page 32: ...32 12 Assembling the carrier plate printing Place the carrier plate on the drawer as shown in the following figure Then place the base plate on the carrier plate...

Page 33: ...ff the printer Unplug the power cable Use a dry soft cloth to remove dust and other foreign bodies To remove stubborn dirt carefully clean the printer using a cloth moistened with water or a neutral d...

Page 34: ...cing the fleece box Change the fleece box as soon as it is apparently full After opening the service flap you will find the fleece box in the lower right corner Remove the fleece box and replace it wi...

Page 35: ...d Dispose of the fleece box at a local waste management site in accordance with the statutory regulations 13 3 Consumed ink cartridges and fleece boxes Dispose of empty ink cartridges and full fleece...

Page 36: ...erature operation 10 C 30 C Humidity operation 20 80 without condensation Device dimensions W x H x D 31 x 18 x 38 cm 12 2 x 7 x 15 inch Installation space W x D 31 x 18 cm 12 2 x 7 inch Weight 2 appr...

Page 37: ...device The ink cartridge will remain with you Fix the carrier plate in the device with an adhesive tape Secure the service flap and all movable parts with an adhesive tape Enclose the USB connecting...

Page 38: ...teristics Limit values and measurement methods EN 55022 B 2011 12 Information technology equipment Immunity characteristics Limit values of test methods EN 55024 2016 05 Electrostatic discharge ESD EN...

Page 39: ...39 Notes...

Page 40: ...As of May 2019 v1 6 8902865312 Murrplastik Systemtechnik GmbH Dieselstra e 10 71570 Oppenweiler Germany 49 7191 482 0 info murrplastik de www murrplastik de...

Reviews: