3016
3. Loosen the seed side chain (3) by loosening the nut of the chain gear (2).
4. Tighten the seed side chain by pushing the chain gear (2) downward.
5. Tighten the chain gear nut (2).
6. Tighten the fertiliser side chain by pushing the chain gear (4) downward.
7. Tighten the chain gear nut (4).
8. Check the chains for de ection.
The de ection should be less than 10 mm.
9. Put the transmission cover back in place.
7.5.3. Tightening the transmission chains of the small seed hopper
1. Raise the transmission cover.
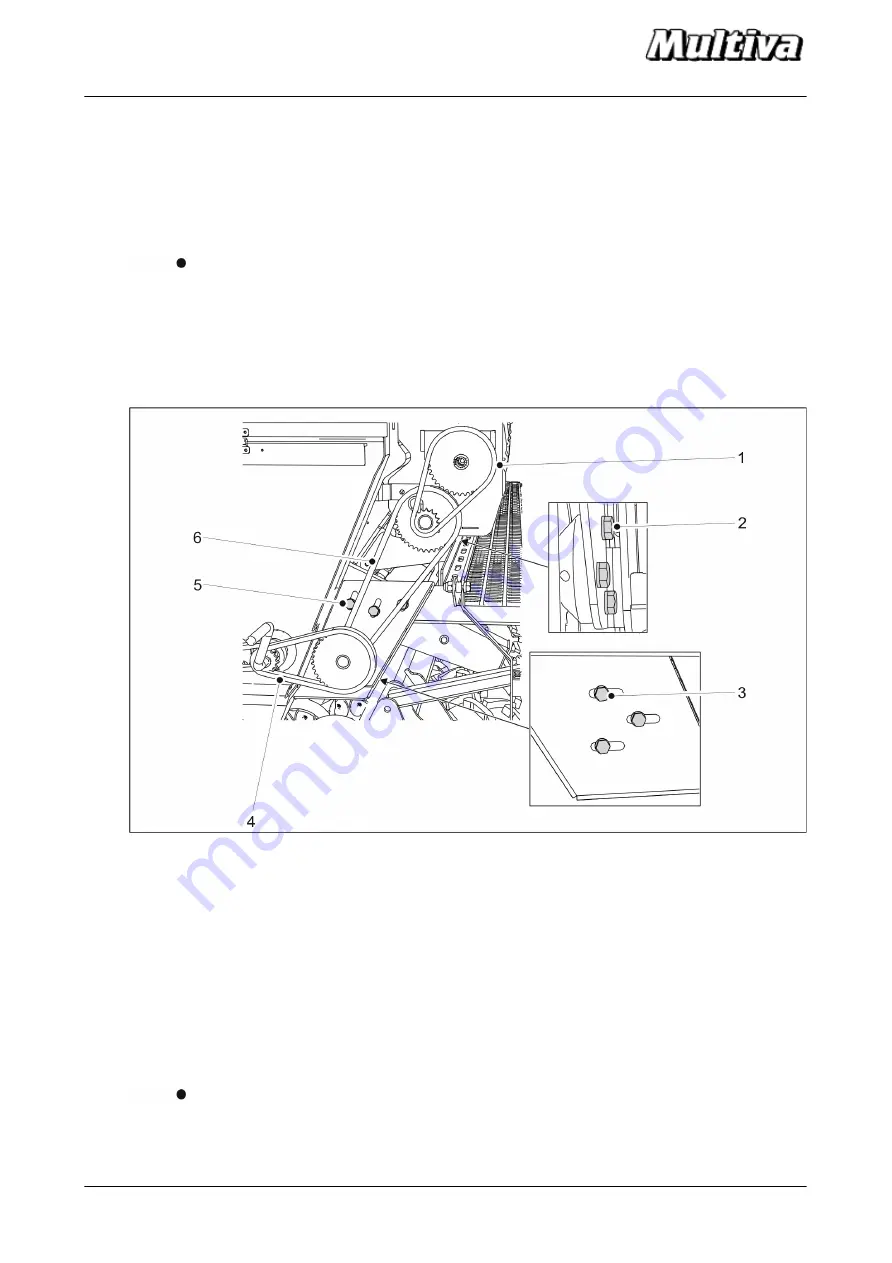
Figure. 7.5.3. - 168. Tightening the transmission chains of the small seed hopper
2. Loosen the chain (1) by loosening the three bolts of the bearing housing (2).
3. Loosen the chain (6) by loosening the three bolts of the casing (5).
4. Loosen the chain (4) by loosening the three bolts of the bearing housing (3).
5. Tighten the chain by moving the bearing downward. Tighten the 3 bolts (2) of the
bearing housing.
6. Tighten the chain (6) by moving the casing vertically and the chain (4) by moving the
casing horizontally.
7. Tighten the three casing bolts (5) and the three bearing housing bolts (3).
8. Check the chains for de ection.
The de ection should be less than 10 mm.
9. Put the transmission cover back in place.
Operation and maintenance
manual
Cerex 300
1.00
135 (156)
Summary of Contents for Cerex 300 SeedPilot
Page 159: ...Hydraulic schematic Appen dix 2 Cerex 300 1 Appendix 2 Hydraulic schematic...
Page 160: ...Hydraulic schematic Appen dix 2 Cerex 300 2...
Page 161: ...Electrical Diagram Annex 3 Cerex 300 1 Annex 3 Electrical Diagram...
Page 162: ...Electrical Diagram Annex 3 Cerex 300 2...


