HDA-SERIES WALK-BEHIND TROWEL — OPERATION AND PARTS MANUAL — REV. #9 (07/02/10) — PAGE 25
3. Place the
centrifugal safety stop switch
(Figure 23) in the
"
ON
" position.
Figure 23. Centrifugal Safety Stop Switch
4. Place the
Choke Lever
(Figure 24) in the "
CLOSED
"
position.
Figure 24. Engine Choke Lever
5. Grasp the starter grip (Figure 25) and slowly pull it out. The
resistance becomes the hardest at a certain position, corre-
sponding to the compression point. Pull the starter grip briskly
and smoothly for starting.
Figure 25. Starter Grip
6. If the engine has started, slowly return the choke lever
(Figure 24) to the
OPEN
position. If the engine has not started
repeat steps 1 through 5.
7. Before the trowel is placed into operation, run the engine for
several minutes. Check for fuel leaks, and noises that would
associate with a loose guard ring and/or covers.
8. Test the Safety Stop Switch.
a.
With the engine at idle, move the safety stop switch lever
to
"OFF"
(Figure 23)
.
The engine should shut off.
b. CLEAR THE AREA AROUND THE TROWEL
. Move
the safety stop switch lever back to the
"ON"
position,
restart the engine and let idle. Stand behind the handle
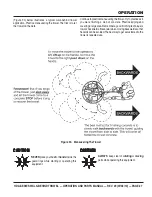
and spin the handle to the right, simulating a runaway
situation. (See Figure 26). Centrifugal force should
throw the safety switch outward to the "OFF" position
thus shutting off the engine
Figure 27. Throttle (Run Position)
INITIAL START-UP
9.
To begin troweling, push the throttle lever (Figure 27) toward
the "
RUN
" position.
Figure 26. Testing the Centrifugal Safety Stop Switch
.
Summary of Contents for WHITEMAN HDA Series
Page 3: ...HDA SERIES WALK BEHIND TROWEL OPERATION AND PARTS MANUAL REV 9 07 02 10 PAGE 3 NOTES...
Page 60: ...PAGE 60 HDA SERIES WALK BEHINDTROWEL OPERATION AND PARTS MANUAL REV 9 07 02 10 GUARD RING ASSY...
Page 137: ...HDA SERIES WALK BEHIND TROWEL OPERATION AND PARTS MANUAL REV 9 07 02 10 PAGE 137 NOTES...


