


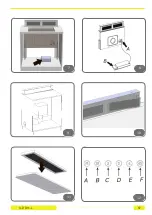


Fit the Downdraft in the opening, by inserting
it from above as shown in (Fig. 1).
Secure the downdraft inside the cabinet, by
using the special fixing brackets supplied
with the product (Fig. 2). Insert the brackets
in the lower side of the downdraft, in such a
way that there is a 3 mm gap between the
lower side of the bracket and the bottom of
the cabinet (Fig. 3). This distance will allow
to pull the appliance downwards during in-
stallation, in order to make the stainless ste-
el frame perfectly adhere with the worktop.
Before inserting the screws into the cabinet,
please make sure that the appliance is per-
fectly perpendicular with the worktop.
After completing the installation and connec-
ting the appliance to the power supply, lift up
the downdraft by pressing on the glass, as
shown in (Fig. 4). If the Downdraft is equip-
ped with internal motor, install the power unit
directing the air outlet to the desired posi-
tion, either downwards or upwards (Fig. 5).
The motor can be installed on the front or on
the rear side of the downdraft. After installing
the motor, fit the air outlet ducts.
If the Downdraft is equipped with external
motor, place the suctioning unit (external
motor) in a suitable area and fit the exhaust
air flue. Then fit the air outlet ducts between
the external motor and the downdraft. Select
the air outlet among the five available op-
tions (Fig. 6) and fit the union supplied with
the appliance.
Place the metal box containing the electro-
nic components in an easily reachable area
for possible technical assistance operations.
(Fig.7), by connecting the related connec-
tors (fig. 8 A )
• Use an air exhausting pipe whose maxi
-
mum length does not exceed 5 meters.
• Limit the number of elbows in the piping,
since each elbow reduces the air capac-
ity of 1 linear meter. (Ex. : if you use no. 2
x 90 ° elbows, the length of piping should
not exceed 3 meters).
• Avoid abrupt direction changes.,
• Use a 150 mm. constant diameter pipe
for the whole length.
• Use piping approved by standards in
force.
The manufacturer shall not be deemed re-
sponsible for air capacity or noise problems
caused by failure to comply with the above
instructions and no warranty on the product
shall be provided.
2.
Before making the hole, check that there are
no structural or other parts inside the cabi-
net, where the appliance is to be placed,
which could hinder a proper installation.
Check that the dimensions of the Downdraft
and the ones of the cook top are compatible
with the cabinet so that the installation can
be carried out properly.
3.
Make a rectangular opening, 842 x 100 mm
in size, in the back of the cook top for the 90
Make a rectangular opening, 790 x 100 mm
in size, in the back of the cook top .In the ver-
sion with the motor already installed, remove
the screws and the suctioning unit in order to
fit the down draft in the opening made.
INSTALLING THE
COOKER HOOD
1.
Before carrying out the appliance installa-
tion, please check that all components are
not damaged, in such a case contact your
retailer and do not carry out any installation
operation.
Before the installation of the Downdraft,
please remove the safety piece you can see
in the picture
(Fig. 1)
. Furthermore, please
• Use an air exhausting pipe whose maxi
• Limit the number of elbows in the piping,
• Avoid abrupt direction changes.,
• Use a 150 mm. constant diameter pipe
• Use piping approved by standards in
EN
• Use an air exhausting pipe whose maxi
• Limit the number of elbows in the piping,
• Avoid abrupt direction changes.,
• Use a 150 mm. constant diameter pipe
• Use piping approved by standards in
S-DD2-L FLUSH TOP
17
• Use an air exhausting pipe whose maxi
• Limit the number of elbows in the piping,
• Avoid abrupt direction changes.,
• Use a 150 mm. constant diameter pipe
• Use piping approved by standards in
-
e
your
installation
Downdraft,
see
please
installation
• Use an air exhausting pipe whose maxi
-
mum length does not exceed 5 meters.
• Limit the number of elbows in the piping,
-
2
should
• Avoid abrupt direction changes.,
• Use a 150 mm. constant diameter pipe
• Use piping approved by standards in
-
oblems
above
oduct
e
cabi-
placed,
Downdraft
compatible
can
mm
90
cm
cm
eady
-
down-draft
4.
5.
6.
7.
8.
‘Before the installation of the Downdraft, ple-
ase remove the packaging,’ Furthermore,
please read carefully all of the following in-
stallation instructions.
Summary of Contents for S-DD11-L
Page 1: ...TelepíTési használaTi és karbanTarTási úTmuTaTó S DD11 L munkaLapba SüLLyeSztett ...
Page 5: ...S DD11 L 5 készülék ismerTeTése 11 INC ...
Page 12: ...S DD11 L 12 képek ...
Page 13: ...S DD11 L 13 11 2 mm 2 6 3 4 5 1 6 1 2 4 6 3 5 ...
Page 14: ...S DD11 L 14 D11 L 9 8 7 10 11 12 6 5 7 8 9 10 11 12 ...
Page 20: ...S DD11 L 16 EN DESCRIPTION OF THE APPLIANCE INC ...
Page 27: ...S DD11 L 65 IMMAGINI IMAGES IMAGES AFBEELDINGEN IMÁGENES BILDER ...
Page 28: ...S DD11 L 66 2 mm 2 6 3 4 5 1 6 1 2 4 6 3 5 ...
Page 29: ...S DD11 L 67 9 8 7 10 11 12 6 5 7 8 9 10 11 12 ...
Page 30: ...90002011000 GM 03 2015 ...


