Multico EW-70244 User Manual Download Page 4

- 3 -

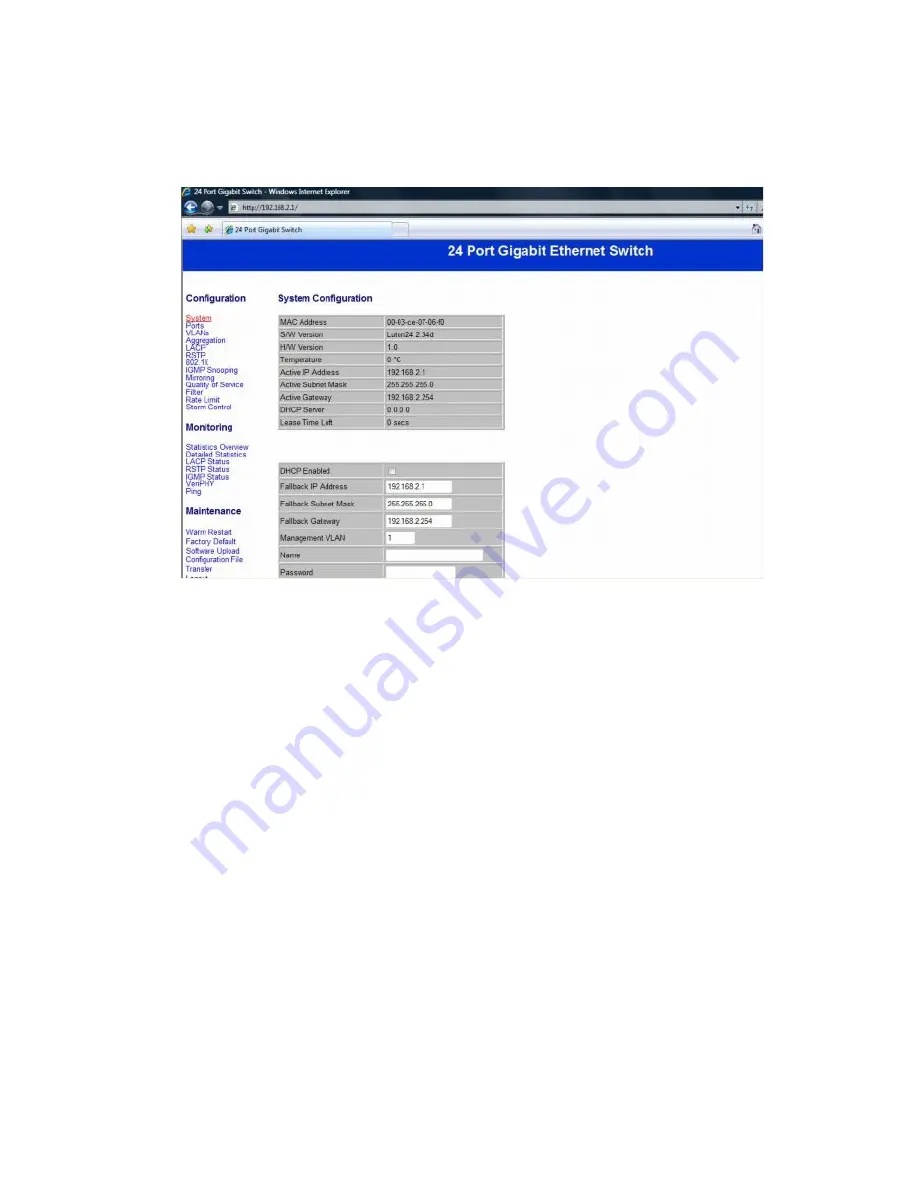
Configuration: System Configuration

It shows system status, such as: MAC address, system
firmware version and so on.

You can change the user name, the password and IP
address, and click “Apply” to confirm the new change.

Afterwards, you can reset the switch by turning off and
turning on it to take the new user name, the password and IP
address effectively.

Summary of Contents for EW-70244

Page 1: ...24 Port Nway Gigabit Ethernet Web Smart Switch User s Manual...

Page 2: ...1st port can t be disabled Supports port setting for N Way or force mode operation Supports Broadcast Storm Protection Supports Port bases VLAN Supports priority queues for QoS Configure Please follo...

Page 3: ...e login screen as below Please key in the password to pass the authentication Password admin After the authentication procedure the switch can be used now Step 4 On the home page select the configurat...

Page 4: ...ddress system firmware version and so on You can change the user name the password and IP address and click Apply to confirm the new change Afterwards you can reset the switch by turning off and turni...

Page 5: ...ation You can enable or disable Jumbo Frames by clicking the checking box Select the Port no which you want to configure the mode below Auto speed enable disable the port 10M 100M 1000M full half dupl...

Page 6: ...tion VLAN Configuration There are 16 VLAN groups Select and add a group into VLAN ID and then click the port number which you want to put into the selected VLAN group Configuration Aggregation Trunk C...

Page 7: ...up port trunk groups and then click the port number you want to include into the same group There are eight groups to choose and the maximum for one group is 24 ports Configuration LACP Port configur...

Page 8: ...7 Select the port number which you want to enable disable its protocol Configuration RSTP Configuration...

Page 9: ...8 Select the port number which you want to enable disable its protocol Configuration 802 1x Configuration...

Page 10: ...9 Select the Port no which you want to configure the mode below Auto Force Authorized Force Unauthorized Configuration IGMP Configuration...

Page 11: ...10 You can enable or disable IGMP by clicking the checking box Select the Port no which you want to configure the mode Configuration Port Mirror configuration...

Page 12: ...is for mirror the traffic from Source port to Destination port Select the Destination port from port 1 to port 24 and then select the Source port by clicking the checking box of each port Configuratio...

Page 13: ...12 You can enable or disable QoS by clicking the checking box If you enable QoS you can select the class of service for each port Configuration Filter Configuration...

Page 14: ...13 Select the Port no which you want to configure the mode to enable disable filtering IP address Configuration Rate Limit Configuration...

Page 15: ...14 Select the Port no which you want to configure the mode of the speed Configuration Storm Control configuration...

Page 16: ...15 You can set up storm control by configuring the modes Monitoring Statistics Overview for All Ports...

Page 17: ...16 You can read statistics for all ports Monitoring Detailed Statistics...

Page 18: ...17 You can have detailed statistics of each port by clicking the port number Monitoring LACP Status...

Page 19: ...18 You can read LACP status for LACP ports Monitoring RSTP Status...

Page 20: ...19 You can read RSTP status for RSTP ports Monitoring IGMP Status...

Page 21: ...20 You can read IGMP status for IGMP ports Monitoring VeriPHY Cable Diagnostics...

Page 22: ...21 You can read VeriPHY cable status for all ports which you want to check by clicking the port number and the mode Monitoring Ping Parameters...

Page 23: ...22 You can set target IP address by setting the mode which you want Monitoring Warm Restart...

Page 24: ...23 You can select yes no to do the warm restart and then the new settings will change according to your selection Maintenance Factory Default...

Page 25: ...24 You can select yes no to perform a Factory Default and then the new settings will change according to your selection Maintenance Software Upload...

Page 26: ...25 Follow the instruction on the screen to upload the new software Maintenance Configuration Upload...

Page 27: ...26 Follow the instruction on the screen to upload and download the configuration Logout When you forgot your IP or password...

Page 28: ...ault Step 1 Turn on the Web Smart Switch Step 2 Press and hold the reset button continuously for 15 seconds and release the reset button Step 3 The switch will reboot for 20 seconds and the configurat...

Reviews: