background image

DRIED BEANS

AND OTHER LEGUMES

• 

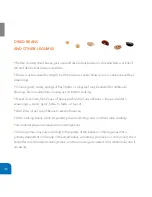
Before cooking dried beans, pick over and discard any broken or shriveled beans or bits of 

dirt and debris. Rinse beans and drain.

• 

Beans may be soaked overnight, but the pressure cooker allows you to cook beans without 

presoaking.

• 

Onions, garlic, celery, springs of fresh herbs or a bay leaf may be added for additional 

flavoring. Do not salt before cooking as salt inhibits cooking.

• 

Never cook more than 2 cups of beans per batch (2 cups of beans + 8 cups of water + 

seas onion, garlic, herbs to taste + 4 tsp oil).

• 

Add 2 tsp oil per cup of beans to prevent foaming.

• 

After cooking beans, clean lid, gasket, pressure limiting valve, and float valve carefully.

• 

Use natural pressure release when cooking beans.

• 

Cooking times may vary according to the quality of the beans or other legumes (this is 

partially dependent on the age of the dried beans, something you have no control over). If still 
hard after recommended cooking times, continue cooking uncovered. Add additional water, if 
necessary.

35

Summary of Contents for UltraPot

Page 1: ...UltraPot Happiness is Homemade Instruction Manual ...

Page 2: ...er while maintaining important nutrients for healthier meals Cooking fast and with less water saves vital natural resources and energy Our pressure cooker is built to meet and far surpass all safety and functional standards Pressure cooking with the Mueller Cooker is not only safe but it is easy and saves time This manual will guide you through the pressure cooking process and help you understand ...

Page 3: ...P 11 BEFORE THE FIRST USE 13 PRESSURE COOKING 16 SELECTING THE PRESSURE LEVEL 18 COOKING POT INNER POT MAKINGS 19 PRESSURE COOKING INFORMATION SHEET 20 HOW TO USE THE SAUTE FUNCTION 22 HOW TO USE THE SLOW COOK FUNCTION 23 HOW TO MAKE YOGURT STEP ONE PASTEURIZING 24 HOW TO MAKE YOGURT STEP TWO MAKING YOGURT CULTURE 25 HOW TO DELAY THE START OF PRESSURE COOKING 26 HOW TO CLEAN AND MAINTAIN THE PRESS...

Page 4: ...dicates that the cooker is still pressurized do not open it by force Any pressure in the cooker can be hazardous The appliance is for household and noncommercial use ONLY Keep away from children For countertop use ONLY DO NOT place on or near a hot gas or electric burner or in a heated oven and DO NOT move it while working Never use it without the INNER POT Make sure the contact surface between th...

Page 5: ...the base cord or the plug in any liquids If steam releases around the Lid during the cooking process please unplug from the power supply immediately let cool remove content and contact the customer service Certain foods such as applesauce cranberries pearl barley oatmeal or other cereals split peas noodles macaroni rhubarb or spaghetti can foam froth and sputter and clog the pressure release devic...

Page 6: ...ster and healthier cooking Your pressure cooker seals the food in steam to cook hotter and faster while maintaining important nutrients for healthier meals Cooking fast and with less water saves vital natural resources and energy It s the easiest pressure cooker to use on the market GLASS LID SPOON STAINLESS STEEL STEAMER STEAM RACK 5 ...

Page 7: ...essure cooker uses most advanced technology to provide you safety while cooking With our safety features cooking is now more safe than ever and you can be at peace knowing that our best team of engineers developed one of the safest cooker on the market 6 ...

Page 8: ...It is important for you to know all the parts of the pressure cooker so you could understand how it s functioning and how to properly use the cooker how to dissemble and assemble it for maintenance and cleaning PLS point Filter ...

Page 9: ...re Cooking Program Preset Pressure Cooking Program Preset PressureCooking Program Manual Pressure Cooking YOGURT FUNCTION Including two steps Pasteurize and Culture The Pressure Cooker will automatically set itself to Keep Warm after cooking Also press this button to Cancel ANY function at ANY time Use this button to select pressure cooking level Low Pressure or High Pressure FOOD MENU BUTTONS ...

Page 10: ...ANEL LCD DISPLAY The LCD display uses icons words and numbers to depict time pressure levels modes cooking progress and messages Keep Warm Icon Delay Start Icon Pre Heating Icon Pressurized Icon Low Normal or More ...

Page 11: ...SEMBLY UltraPot is plugged in but still no programs are selected Ready to use and to chose a program Your UltraPot is ready to use and it is preheating Timer indicating how much time is still left used for Cook Time Delay start or Keep Warm function Preheating Saute is over Yogurt program is complete and ready for Pasteurizing Pasteurizing Lid is not locked in place Assembly of the Knob on the Gla...

Page 12: ...warm soapy water Rinse towel or air dry and place in the pressure cooker LID ASSEMBLY 1 How to OPEN the lid Hold the handle firmly while pushing down on the red lid release button turn the lid clockwise until it loosens and lift vertically The lid can stand on the Lid Rest Note For new units the seal of the Lid may be slightly stronger than normal and may be slightly difficult to unlock Once the L...

Page 13: ...r or replace 2 How to CLOSE the lid Observe the Rubber Seal Ring inside the Lid and ensure that it is fitted onto the lid all the way around To lock the Lid hold the Handle and close it downwards at the Opened Lid position Turn counter clockwise until you reach the Closed Lid position A clamping sound can be heard Note A sound should be heard when closing the lid meaning the lid is closed and seal...

Page 14: ...s a built in safety feature that prevents all functions from activating if the Lid is not properly locked secured into place A cooking function cannot be selected if the Lid is not properly locked secured into place The display will show LID and continuously beep until the Lid is properly closed You will not be able to select a cooking function This is to prevent the unit from cooking without the ...

Page 15: ... Pres sure Release or Quick Pressure Release Natural Release Following pressure cooking allow the unit to remain on keep Warm The pressure will begin to drop time for pressure to drop depends on the amount of liquid in the cooker and the length of time that pressure was maintained Natural Release can take from 15 to 30 minutes 5 AFTER CYCLE COMPLETES TURN TO EXHAUST FOR QUICK RELEASE Airtight Exha...

Page 16: ...re Following pressure cooking the cooker will beep and go to keep Warm Press the keep Warm Cancel button and the display will show OFF Using an oven mitt or long utensil carefully turn the Pressure Limiting Valve to the Exhaust position to release pressure until the Float Valve sinks NOTE You cannot adjust the Pressure Limiting Valve to the Exhaust position immediately after cooking when using fun...

Page 17: ...king 1 Put the ingredients into the Inner pot and close the Lid Turn the vent to Airtight position 2 Select a desired program from the Menu 3 The Default Cook Time will display for the selected setting For example if Rice is select ed the display will show 00 12 There is no need to press any other button 4 The Rice Indicator will blink 5 times and the unit will begin heating The Pre heating Icon w...

Page 18: ...mpleted the pressure cooker will beep and automatically go to keep Warm function The Keep Warm indicator light and the Keep Warm icon will illumi nate and the display will show 00 00 After 24 hours the cooker will automatically switch to OFF 10 When the pressure cooking cycle has completed the unit will automatically switch to keep Warm You can release pressure in one of two ways Natural Pressure ...

Page 19: ...or will light up The work ing pressure will be high pressure if you press the Pressure Level button twice AUTO KEEP WARM FEATURE When cooking has completed the pressure cooker will beep and automatically go to keep Warm function The Keep Warm indicator light and the Keep Warm icon will illuminate and the display will show 00 00 After 24 hours the cooker will automatically switch to OFF NOTE The ke...

Page 20: ...iquid must not exceed 2 3 of the capacity of the cooking pot The total volume for foods such as dried vegeta bles beans or rice and grains must not exceed 1 2 the capacity Overfilling may clog the pressure limit valve which can cause excess pressure to develop Always use at least cup liquid when pressure cooking WARNING To avoid a serious burn injury when cooking foods other than rice never exceed...

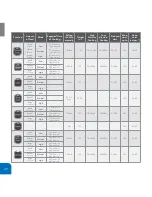
Page 21: ...Small Portion Portion Portion Normal Large Small Portion Portion Portion Normal Large Small Portion Portion Portion Normal Large 1 99 min 165 50 60 kpa 30 40KPa 0 5 24h 24h 60 80 Mode Low Normal High Low Normal High Low Normal High Low Normal High Low Normal High Low Normal High Low Normal High Expected Time of Cooking 12 minutes on High pressure 15 minutes on High pressure 20 minutes on High pres...

Page 22: ...High pressure 1 99 min 165 50 60 kpa 30 40KPa 0 5 24h 24h 60 80 1 99 min 135 0 5 24h 24h 60 80 0 5 9 5 hour 88 98 0 5 24h 24h 60 80 1 99 min 165 50 60 kpa 30 40KPa 0 5 24h 24h 60 80 NA 175 24h 60 80 1 99 min 165 50 60 kpa 30 40KPa 0 5 24h 24h 60 80 1 99 min 165 50 60 kpa 30 40KPa 0 5 24h 24h 60 80 Low Normal High Mode Low Normal High Low Normal High Low Normal High Low Normal High Low Normal High ...

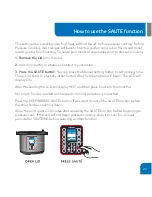
Page 23: ... Setting button to set cooking time There is no need to press any other button After 5s the program will begin The LCD will display ON After Pre heating the LCD will display HOT and then place food into the Inner Pot Stir or turn food as needed until desired color and consistency is reached Press the KEEP WARM CANCEL button if you want to cancel the SAUTÉ function before the timer finishes countin...

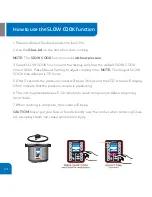
Page 24: ...The longest SLOW COOK time allowed is 9 5 hours 5 After 5 seconds the pressure cooker will beep 3 times and the LCD screen will display ON to indicate that the pressure cooker is preheating 6 The unit may take between 5 20 minutes to reach temperature before beginning count down 7 When cooking is complete the cooker will beep CAUTION Never put your face or hands directly over the cooker when remov...

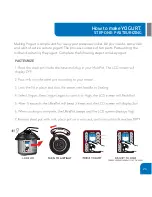
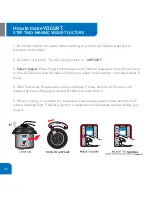
Page 25: ... need is some milk and a bit of active culture yogurt The process consists of two parts Pasteurizing the milk and culturing the yogurt Complete the following steps to make yogurt How to make YOGURT STEP ONE PASTEURIZING TURN TO AIRTIGHT Airtight Exhaust 24 PASTEURIZE ...

Page 26: ...l Normal displays with an 8 hour timer on the LCD screen Use the Manual Setting to adjust cooking time normally it takes 8 hours 4 After 5 seconds the pressure cooker will beep 3 times and the LCD screen will display the timer the yogurt timer will start and count down 5 When cooking is complete the pressure cooker beeps several times and the LCD screen displays Yogt Transfer yogurt to containers ...

Page 27: ...ay Start icon will illuminate The LCD screen will show 00 30 which is minimum delay time 30 minutes Press the Delay Start button to set your delay time The maximum Delay period is 24 hours The time that displays on the LCD screen shows how long the user wants the unit to wait before the cooking process begins 8 After programming your Delay Start time select the menu function CAUTION It is not reco...

Page 28: ...gripping and firmly pulling upwards Rinse with warm water and dry Clean the Lid with warm soapy water including the Rubber Seal Ring Filter Vent Float Valve and let dry thoroughly On the underside of the lid below the pressure limiting valve is a small metal filter which can be easily removed to clean Let the parts dry completely before reassembling Wash the Inner Pot Steamer Basket and Tempered G...

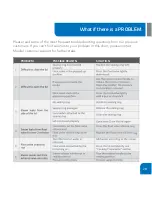
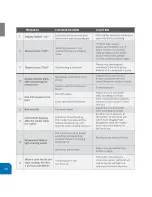
Page 29: ...equent troubleshooting questions from our previous customers If you can t find solution to your problem in this chart please contact Mueller customer support for further steps PROBLEM POSSIBLE REASON SOLUTION What if there is a PROBLEM ...

Page 30: ...PROBLEM POSSIBLE REASON SOLUTION 29 ...

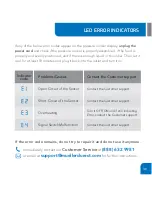
Page 31: ... if there is enough liquid in th cooker Then let it cool for at least 10 minutes and plug it back into the outlet and turn it on Immediately contact our Customer Service at 888 632 9981 or email at support muellerdurect com for further instructions If the error code remains do not try to repair it and do not use it anymore Turn it OFF ON and if still indicating Error contact the Customer support P...

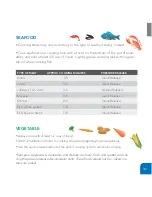
Page 32: ...r the cut the longer the cooking time should be COOKING TIME CHART Beef Veal roast or brisket 38 42 Quick Release Beef Meatloaf 2 lbs 13 18 or use the Whole Roast Function Quick Release Beef meatballs 1 2 lbs 7 12 or use the Pot Roast Function Natural Release Beef Corned 55 65 Natural Release Pork roast 43 47 Natural Release Pork ribs 2 lbs 18 or use the Pot Roast Function Quick Release Pork ham s...

Page 33: ...on a cooking rack with a trivet on the bottom of the pot if avail able and add at least 3 4 cup of liquid Lightly grease cooking rack with vegeta ble oil when cooking fish VEGETABLE Always cook with at least 1 2 cups of liquid Add 1 2 additional minutes to cooking time when preparing frozen vegetables Use the quick release method at the end of cooking cycle to avoid over cooking Split peas applesa...

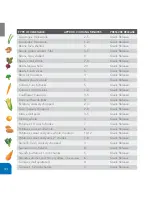
Page 34: ...the cob 4 6 4 Quick Release Escarole coarsely chopped 2 3 Quick Release Kale coarsely chopped 2 3 Quick Release Okra small pods 3 5 Quick Release Onions whole 3 Quick Release Potatoes 11 2 inch chunks 7 Quick Release Potatoes new small whole 6 Quick Release Potatoes sweet and yams whole medium 10 12 Quick Release Potatoes sweet and yams 2 chunks 7 8 Quick Release Spinach fresh coarsely chopped 3 Q...

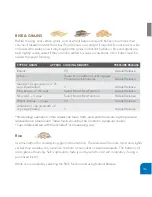
Page 35: ... referenced are with the included rice measuring cup Rice Use this method for cooking long grain or basmati rice The texture will be more moist and slightly stickier than stovetop rice more like rice from a rice cooker or Asian restaurants The butter or oil are to prevent foaming Salt is optional to taste you may wish to omit salt completely if using a purchased broth White rice is cooked by selec...

Page 36: ...oking Never cook more than 2 cups of beans per batch 2 cups of beans 8 cups of water seasonings onion garlic herbs to taste 4 tsp oil Add 2 tsp oil per cup of beans to prevent foaming After cooking beans clean lid gasket pressure limiting valve and float valve carefully Use natural pressure release when cooking beans Cooking times may vary according to the quality of the beans or other legumes thi...

Page 37: ... 35 Natural Release Kidney Beans Red 20 25 30 Natural Release Lentils green N A 10 12 Natural Release Lentils soup N A 8 10 Natural Release Lentils red N A 10 15 Natural Release Lima Beans 7 8 9 12 Natural Release Cannellini 18 22 33 38 Natural Release Pinto 20 24 30 35 Natural Release Navy beans 22 25 30 35 Natural Release Soybeans 26 33 33 40 Natural Release APPROX COOKING MINUTES Soaked overnig...

Page 38: ...the warranty does not cover damage resulting from Acts of God such as fire flood hurricanes and tornadoes Müeller USA is not responsible for shipping cost for warranty service LIMITATION AND EXCLUSIONS To the extent permitted by applicable law the liability of Müeller USA if any for any allegedly defective appliance or part shall be limited to repair or replacement of the appliance or part and sha...

Page 39: ...Reserved If it seems your pressure cooker is defective please contact Müeller support Customer Service team by Email support muellerdirect com Call 888 632 9981 for Müeller Customer Support The cases in the following tables do not always indicate a faulty cooker Please examine the cooker carefully before contacting Customer Support All contents in this document have been checked carefully Mueller ...

Page 40: ... in material and work manship under normal use and service for 2 years from the date of original purchase with receipt The manufacturer s obligation shall be limited to repairing or replacing FOB NY any part of the product that is defective Such warranty shall not apply to damages resulting from accidents abuse or misuse This warranty is valid only for First quality goods purchased from an authori...

Reviews: