background image

10

s

ectiOn

 3 — a

sseMbly

 & s

et

-u

p

IMPORTANT: 

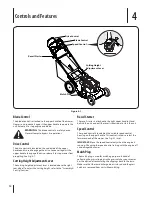
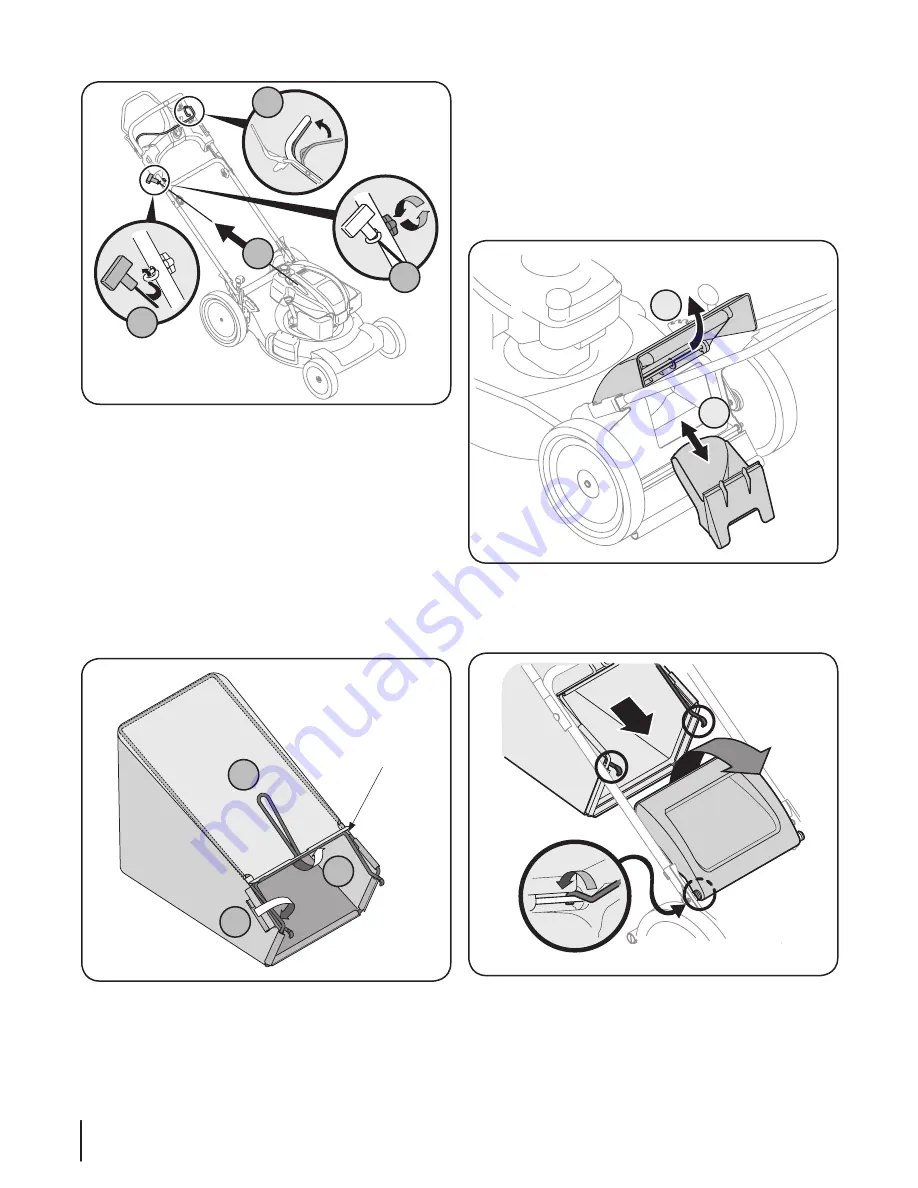
Be certain to attach the smaller, rear channel 

on each side of the bag to ensure the proper fit of bag. 

Refer to Fig. 3-4.

Attach center top of bag from inside of frame.

c. 

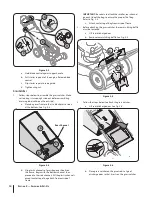
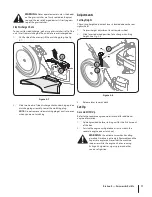
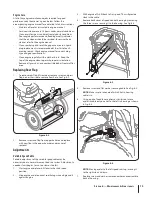
Before attaching the grass catcher, the rear mulching baffle 

2. 

must be removed.

Lift rear discharge door.

a. 

Remove rear mulching baffle. See Fig. 3-5.

b. 

Follow the steps below to attach the grass catcher:

3. 

Lift rear discharge door. See Fig. 3-6.

a. 

Place grass catcher on the pivot rod. Let go of 

b. 

discharge door so that it rests on the grass catcher.

Hold blade control against upper handle.

a. 

Pull starter rope out of the engine. Release blade 

b. 

control.
Slip starter rope into rope guide.

c. 

Tighten wing nut.

d. 

Grass Catcher

Follow steps below to assemble the grass catcher. Make 

1. 

certain bag is turned right side out before assembling 

(warning label will be on the outside).

Place bag over frame so that its black plastic side is 

a. 

at the bottom. See Fig. 3-4. 

Slip plastic channels of grass bag over hooks on 

b. 

the frame.  Begin with the bottom channel, then 

proceed to the side channels. All the plastic channels 

except center top of bag attach from outside of 

frame.

A

C

D

B

Figure 3-3

Figure 3-4

A

C

B

Rear Channel

Figure 3-5

B

A

Figure 3-6

Summary of Contents for 86M

Page 1: ...ntenance Service Troubleshooting Warranty WARNING READ AND FOLLOW ALL SAFETY RULES AND INSTRUCTIONS IN THIS MANUAL BEFORE ATTEMPTING TO OPERATE THIS MACHINE FAILURE TO COMPLY WITH THESE INSTRUCTIONS MAY RESULT IN PERSONAL INJURY Operator s Manual Form No 769 05894 February 2 2010 Self Propelled Mower Model 86M ...

Page 2: ...this Operator s Manual may cover a range of product specifications for various models Characteristics and features discussed and or illustrated in this manual may not be applicable to all models We reserve the right to change product specifications designs and equipment without notice and without incurring obligation If you have any problems or questions concerning the machine phone your local aut...

Page 3: ...s and pets at least 75 feet from mower while it is in operation Stop machine if anyone enters area Always wear safety glasses or safety goggles during 9 operation and while performing an adjustment or repair to protect your eyes Thrown objects which ricochet can cause serious injury to the eyes Wear sturdy rough soled work shoes and close fitting 10 slacks and shirts Shirts and pants that cover th...

Page 4: ...tment while the engine is running Only use parts and accessories made for this machine by 26 the manufacturer Failure to do so can result in personal injury When starting engine pull cord slowly until resistance 27 is felt then pull rapidly Rapid retraction of starter cord kickback will pull hand and arm toward engine faster than you can let go Broken bones fractures bruises or sprains could resul...

Page 5: ...frequent 3 intervals for proper tightness Also visually inspect blade for damage e g bent cracked worn Replace blade with the original equipment manufacture s O E M blade only listed in this manual Use of parts which do not meet the original equipment specifications may lead to improper performance and compromise safety Mower blades are sharp and can cut Wrap the blade or 4 wear gloves and use ext...

Page 6: ...nal combustion engine and should not be used on or near any unimproved forest covered brush covered or grass covered land unless the engine s exhaust system is equipped with a spark arrester meeting applicable local or state laws if any If a spark arrester is used it should be maintained in effective working order by the operator In the State of California the above is required by law Section 4442...

Page 7: ...njury keep hands and feet away Do not operate unless discharge cover or grass catcher is in its proper place If damaged replace immediately DANGER BYSTANDERS Do not mow when children or others are around DANGER HAND FOOT CUT Keep hands and feet away from rotating parts DANGER THROWN DEBRIS Remove objects that can be thrown by the blade in any direction Wear safety glasses DANGER SLOPES Use extra c...

Page 8: ... a guide to determine slopes where you may not operate safely WARNING Do not operate your lawn mower on such slopes Do not mow on inclines with a slope in excess of 15 degrees a rise of approximately 2 1 2 feet every 10 feet A riding mower could overturn and cause serious injury Operate riding mowers up and down slopes never across the face of slopes Operate walk behind mowers across the face of s...

Page 9: ...he handle A B B Figure 3 1 Locate the hairpin clip on the weld pin on each side of 2 lower handle Remove hairpin clip from this hole Using a pair of a pliers insert hairpin clip into the hole on pin closest to the bracket See Fig 3 2 Repeat on other side Insert a carriage bolt found in the manual bag into b the lower hole on the handle mounting bracket Secure with one plastic wing nut also include...

Page 10: ...hat it rests on the grass catcher Hold blade control against upper handle a Pull starter rope out of the engine Release blade b control Slip starter rope into rope guide c Tighten wing nut d Grass Catcher Follow steps below to assemble the grass catcher Make 1 certain bag is turned right side out before assembling warning label will be on the outside Place bag over frame so that its black plastic ...

Page 11: ...soline is extremely flammable and the vapors are explosive Never fuel the machine indoors or while the engine is hot or running Extinguish cigarettes cigars pipes and other sources of ignition WARNING Never operate mower unless the hooks on the grass catcher are firmly seated on the pivot rod and the rear discharge door rests firmly against top of the grass catcher Side Discharge Chute To convert ...

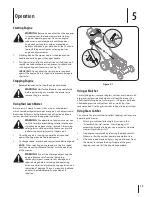
Page 12: ...n Figure 4 1 Recoil Starter Blade Control Drive Control Cutting Height Adjustment Lever Mulch Plug Speed Control 1 2 3 4 Recoil Starter The recoil starter is attached to the right upper handle Stand behind the unit and pull the recoil starter rope to start the unit Speed Control The speed control is located on the variable speed control housing on the upper handle This control is used to select th...

Page 13: ...ety glasses while operating the mower or while performing any adjustments or repairs on it Once the engine is running squeeze the drive control 1 against the upper handle to propel mower To change speed move speed control to the desired speed 2 NOTE When selecting a drive speed use the first speed until you are comfortable and familiar with the operation of the mower WARNING If you strike a foreig...

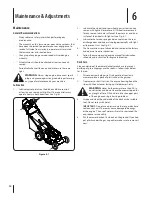
Page 14: ...nts on the rear 3 discharge door and side mulch plug periodically with light oil to prevent rust See Fig 6 1 The transmission is pre lubricated and sealed at the factory 4 and does not require lubrication Follow the accompanying engine manual for lubrication 5 schedule and instruction for engine lubrication Deck Care Clean underside of the mower deck after each use to prevent build up of grass cli...

Page 15: ...ew and press 1 flap in on either side to remove from hole See Fig 6 2 Remove screw and flap from opposite hole and replace 2 with new flap in the opposite order and manner of removal Adjustments Variable Speed Cable Periodic adjustment of the variable speed cable may be necessary due to normal wear on the drive system Adjustment is needed if unit begins to run too slow or too fast Start engine and...

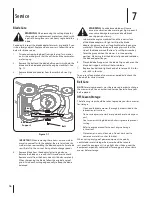
Page 16: ...ructions Store mower in a dry clean area Do not store next to corrosive materials such as fertilizer When storing any type of power equipment in a poorly ventilated or metal storage shed care should be taken to rust proof the equipment Using a light oil or silicone coat the equipment especially cables and all moving parts of your lawn mower before storage Blade Care WARNING When removing the cutti...

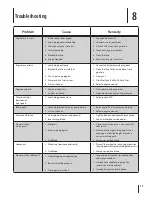
Page 17: ... at high speed Spark plug gap too close 1 Adjust gap to 030 1 Idles poorly Spark plug fouled faulty or gap too wide 1 Dirty air cleaner 2 Reset gap to 030 or replace spark plug 1 Refer to engine manual 2 Excessive Vibration Cutting blade loose or unbalanced 1 Bent cutting blade 2 Tighten blade and adapter Balance blade 1 See an authorized service dealer 2 Mower will not mulch grass Wet grass 1 Exc...

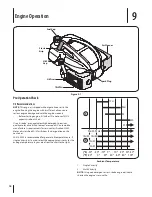
Page 18: ...soline or oil in the engine Running the engine with insufficient oil can cause serious engine damage and void the engine warranty Before starting engine fill with oil Do not over fill Oil capacity is about 20 oz Use a 4 stroke or an equivalent high detergent premium quality motor oil certified to meet or exceed U S automobile manufacturer s requirements for service classification SG SF Motor oils ...

Page 19: ...or allow flames or sparks in the area where the engine is refueled or where gasoline is stored Avoid repeated or prolonged contact with skin or breathing of vapor WARNING Do not overfill the fuel tank there should be no fuel in the filler neck After refueling make sure the tank cap is closed properly and securely Be careful not to spill fuel when refueling Spilled fuel or fuel vapor may ignite If ...

Page 20: ...vals and the kind of maintenance to be performed are described in the table below Follow the hourly or calendar intervals whichever occur first More frequent service is required when operating in adverse conditions WARNING If the engine has been running the muffler will be very hot Be careful not to touch the muffler Service more frequently when used in dusty areas Every season or 25 hours if oper...

Page 21: ...el surface with the engine stopped Drain the oil while the engine is still warm to assure rapid and complete draining Remove all fuel from tank by running engine until it stops 1 from lack of fuel Remove drain plug and allow oil to drain into a suitable 2 container See Fig 10 1 WARNING Before tipping engine or equipment to drain oil drain fuel from tank by running engine until fuel tank is empty R...

Page 22: ...IMPORTANT The spark plug must be securely tightened An improperly tightened spark plug can become very hot and may damage the engine Electrode 0 030 in Figure 10 4 Spark Plug Service WARNING DO NOT check for spark with spark plug removed DO NOT crank engine with spark plug removed To ensure proper engine operation the spark plug must be properly gapped and free of deposits Remove the spark plug bo...

Page 23: ...erioration and gum from forming in fuel system or on essential carburetor parts If the gasoline in your engine deteriorates during storage you may need to have the carburetor and other fuel system components serviced or replaced Remove all fuel from tank by running engine until it stops 1 from lack of fuel WARNING Never leave engine unattended while running Change oil See Oil Change section 2 Remo...

Page 24: ...d MTD service provider Repairs or adjustments to correct starting difficulties due to any of the following failure to follow proper maintenance procedures rotary mower blade striking an object contaminants in the fuel system improper fuel or fuel oil mixture consult your Operator s Manual if in doubt failure to drain the fuel system prior to any period of non use over three months Any starting pro...

Page 25: ... 10298 Air Cleaner Kit 951 10300 Fuel Cap Assembly 951 10358 Fuel Filter 734 04033 Wheel Front Yardman 734 04549 Wheel Front Cub Cadet 934 04404 Wheel Rear 964 04047 Yardman Grass Bag 664 04135 Cub Cadet Grass Bag 731 04177 Side Discharge Chute 942 0741A Mulching Blade 954 04176A V Belt ...

Page 26: ...at cause the failure of a warranted part to be identical in all material respects to that part as described in MTD Consumer Group Inc s application for certification The warranty period begins on the date the outdoor equipment engine is delivered to an ultimate purchaser or first placed into service The warranty period is two years Subject to certain conditions and exclusions as stated below the w...

Page 27: ...till eligible for warranty coverage Further the coverage under this warranty extends only to parts that were present on the off road engine and equipment purchased The following emission warranty parts are covered if applicable 1 Fuel Metering System Cold start enrichment system soft choke Carburetor and internal parts or fuel injection system Fuel pump Fuel tank 2 Air Induction System Air cleaner...

Page 28: ...e following cases a Log splitter pumps valves and cylinders have a separate one year warranty b Routine maintenance items such as lubricants filters blade sharpening tune ups brake adjustments clutch adjustments deck adjustments and normal deterioration of the exterior finish due to use or exposure c Service completed by someone other than an authorized service dealer d MTD does not extend any war...

Reviews: