background image

18

SECTION 8:  OFF-SEASON STORAGE

WARNING: 

Never store the machine or

fuel container indoors where there is an open
flame, spark or pilot light such as on a water
heater, furnace, clothes dryer or other gas
appliances.

If unit is to be stored over 30 days, prepare the 
engine for storage following instructions in the 
engine manual. 

Remove all dirt from exterior of engine and 
equipment.

Follow instructions recommendations on page 15.

NOTE:  When storing any type of power equipment in
an unventilated or metal storage shed, care should be
taken to rust proof the equipment. Using a light oil or
silicone, coat the equipment, especially any chains,
springs, bearings and cables.

SECTION 9:  TROUBLE SHOOTING GUIDE

NOTE: For repairs beyond the minor adjustments listed above, contact your nearest authorized service dealer or
call 1-800-800-7310 for the Customer Support Center. Refer to separate engine manual packed with your snow
thrower for more engine related information.

Trouble

Possible Cause(s)

Corrective Action

Engine fails to start

Fuel tank empty, or stale fuel.

Blocked fuel line.
Choke not in ON position
Faulty spark plug.
Key not in switch on engine.
Spark plug wire 
disconnected.
Primer button not depressed.

Fill tank with clean, fresh gasoline. Fuel may not last over thirty days 
unless a fuel stabilizer is used.
Clean fuel line.
Move switch to ON position
Clean, adjust gap or replace.
Insert key.
Connect spark plug wire.

Refer to the engine manual packed with your unit.

Engine runs erratic

Unit running on CHOKE.
Blocked fuel line or stale fuel.

Water or dirt in fuel system.
Carburetor out of adjustment.

Move choke lever to OFF position.
Clean fuel line; fill tank with clean fresh gasoline. Fuel may not last 
over thirty days unless a fuel stabilizer is used.
Drain fuel tank. Refill with fresh fuel.
Refer to the engine manual packed with your unit or have carburetor 
adjusted by an authorized service dealer.

Loss of power

Spark plug wire loose.
Gas cap vent hole plugged.
Exhaust port plugged.

Connect and tighten spark plug wire.
Remove ice and snow from cap. Be certain vent hole is clear.
Clean-see Maintenance section of engine manual.

Engine overheats

Carburetor not adjusted 
properly.
Incorrect fuel mixture.

Refer to the engine manual packed with your unit or have carburetor 
adjusted by an authorized service dealer.
Drain fuel tank. Refill with proper fuel mixture.

Excessive vibration Loose parts or damaged auger.

Stop engine immediately and disconnect spark plug wire. Tighten all 
bolts and nuts. Make all necessary repairs. If vibration continues, have 
unit serviced by an authorized service dealer.

Unit fails to propel 
itself

Incorrect adjustment of drive 
cable.
Drive belt loose or damaged.

Adjust drive cable. Refer to Adjustment section of this manual.

Replace drive belt. Refer to Belt Replacement on page 17.

Unit fails to
discharge snow

Discharge chute clogged.

Foreign object lodged in auger.
Incorrect adjustment of drive 
cable.

Drive belt loose or damaged.
Shear bolt(s) sheared

Stop engine immediately and disconnect spark plug wire. Clean dis-
charge chute and inside of auger housing.
Stop engine immediately and disconnect spark plug wire. Remove 
object from auger.
Adjust drive cable. Refer to Adjustment section of this manual.

Replace drive belt. Refer to Belt Replacement on page 17.
Replace shear bolt(s)

Summary of Contents for 615

Page 1: ...uipped with a spark arrester meeting applicable local or state laws if any If a spark arrester is used it should be maintained in effective working order by the operator In the State of California the above is required by law Section 4442 of the California Public Resources Code Other states may have similar laws Federal laws apply on federal lands A spark arrester for the muffler is available thro...

Page 2: ...number and the serial number of the equipment in the space below ENGINE INFORMATION The engine manufacturer is responsible for all engine related issues with regard to performance power rating specifications warranty and service Please refer to the engine manufacturer s Owner s Operator s Manual packed separately with your unit for more information CALLING CUSTOMER SUPPORT Please do NOT return the...

Page 3: ... the auger impeller 2 Always wear safety glasses or eye shields during operation and while performing an adjustment or repair to protect your eyes Thrown objects which ricochet can cause serious injury to the eyes 3 Do not operate without wearing adequate winter outer garments Do not wear jewelry long scarves or other loose clothing which could become entangled in moving parts Wear footwear which ...

Page 4: ...cessories approved by the manufacturer e g wheel weights tire chains cabs etc 20 If situations occur which are not covered in this manual use care and good judgment Contact your dealer or telephone 1 800 800 7310 for assistance and the name of your nearest servicing dealer MAINTENANCE AND STORAGE 1 Never tamper with safety devices Check their proper operation regularly Refer to the maintenance and...

Page 5: ...apping Screws 710 0599 4 D ATTACHING CONTROL CABLES AND Z Fitting 746 0778 2 Hex Nuts 712 0121 2 F ATTACHING CHUTE DIRECTIONAL CONTROL G Hex Lock Nuts 712 0429 2 REPLACEMENT SHEAR BOLTS Hex Bolts 710 0890A 2 Hex Bolts 710 04039 5 16 18 x 2 Handle Tabs 784 5599 ATTACHING THE HANDLES Hex Bolts 710 1880 5 16 18 x 3 4 Carriage Bolts 710 0262 Cupped Washers 736 0242 5 16 I D 5 16 18 x 1 1 2 5 16 Thread...

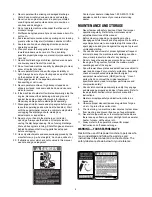
Page 6: ...ware Groups A Insert each hex bolt and lock washer through the bottom hole in the handle and bottom hole in snow thrower housing Do not tighten at this time Repeat on other side Raise both handles up until the upper hole in the handle align with the upper hole in the snow thrower housing on both sides Secure with hex bolts lock washers and handle tabs See Figure 2 Figure 2 Attaching Speed Selector...

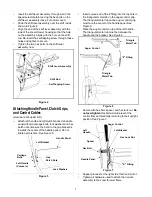
Page 7: ...en at this time See Figure 5 Figure 5 Insert curved end of the Z fitting into the top hole in the triangular metal tab on the auger control grip The triangular metal tab on the auger control grip must face the center of the handle panel See Figure 6 Place the auger control on top of the left handle The triangular metal tab must be between the handle and the bracket See Figure 6 Figure 6 Secure wit...

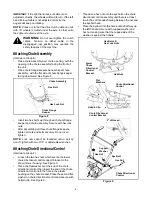
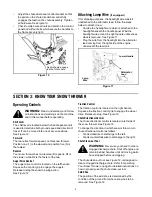
Page 8: ...cannot be threaded onto a bolt by hand Tighten with two 7 16 or adjustable wrenches Attaching Chute Directional Control Hardware Group F Loosen the two hex nuts which secure the lower chute directional control support bracket to the snow thrower housing See Figure 9 Place one flat washer over the end of the chute directional control then insert the end of the chute directional control into the hol...

Page 9: ... thrower Position one 1 is the slowest and position five 5 is the fastest Reverse Your snow thrower has two reverse R speeds R1 is the slower while R2 is the faster of the two Auger Drive Control The auger drive control is located on the left handle Squeeze the control grip to engage the augers Release to stop the snow throwing action See Figure 12 Traction Control The traction control is located ...

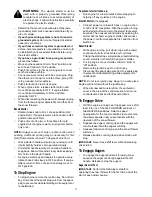
Page 10: ...ic cup is provided inside the fuel fill opening on the fuel tank Remove and discard this cup before filling up the tank Use the separate fuel tank cap to close after fill up Starting Engine IMPORTANT Prior to operating your snow thrower read understand and follow ALL instructions to perform adjustments found on pages 11 and 12 of this manual Attach spark plug wire to spark plug Make certain the me...

Page 11: ...rn to FULL choke then slowly move to OFF position To Stop Engine To stop engine remove the ignition key Do not turn key Disconnect the spark plug wire from the spark plug to prevent accidental starting while equipment is unattended To prevent starter freeze up Run engine for a few minutes before stopping to help dry off any moisture on the engine Electric Starter If equipped Connect power cord to ...

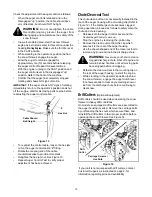
Page 12: ... out Tool The chute clean out tool is conveniently fastened to the rear of the auger housing with a mounting clip Refer to Figure 12 If the discharge chute becomes clogged during operation proceed as follows to safely clean the chute and chute opening Release both the Auger Control Lever and the Traction Auger Control Lock Lever Stop the engine by removing the ignition key Remove the clean out too...

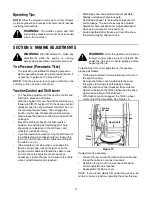
Page 13: ...the unit again Move the shift lever back to the fast reverse position then all the way forward again There should be no resistance in the shift lever and wheels should keep turning If you feel resistance when moving the shift lever or the wheels stop when they should not loosen the jam nut on the traction control cable and unthread the cable one turn If the wheels do not stop when you engage the t...

Page 14: ... surrounding heated surfaces Minor carburetor adjustment may be required to compensate for differences in fuel temperature altitude and load Refer to the separate engine manual packed with your unit for carburetor adjustment information Drive Wheels The wheels may be adjusted for two different methods of operation Follow the steps below for adjustment See Figure 17 Figure 17 One Wheel Driving On t...

Page 15: ...ear cover Oil any chains sprockets gears bearings shafts and shifting mechanism at least once a season Use engine oil or a spray lubricant Avoid getting oil on rubber friction wheel and aluminum drive plate Friction Wheel The rubber on the friction wheel is subject to wear and should be checked after 25 hours of operation and periodically thereafter Replace the friction wheel rubber if any signs o...

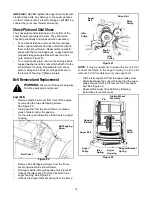
Page 16: ... Remove plastic belt cover from front of the engine by removing the two self tapping screws See Figure 20 Drain gasoline from the snow thrower or place a piece of plastic under the gas cap Tip the unit up and forward so that it rests on auger housing Figure 20 Remove six self tapping screws from the frame cover underneath the snow thrower Roll auger belt s off engine pulley See Figure 21 Unhook th...

Page 17: ...rom the axle Using a wrench to hold the shaft loosen but do not completely remove the hex nut and bell washer on the left end of gear shaft See Figure 24 Lightly tap the hex nut to dislodge the ball bearing from the right side of the frame Remove the hex nut and bell washer from the left end of the shaft Slide the gear shaft to the right then slide the friction wheel assembly from the shaft Remove...

Page 18: ...rt in fuel system Carburetor out of adjustment Move choke lever to OFF position Clean fuel line fill tank with clean fresh gasoline Fuel may not last over thirty days unless a fuel stabilizer is used Drain fuel tank Refill with fresh fuel Refer to the engine manual packed with your unit or have carburetor adjusted by an authorized service dealer Loss of power Spark plug wire loose Gas cap vent hol...

Page 19: ...xle 22 711 0908A Spiral Axle 24 711 0909A Spiral Axle 26 4 714 0161 Key 5 715 0143 Pin Spiral 6 717 0526 Shaft Worm 7 717 0528A Gear Worm 8 718 0186 Collar Thrust 9 721 0325 Plug 10 721 0327 Seal Oil 11 736 0351 Washer Flat 12 736 0369 Washer Flat 13 736 0445 Washer Flat 14 737 0168 Grease 15 741 0662 Bearing Flange 16 741 0663 Bearing Flange 17 618 0152A Ass y Complete 22 618 0120A Ass y Complete...

Page 20: ...20 Model Series 615 E6A5 E645 E665 1 2 3 4 5 6 7 8 9 10 11 12 14 15 13 9 9 18 19 20 21 22 23 24 25 23 22 26 18 27 28 29 30 30 31 9 31 9 33 9 18 35 36 37 38 39 41 40 42 43 40 39 45 34 46 17 48 47 44 ...

Page 21: ...riage Bolt 25 710 0703 Carriage Screw 1 4 20 x 75 26 710 0726 Hex Washer Screw 5 16 12 x 75 27 736 0169 Lock Washer 3 8 28 712 0798 Hex Nut 3 8 16 29 710 0451 Carriage Bolt 5 16 18 x 75 30 784 5580 Snow Shoe 31 736 0242 Bell Washer 33 784 5576 22 Shave Plate 784 5581A 24 Shave Plate 784 5579A 26 Shave Plate 35 684 0065 Impeller Assembly 36 715 0114 Pin 37 618 0152A 22 Gear Assembly 618 0120A 24 Ge...

Page 22: ...4 15 712 0181 Lock Jam Nut 3 8 16 16 756 0569 Pulley Half 17 736 0242 Bell Washer 18 736 0505 Flat Washer 19 754 0430B Belt 20 756 0967 Auger Pulley 21 736 0247 Flat Washer 3 8 x 1 25 OD 22 736 0331 Bell Washer 23 710 0696 Hex Cap Screw 3 8 24 24 748 0360 Adapter Pulley 25 710 0654A Hex Screw 3 8 16 x 1 0 26 629 0071 Extension Cord 27 OEM 390 987 Electric Start Ref No Part No Description IMPORTANT...

Page 23: ... 710 0230 Hex Cap Screw 1 4 28 x 50 13 756 0313 Flat Idler 14 710 1245B Lock Cap Screw 5 16 24 15 712 0181 Lock Jam Nut 3 8 16 16 756 0569 Pulley Half 17 736 0242 Bell Washer 18 736 0505 Flat Washer 19 736 0507 Washer 20 754 0430B Belt 21 756 0967 Auger Pulley 22 736 0247 Flat Washer 23 736 0331 Bell Washer 24 710 0696 Hex Cap Screw 3 8 24 25 748 0360 Pulley 26 710 0654A Hex Washer Screw 3 8 16 x ...

Page 24: ...ls Series 615 E6A5E E645E E665E 1 2 3 3 4 5 6 7 8 15 15 18 20 21 19 23 15 15 24 25 26 27 28 29 30 31 32 33 34 37 36 40 41 42 43 44 39 11 12 14 35 38 5 11 12 17 13 55 24 56 48 46 51 47 50 10 9 15 49 50 46 45 24 ...

Page 25: ...0223 Grip 28 705 5265 Speed Selector Plate 1 Rev 705 5231 Speed Selector Plate 2 Rev 29 710 1652 Hex Washer Screw 1 4 20 x 625 30 710 1003 Hex Washer Screw 10 16 x 625 31 710 0599 Hex Washer Screw 1 4 20 x 50 32 712 0415 Hex Nut 33 725 1300 Headlight 18 Watt 34 731 1317 Headlight Cover 35 747 0904 Shift Lever 36 710 3015 Hex Cap Screw 1 4 20 x 75 37 712 3027 Hex Lock Nut 1 4 20 38 732 0733 Shift L...

Page 26: ...1 1 2 3 4 4 5 5 6 16 Wheels 13 or 15 Wheels 4 7 7 8 9 10 10 11 11 12 1 5 13 14 15 16 17 18 1 19 20 21 22 23 24 25 25 26 28 29 42 1 1 30 31 32 33 34 8 35 Drive Clutch Cable Auger Clutch Cable Blower Housing 36 43 43 44 41 20 37 38 39 40 27 45 ...

Page 27: ... Shift Rod Assembly 30 746 0897 Drive Cable 31 748 0190 Spacer 32 684 0021 Friction Wheel Bracket Assembly 33 732 0264 Extension Spring 34 712 0711 Jam Nut 3 8 24 35 746 0898B Drive Cable 36 738 0869 Axle 13 Wheels 738 0830 Axle 16 Wheels 37 790 00010 Friction Plate 790 00011 Friction Plate w Extrusion 38 735 0243B Friction Wheel Rubber 39 718 0301A Friction Wheel Hub 40 618 0063A Friction Wheel B...

Page 28: ...intenance items such as lubricants filters blade sharpening tune ups brake adjustments clutch adjustments deck adjustments and normal deterioration of the exterior finish due to use or exposure d MTD does not extend any warranty for products sold or exported outside of the United States its possessions and territories except those sold through MTD s authorized channels of export distribution e Rep...

Reviews: