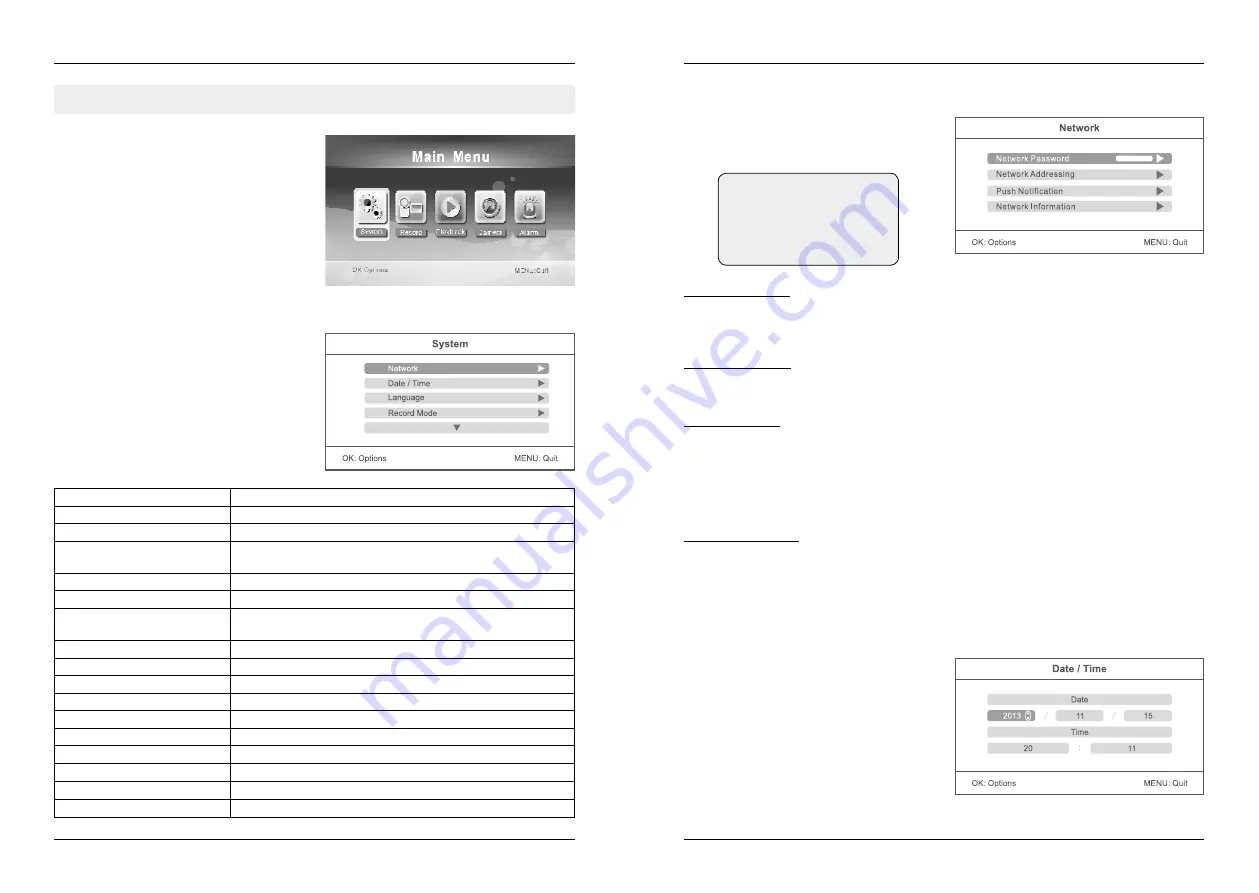
MT Vision HS-201 User Manual Download Page 17

5.1 System

5. Main Menu

08

09

5. Main Menu

ENGLISH

ENGLISH

Press in the real-time monitoring the MENU but-
ton to enter the main menu.

Press the 

t

 or 

u

 button to select the menu 

item SYSTEM. Confirm with OK.

Press the 

p

 or 

q

 button to select the menu 

item NETWORK. Confirm with OK.

Press the 

p

 or 

q

 button to select the menu 

item DATE / TIME. Confirm with OK.

Press the 

t

 or 

u

 keys to select an option. Press 

the 

p

 or 

q

 keys to a corresponding value set.

To save and exit the menu, press the OK button.

Network Password:
Enter any password as a security (12 characters max.). The same password you must enter in the 
app on your smartphone or tablet. The function of the application to a mobile terminal is explained 
in a later section.

Network Adressing:
Choose between a dynamic IP address (DHCP) or a static IP address. The dynamic IP address 
applies in most cases.

Push Notification:
„Enable / Disable“ set the push notification (on or off). The notification is done on your mobile 
device when the camera detects motion. With the „minimum push interval“ you can set the dis-
tance between the camera detection and notification (2, 5, 10, 20 or 30 minutes). Put in „period“ 
the period of time in which a push notification to be done. Under „Registered Mobile“ you will see 
the selected mobile devices. If „None“ is displayed on the screen, no mobile devices are currently 
connected to the camera system.

Network Information:
Here all the network information will be displayed when a network connection is available. This 
option is available only at the IP version.

Network:

Date / Time:

The SYSTEM menu consists of several sub-items, which are explained in the following:

Network (only at IP version)

Sets and views the network information.

Date / Time

Sets the system time and date.

Language

Sets the system language.

Record Mode

Sets to stop recording or overwrite the earliest video record 
when the storage medium is full.

Format SD/USB

Sets whether to format the storage medium.

Storage for Recording

Selects the storage medium.

Display Items

Sets whether to display RSSI, SD/USB Status and Camera on 
the screen and the recorded video.

TV System

Selects a system.

System Information

Views the system information.

System Upgrade

For software upgrade.

Scan Mode Periode

Sets the cyclic display interval of monitoring picture on the camera.

Mute

Turns on/off the speaker on the receiver.

Load Default

Sets whether to restore default settings.

Brightness

Adjusts brightness of the LCD screen.

Volume

Adjusts the volume.

Alarm Volume

Adjusts the alarm volume.

Power Saving Mode

Adjusts power saving mode.

Note:

The menu item „Network“ is 
only available at the IP versi-
on of the camera system!

Summary of Contents for HS-201

Page 1: ...Bedienungsanleitung HS 201 HS 401 ...

Page 2: ...er Monitor angeschlossen wird Darüber hinaus verfügen die Kameras über eine Infraroterfassung des menschlichen Kör pers mit Alarmfunktion Einfache Installation ohne Kabel Komplett digital keine Störungen Empfangseinheit mit integriertem Videorekorder Unterstützt SD Karten bis zu 32GB SDHC empfohlen oder externe Festplatten bis zu 1TB Unterstützt bis zu 4 Kameras 24 Stunden 7 Tage non stop Aufnahme...

Page 3: ...dnungsgemäß an einer Wand oder Decke 2 Installieren Sie die Empfangseinheit an einem geeigneten Ort 3 Legen Sie die SD Karte ein oder schließen Sie ein externes USB Speichermedium an Hinweis 1 Die SD Karte oder das externe Speichermedium kann nicht während des Betriebes gewechselt werden 2 Die SD Karte oder das externe Speichermedium sollte in FAT32 formatiert werden 3 Bitte formatieren Sie die SD...

Page 4: ...n oder drücken Sie den Netzschalter auf der Fernbedienung Richten Sie die Fernbedienung auf den Empfänger Die Betriebsanzeige ist eingeschaltet und das Betriebsbild erscheint 5 Koppeln Sie die Kameras mit dem Empfänger maximal vier Kameras können gleichzeitig betrie ben werden Das Koppeln ist standardmäßig eingestellt Sollte die Verbindung nicht funktionieren lesen Sie bitte unter Kopplung Pairing...

Page 5: ...egen 2 5 10 20 oder 30 Minuten Legen Sie bei Zeitraum die Zeit spanne fest in der eine Pushbenachrichtigung erfolgen soll Unter Registrierte Mobiles sehen Sie die ausgewählten Mobilgeräte Wenn auf dem Display Keine angezeigt wird sind aktuell keine Mobilgeräte mit dem Kamerasystem verbunden Netzwerkinformationen Hier werden alle Netzwerkinformationen angezeigt wenn eine Netzwerkverbindung besteht ...

Page 6: ...hlen und be stätigen Sie anschließend mit OK Sie können zwischen zwei Optionen auswählen SD Karte Wählen Sie SD Karte aus um die Videos auf einer SD Karte aufzunehmen USB Gerät Wählen Sie USB Gerät aus um die Videos auf einem USB Gerät aufzunehmen Drücken Sie die p oder q Taste um den Menüpunkt Displayoptionen auszuwählen und be stätigen Sie anschließend mit OK In diesem Menü können Sie festlegen ...

Page 7: ...um das Menü wieder zu verlassen Drücken Sie die p oder q Taste um den Menüpunkt Helligkeit auszuwählen und bestätigen Sie anschließend mit OK In diesem Menü können Sie die Helligkeit des Monitors einstellen Nutzen Sie die t oder u Tasten um die Helligkeit anzupassen Bestätigen Sie mit OK um zu speichern und das Menü zu verlassen Drücken Sie die p oder q Taste um den Menüpunkt Lautstärke auszuwähle...

Page 8: ...ers empfindlich reagieren wenn eine Bewegung erfolgt Wenn Sie alle Einstellungen vorgenommen haben drücken Sie die MENÜ Taste um zu speichern und das Menü zu verlassen Nachdem Sie alle Einstellungen vorgenommen haben drücken Sie die OK Taste um den Timer zu speichern und noch einmal Ihre Einstellun gen in einer Übersicht zu überprüfen Um die Timerprogrammierungen zu speichern und das Menü zu verla...

Page 9: ...bstand größer kann die Abtastung scheitern Wenn eine Videoaufnahme länger als 5 Minuten beträgt wird eine Videodatei automatisch gespeichert Demzufolge wird alle 5 Minuten ein Video auf dem Speichermedium abgelegt Gleichzeitige Aufnahmen mit mehreren Kameras max 4 Kameras ist möglich Die aufge zeichneten Videos der jeweiligen Kameras werden unabhängig von einander in einem sepa raten Videoordner a...

Page 10: ...q Taste eine Kamera aus und bestätigen erneut mit OK Auflösung Wählen Sie mit der p oder q Taste eine Auf lösung der Videos aus Sie können zwischen Hoch und Niedrig wählen Bestätigen Sie die Auswahl mit OK Qualität Wählen Sie mit der p oder q Taste die Qualität der Videos aus Sie können wählen zwischen Niedrig Mittel Hoch oder Top Bestäti gen Sie die Auswahl mit OK Um das Menü zu verlassen und die...

Page 11: ...Ü Taste Kamera Bildgebung Sensor 1 5 Zoll Farbe CMOS Video Auflösung 656 x 488 Sichtwinkel 50 Spannungsversorgung 5Volt Stromaufnahme max 500mA Schutzklasse IP Schutzgrad IP66 Nachtsicht Entfernung max 20m Abmessungen B x T x H 164 x 81 x 172mm inklusive Halterung Gewicht ca 686 g Empfangseinheit SD Karten Unterstützung bis 32GB Festplatten Unterstütztung bis 1TB Video Bildfrequenz max 30fps Video...

Page 12: ...Bewegungssensors ist größer als der Aufnahmewinkel Objekte durchlaufen die effektive Aufnahmefläche zu schnell bzw unter 2 Sekunden Die Linsenabdeckung ist verschmutzt Hiermit wird die Übereinstimmung mit folgenden Richtlinien Normen bestätigt Richtlinie zur elektromagnetischen Verträglichkeit 2004 108 EG EN 55013 2001 A1 2003 A2 2006 EN 55020 2007 EN 61000 3 2 2006 A1 2009 A2 2009 EN 61000 3 3 20...

Page 13: ...Stand 2 1 Januar 2015 Technische Änderungen Druckfehler und Irrtümer vorbehalten Megasat Werke GmbH Industriestraße 4a D 97618 Niederlauer www mtvision tv info mtvision tv User manual HS 201 HS 401 ...

Page 14: ...ras have an infrared detection of the human body with alarm function Easy installation without cables Completely digital no interference Receiver unit with built in VCR Supports SD cards up to 32 GB SDHC recommended or external hard drives up to 1TB Supports up to 4 cameras 24 hours 7 days non stop recording function Multiple recording modes manual schedule motion continuous recording 20 m night v...

Page 15: ... Install the camera at the proper monitoring location and screw up the bracket 2 Install the receiver at a proper location 3 Insert the SD card or connect an external USB storage device Note 1 It doesn t support hot swappable of SD card or external storage device 2 The external mobile disk SD card should be in format of Fat32 3 Please format the SD card or external mobil disk if they have been use...

Page 16: ...page 18 6 After successful pairing the following real time monitoring picture appears 7 Press the button to switch between four display modes 8 Press the button to enter cyclic mode display Five cyclic intervals are available 5s 10s 15s 20s and 30s and can be set under System Time stamp four pics one big three small pics one pics one big three small pics 4 Operation 06 07 4 Operation ENGLISH ENGLI...

Page 17: ...ed Mobile you will see the selected mobile devices If None is displayed on the screen no mobile devices are currently connected to the camera system Network Information Here all the network information will be displayed when a network connection is available This option is available only at the IP version Network Date Time The SYSTEM menu consists of several sub items which are explained in the fo...

Page 18: ... p or q button to select the menu item STORAGE FOR RECORDING Confirm with OK You can choose between two options SD Card Choose SD card to get the videos on an SD card USB device Choose USB device to get the videos on an USB device Press the p or q button to select the menu item DISPLAY ITEMS In this menu you can choose which icons should be shown on the display RSSI Signal intensity icon SD USB St...

Page 19: ...ation by clicking OK or select Cancel to leave the menu Press the p or q button to select the menu item BRIGHTNESS In this menu you can adjust the brightness of the monitor Use the t or u keys to adjust brightness Confirm with OK to save and exit the menu Press the p or q button to select the menu item VOLUME In this menu you can adjust the volume of the monitor Use the t or u keys to adjust the v...

Page 20: ... particularly sensitive when movement takes place When you have made your settings press the MENU button to save and exit the menu After you have made all the settings press the OK button to set the timer to save and again to check your settings in an overview To save the timer settings and exit the menu press the MENU button If you want to add another recor ding select New Schedule and confirm wi...

Page 21: ...nce is larger the scan may fail If a video recording is longer than 5 minutes a video file will be saved automatically Accor dingly it is stored on the storage medium every 5 minutes a video Simultaneous recordings with multiple cameras max 4 cameras is possible The recorded videos of the respective cameras are placed independently of each other in a separate video folder PIR Recording Manual Reco...

Page 22: ... q button to select a camera and confirm again with OK Resolution Size Press the p or q button to select a video re solution You can choose between high and low Confirm your selection with OK Quality Press the p or q button so set the quality of the videos You can choose between Low Medium High or Top Confirm your selec tion with OK To exit the menu and save the settings press the MENU button Pres...

Page 23: ...ra Imaging Sensor 1 5 inch Color CMOS Video resolution 656 x 488 Viewing angle 50 Power supply 5 volts Current consumption max 500 mA IP degree of protection IP66 Night vision distance max 20 m Dimensions W x D x H 164 x 81 x 172 mm including bracket Weight 686 g Receiver SD card support up to 32 GB Hard Drives supported up to 1 TB Video frame rate max 30 fps Video resolution CIF VGA Video format ...

Page 24: ...ctive area too quickly in less than 2s Fresnel shell is dirty This attesting conformity with the following directives standards Electromagnetic Compatibility Directive 2004 108 EC EN 55013 2001 A1 2003 A2 2006 EN 55020 2007 EN 61000 3 2 2006 A1 2009 A2 2009 EN 61000 3 3 2008 Low Voltage Directive 2006 95 EG EN 60065 2002 A1 2006 A11 2008 7 Troubleshooting 30 31 Declaration of Conformity ENGLISH EN...

Page 25: ...Status 2 1 January 2015 Technical changes misprint and errors reserved Megasat Werke GmbH Industriestraße 4a D 97618 Niederlauer www mtvision tv info mtvision tv ...

Reviews: