background image

D 21

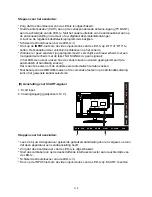
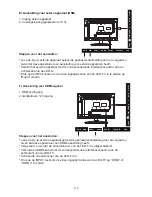
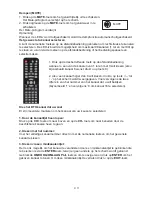
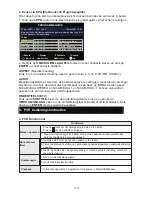
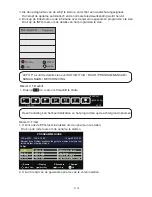
12- Bediening van het menu

0

ard

ff

ff

ff

Exit

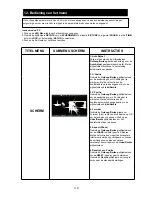
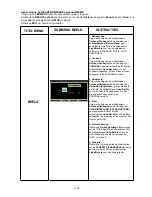
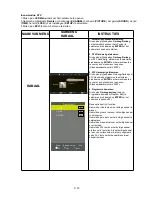
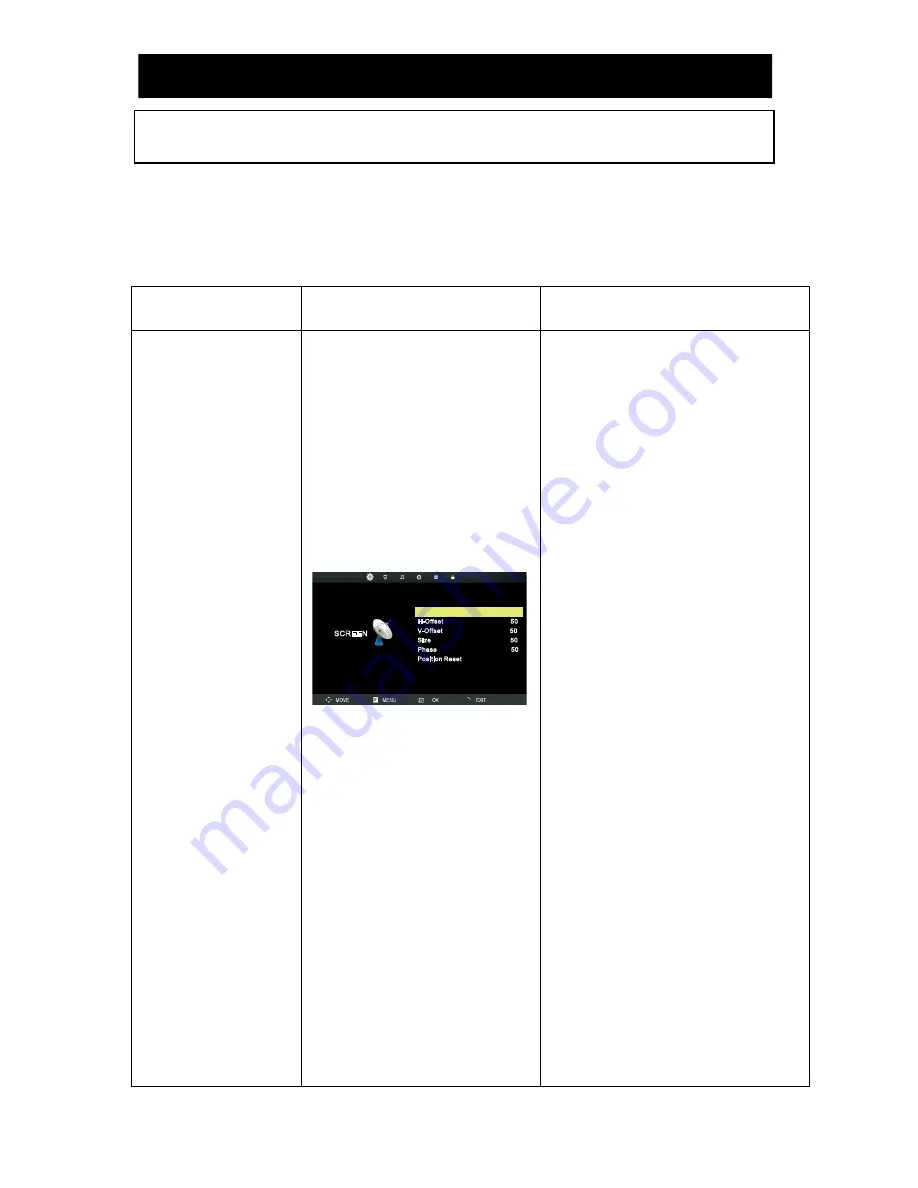
Auto Adjust

V-Offset                                       50

Size                                              50

Phase                                           50

Position Reset

H-Offset                                       50

SCREEN

SCHERM

TITEL MENU

SUBMENU SCHERM 

INSTRUCTIES

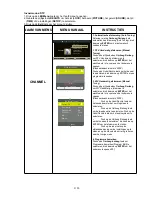
U kunt bepaalde parameters van de LED-tv in het menu aanpassen. Lees de onderstaande beschrijvingen 
zorgvuldig door om meer inzicht te krijgen in de parameters die kunnen worden aangepast.

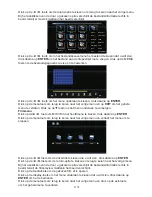
Invoer-modus: PC 

1.Druk op de 

LED Menu

-toets om het hoofdmenu te openen.

2.Gebruik de pijltjestoets 

RECHTS

 om het 

SCHERMMENU

, het beeld (

PICTURE

), het geluid (

SOUND

), de tijd (

TIME

), 

   het slot (

LOCK

) of de instelling (

SETUP

) te selecteren.

3.Druk op de Exit-toets om het menu te sluiten.

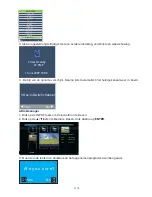
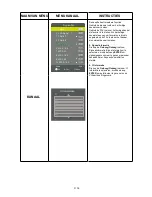
1. Auto Adjust

Zorg met behulp van de pijltjestoetsen 

Omhoog/Omlaag

 dat de aanduiding voor de 

Auto Adjust

 geel gemarkeerd wordt. Met de 

pijltjestoets Rechts kunt u de instelling 
automatisch aanpassen.

2. H Positie

Gebruik de 

Omhoog/Omlaag

 pijltjestoetsen 

om de aanduiding voor H Positie geel te 
markeren. Met deze functie kan de 
beeldbreedte worden aangepast d.m.v. de 
pijltjestoetsen 

Links/Rechts

.

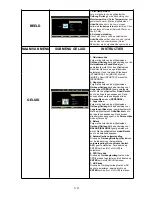
3. V Positie

Gebruik de 

Omhoog/Omlaag

 pijltjestoetsen 

om de aanduiding voor V Positie geel te 
markeren. Met deze functie kan de 
beeldhoogte worden aangepast d.m.v. de 
pijltjestoetsen 

Links/Rechts

.

4. Formaat

Gebruik de 

Omhoog/Omlaag

 toets om 

Formaat (Size) te kiezen, druk daarna op OK 
om het submenu te openen. Druk op de 

Links/Rechts

 pijltjestoetsen om het 

beeldformaat aan te passen.

5. Aspect (Phase)

Gebruik de 

Omhoog/Omlaag 

pijltjestoetsen 

om de 

PHASE

 indicator geel te markeren. 

Met deze functie kan mogelijke horizontale 
interferentie worden gecorrigeerd en kunnen 
de omtrekken van personen worden 
verscherpt door middel van de

 Links/Rechts 

pijltjestoetsen.

6. Resetten van Positie

Gebruik de 

Omhoog/Omlaag

 pijltjestoetsen 

om de 

RESET

 indicator geel te markeren. 

Gebruik de

 Rechts

-pijltjestoets om terug te 

keren naar de standaardinstellingen.

Summary of Contents for LE-227794MT

Page 1: ...GEBRUIKSHANDLEIDING INSTRUCTION MANUAL Model Nr LE 227794MT ...

Page 2: ...teek geen voorwerpen metalen of brandbare voorwerpen in de tv deze kunnen elektrische schokken of brand veroorzaken Plaats de LED tv niet in de nabijheid van meubels bekleding of elektronische producten Het product is niet ontworpen voor inbouw en mag daarom niet in een omsloten ruimte worden geplaatst zonder deugdelijke ventilatie Plaats het apparaat niet in de nabijheid van direct zonlicht of wa...

Page 3: ...videosignaal 3 Geschikt voor HDMI signaal 4 Geschikt voor ontvangst SCART signaal 5 Geschikt voor ontvangst tv signaal 6 Twee ingebouwde 5W luidsprekers twee sets audioaansluitingen 7 Infraroodafstandsbediening voor alle functies 8 Coax audio uitgang 9 Ondersteuning USB voor PVR harddisk videorecorder en Mediaspeler 10 Ondersteuning CI slot common interface 11 Ondersteuning van DVD playback Onjuis...

Page 4: ...anden 4 Als u gebruikte batterijen afdankt dient u daarbij de plaatselijk geldende voorschriften in acht te nemen Gooi batterijen niet weg bij het huishoudafval 1 Functies controlepaneel 1 INPUT Selecteer het binnenkomend signaal ATV DTV Media AV PC Components SCART HDMI1 HDMI2 2 MENU Toegang tot het MENU 3 VOL Volume omlaag 4 VOL Volume omhoog 5 CH TV kanaal omlaag 6 CH TV kanaal omhoog 7 STANDBY...

Page 5: ...w versterker 8 Uitgang voor hoofdtelefoon 9 YPbPr Componentingang Sluit hier uw AV systeem op aan 10 CVBS Composiet video ingang Sluit hier uw AV systeem op aan 11 Ingang rechter linker audiokanaal voor Composiet video en S Videomodus 12 Antenne uitgang 75 Ω Sluit een antennekabel of antenne aan om een kabelsignaal antennesignaal te ontvangen 13 PCMCIA ingang voor de kaartlezer CI Common Interface...

Page 6: ...t scherm 15 INPUT Invoermodus selecteren 16 SLEEP Tijd instellen waarop de TV automatisch uitschakelt 17 PMODE Beeldmodus selecteren 18 SMODE Geluidsmodus selecteren 19 TEXT Teletekst in en uitschakelen 20 SUBTITLE Ondertiteling inschakelen 21 HOLD Huidige teletekstpagina vastzetten EPG druk op deze toets voor de EPG functie 22 TV RADIO TV of Radio instellen 23 INDEX Indexpagina opvragen 24 SUBPAG...

Page 7: ...al U kunt uw LED tv gebruiken als monitor voor uw pc met behulp van een VGA kabel niet bijgeleverd D 6 1 VGA ingang vergeet niet de schroeven aan te draaien 2 PC Audio ingang 3 DC 12V voedings ingang 3 2 1 DC IN USB HDMI1 HDMI2 SCART PC AUDIO VGA COAX YPbPr CVBS R L RF IN CI SLOT ...

Page 8: ...eo ingang 3 YPbPr componentingang 4 Voedingsingang gelijkstroom 12 V C Aansluiting voor tv signaal 1 Ingang kabel antenne 75 Ω 2 Voedingsingang gelijkstroom 12 V D 7 4 2 3 1 DC IN USB HDMI1 HDMI2 SCART PC AUDIO VGA COAX YPbPr CVBS R L RF IN CI SLOT 2 1 DC IN USB HDMI1 HDMI2 SCART PC AUDIO VGA COAX YPbPr CVBS R L RF IN CI SLOT ...

Page 9: ...jnt een blauw scherm met een rondgaand wit scherm met de tekst NO SIGNAL tv geen signaal In het LED menu kunt u lezen hoe de zenders kunnen worden geprogrammeerd via automatisch of handmatig zoeken Het is aan te bevelen om de zenders eerst automatisch te laten zoeken Met behulp van de CH CH toetsen of de numerieke toetsen op de afstandsbediening kunt u het gewenste kanaal selecteren Stappen voor h...

Page 10: ...om de video ingangsmodus van de LED TV in te stellen op Media modus Stappen voor het aansluiten Lees de bij uw externe apparaat geleverde gebruikershandleiding door en vergewis u ervan dat deze apparatuur een HDMI aansluiting heeft Vergewis U ervan dat de stroomtoevoer van de LED TV is uitgeschakeld Verbind een HDMI kabel met de corresponderende interfaceconnector aan de achterkant van de LED TV S...

Page 11: ...de stand by modus en gaat het indicatorlampje rood branden Schakelen tussen verschillende bronnen ATV DTV Media AV PC Component SCART HDMI1 HDMI2 Als u op de INPUT toets drukt wordt het menu voor de inputmodus weergegeven In het menu kunt u vervolgens op drukken om een inputbron te kiezen Druk op de Enter toets om uw selectie te bevestigen 1 Druk op de toets VOL om het volume toe te laten nemen Er...

Page 12: ...t u op toets 8 2 Als u een kanaal hoger dan 9 wilt kiezen drukt u op toets tot op het scherm wordt weergegeven Voer vervolgens de twee cijfers in van het nummer van het kanaal dat u wilt bekijken bijvoorbeeld 1 en vervolgens 6 om kanaal 16 te selecteren Kies het DTV kanaal dat u wenst Er zijn meerdere manieren om het kanaal van uw keuze te selecteren 1 Door de kanaallijst heen lopen Druk op de CH ...

Page 13: ...malige opname 3 Als de ingestelde tijd van opname strijdig is met een eerdere instelling verschijnt een waarschuwing 1 Kan een enkel bestand wissen 2 Geeft disk formatteerfuncties 1 U kunt het opgenomen programma terugspelen in Media USB kanaal Meteen opnemen Opnemen met timer Diskmanager Playback Record Move View Prev Day OK Display Schedule Remind Next Day 14 00 15 00 Midsomer nurders 2 Gebruik ...

Page 14: ... druk daarna op ENTER Dan wordt de USB snelheid gecontroleerd 3 Opnamemethodes Manier 1 Sneltoets 1 Druk op toets om het huidige programma op te nemen Druk op om de opname te stoppen 2 Druk op de STOP toets om de opname te stoppen daarna wordt de normale televisieuitzending hervat Select Disk C Check PVR File System Start Format Free Record Limit 6 Hr USB Disk Time Shift Size Speed OK Menu Select ...

Page 15: ...eze handeling kan het beeld stilzetten en het programma op de achtergrond opnemen Manier 3 Timer 1 U kunt ook de EPG toets indrukken om de opname in te stellen Druk op de rode toets om de opname te starten 2 U kunt de tijd van de gewenste opname van te voren instellen PROGRAMME GUIDE 10 Apr 14 E4 The Force Double Indemnity Surprisel Brilliant Creatu 15 00 16 00 16 00 17 00 17 00 18 00 28 ITV4 32 F...

Page 16: ...zen 2 Druk op de toets om Media te kiezen druk daarna op ENTER 3 Door de rode toets in te drukken kan het opgenomen programma worden gewist Ar e y ou s ur e Yes No RECORDER 1 YLE TV1 15 Minute 03 Minute 07 Date 07 Date End Time Start Time 08Hour 09 Hour Dec Month Dec Month Mode once OK Back 3 Sec to Switch channel Yes No Timer Overlay 21 TMF 13 Jul 2007 03 00 Y R F Resolution 1200X900 Size 1381KBy...

Page 17: ... toets om de optie die u wilt aanpassen in het hoofdmenu Media te kiezen druk daarna op ENTER Fotomenu Druk op de toets om FOTO te kiezen in het hoofdmenu druk daarna op ENTER Druk op de menutoets om terug te gaan naar het vorige menu en verlaat het menu om te stoppen Druk op de toets om de drive disk te kiezen die wilt bekijken druk daarna op ENTER Druk op de toets om de return optie te kiezen om...

Page 18: ...lete Flower00 jpg Druk op de toets om in het bestandskeuzemenu de bestandsmap te kiezen waarin u wilt zoeken druk daarna op de rode toets of op ENTER op uw afstandsbediening om naar het submenu te gaan Druk op de toets om in het bestandskeuzemenu het bestand te kiezen dat u wilt wissen druk daarna op de rode toets of op ENTER op uw afstandsbediening om bestanden te wissen Muziekmenu Druk op de toe...

Page 19: ...e menutoets om terug te keren naar het vorige menu en op EXIT om het gehele menu te verlaten Druk op de toets om het menu onderaan te verbergen Filmmenu Druk op de toets om MOVIE in het hoofdmenu te kiezen druk daarna op ENTER Druk op de menutoets om terug te keren naar het vorige menu en verlaat het menu om te stoppen Druk op de toets om de drivedisk te kiezen die u wilt zien druk daarna op ENTER...

Page 20: ...de toets om de return optie te kiezen en terug te keren naar het vorige menu Bij het aanklikken van de door u gekozen optie verschijnt de bestandsinformatie rechts in beeld terwijl de tekst middenin het beeld verschijnt Druk op de mediatoets om de gekozen tekst te bekijken Druk op de displaytoets om het menu onderaan te kiezen druk daarna op OK om het te bedienen Druk op de menutoets om terug te k...

Page 21: ...bpage toets Subpagina Wanneer de teletekstinformatie op meerdere pagina s wordt weergegeven kan het enige tijd duren voordat de door u gewenste subpagina automatisch wordt weergegeven U kunt het nummer van de gewenste subpagina invoeren en naar het tv programma blijven kijken tot de desbetreffende subpagina wordt gevonden Selecteer het paginanummer met behulp van de cijfertoetsen 0 9 Indien boveni...

Page 22: ...2 H Positie Gebruik de Omhoog Omlaag pijltjestoetsen om de aanduiding voor H Positie geel te markeren Met deze functie kan de beeldbreedte worden aangepast d m v de pijltjestoetsen Links Rechts 3 V Positie Gebruik de Omhoog Omlaag pijltjestoetsen om de aanduiding voor V Positie geel te markeren Met deze functie kan de beeldhoogte worden aangepast d m v de pijltjestoetsen Links Rechts 4 Formaat Geb...

Page 23: ...NAL modus 3 Helderheid Zorg met behulp van de pijltjestoetsen Omhoog Omlaag dat de aanduiding voor Helderheid Brightness geel gemarkeerd wordt Met de pijltjestoetsen Links Rechts kunt u de helderheid aanpassen Dit kan alleen worden aangepast in de PERSONAL modus 4 Kleur Zorg met behulp van de pijltjestoetsen Omhoog Omlaag dat de aanduiding voor KLEURINSTELLING COLOUR SETTING geel gemarkeerd wordt ...

Page 24: ...it Standaard STANDARD Film MOVIE Muziek MUSIC Sport SPORTS Persoonlijk PERSONAL 2 Hoge tonen Zorg met behulp van de pijltjestoetsen Omhoog Omlaag dat de aanduiding voor Hoge tonen TREBLE geel gemarkeerd wordt Met de pijltjestoetsen Links Rechts kunt u de hoge tonen aanpassen Deze kunnen alleen worden aangepast in de Persoonlijke modus PERSONAL 3 Lage tonen Zorg met behulp van de pijltjestoetsen Om...

Page 25: ... de volgende drie opties te laten gelden Het standaard wachtwoord is 0000 2 Instellen wachtwoord Druk op de Omhoog omlaag toets om Instellen wachtwoord Set password te selecteren druk daarna op ENTER om het submenu te openen om een nieuw wachtwoord in te stellen 3 Programma blokkeren Druk op de Omhoog omlaag toets om Block Program te selecteren druk daarna op ENTER om het submenu te openen Druk op...

Page 26: ... of Uit Off te selecteren 5 Beeldverhouding Aspect Ratio Zorg met behulp van de pijltjestoetsen Omhoog Omlaag dat de aanduiding voor Aspect Ratio geel gemarkeerd wordt Druk daarna op ENTER om het submenu te openen Druk op de Omhoog Omlaag toets om Aspect Ratio te kiezen Beschikbare opties Auto 4 3 16 9 ZOOM1 ZOOM 2 Just Scan 6 Blauw scherm Zorg met behulp van de pijltjestoetsen Omhoog Omlaag dat d...

Page 27: ...oor CONTRAST geel gemarkeerd wordt Met de pijltjestoetsen Links Rechts kunt u het contrast aanpassen Dit kan alleen worden aangepast in de PERSONAL modus 3 Helderheid Zorg met behulp van de pijltjestoetsen Omhoog Omlaag dat de aanduiding voor Helderheid Brightness geel gemarkeerd wordt Met de pijltjestoetsen Links Rechts kunt u de helderheid aanpassen Dit kan alleen worden aangepast in de PERSONAL...

Page 28: ...uiding voor Hoge tonen TREBLE geel gemarkeerd wordt Met de pijltjestoetsen Links Rechts kunt u de hoge tonen aanpassen Deze kunnen alleen worden aangepast in de Persoonlijke modus PERSONAL 3 Lage tonen Zorg met behulp van de pijltjestoetsen Omhoog Omlaag dat de aanduiding voor Lage tonen Bass geel gemarkeerd wordt Met de pijltjestoetsen Links Rechts kunt u de lage tonen aanpassen Deze kunnen allee...

Page 29: ... de volgende drie opties te laten gelden Het standaard wachtwoord is 0000 2 Instellen wachtwoord Druk op de Omhoog omlaag toets om Instellen wachtwoord Set password te selecteren druk daarna op ENTER om het submenu te openen om een nieuw wachtwoord in te stellen 3 Programma blokkeren Druk op de Omhoog omlaag toets om Block Program te selecteren druk daarna op ENTER om het submenu te openen Druk op...

Page 30: ... of Uit Off te selecteren 5 Beeldverhouding Aspect Ratio Zorg met behulp van de pijltjestoetsen Omhoog Omlaag dat de aanduiding voor Aspect Ratio geel gemarkeerd wordt Druk daarna op ENTER om het submenu te openen Druk op de Omhoog Omlaag toets om Aspect Ratio te kiezen Beschikbare opties Auto 4 3 16 9 ZOOM1 ZOOM 2 Just Scan 6 Blauw scherm Zorg met behulp van de pijltjestoetsen Omhoog Omlaag dat d...

Page 31: ...andmatig afstemmen te selecteren druk daarna op ENTER om het wachtwoord in te voeren en het submenu te openen Standaardwachtwoord is 0000 3 ATV Handmatig afstemmen Druk op de pijltjestoetsen Omhoog Omlaag om ATV Handmatig afstemmen te selecteren druk daarna op ENTER om het wachtwoord in te voeren en het submenu te openen Standaardwachtwoord is 0000 4 Programma bewerken Druk op de Omhoog omlaag toe...

Page 32: ...NAL modus 3 Helderheid Zorg met behulp van de pijltjestoetsen Omhoog Omlaag dat de aanduiding voor Helderheid Brightness geel gemarkeerd wordt Met de pijltjestoetsen Links Rechts kunt u de helderheid aanpassen Dit kan alleen worden aangepast in de PERSONAL modus 4 Kleur Zorg met behulp van de pijltjestoetsen Omhoog Omlaag dat de aanduiding voor KLEURINSTELLING COLOUR SETTING geel gemarkeerd wordt ...

Page 33: ...uiding voor Hoge tonen TREBLE geel gemarkeerd wordt Met de pijltjestoetsen Links Rechts kunt u de hoge tonen aanpassen Deze kunnen alleen worden aangepast in de Persoonlijke modus PERSONAL 3 Lage tonen Zorg met behulp van de pijltjestoetsen Omhoog Omlaag dat de aanduiding voor Lage tonen Bass geel gemarkeerd wordt Met de pijltjestoetsen Links Rechts kunt u de lage tonen aanpassen Deze kunnen allee...

Page 34: ... de volgende drie opties te laten gelden Het standaard wachtwoord is 0000 2 Instellen wachtwoord Druk op de Omhoog omlaag toets om Instellen wachtwoord Set password te selecteren druk daarna op ENTER om het submenu te openen om een nieuw wachtwoord in te stellen 3 Programma blokkeren Druk op de Omhoog omlaag toets om Block Program te selecteren druk daarna op ENTER om het submenu te openen Druk op...

Page 35: ... of Uit Off te selecteren 5 Beeldverhouding Aspect Ratio Zorg met behulp van de pijltjestoetsen Omhoog Omlaag dat de aanduiding voor Aspect Ratio geel gemarkeerd wordt Druk daarna op ENTER om het submenu te openen Druk op de Omhoog Omlaag toets om Aspect Ratio te kiezen Beschikbare opties Auto 4 3 16 9 ZOOM1 ZOOM 2 Just Scan 6 Blauw scherm Zorg met behulp van de pijltjestoetsen Omhoog Omlaag dat d...

Page 36: ...tig afstemmen te selecteren druk daarna op ENTER om het wachtwoord in te voeren en het submenu te openen Standaardwachtwoord is 0000 Druk op de Links Rechts toets om het kanaal te selecteren druk daarna op ENTER om een programma te zoeken 3 ATV Handmatig afstemmen Manual Tuning Druk op de pijltjestoetsen Omhoog Omlaag om ATV Handmatig afstemmen te selecteren druk daarna op ENTER om het wachtwoord ...

Page 37: ... kanaal als favoriet in te stellen Als het huidige kanaal al een van uw favorieten is drukt u nogmaals op de FAV toets om het kanaal als normaal kanaal te kiezen 5 Signaalinformatie Druk op de Omhoog Omlaag toets om Signaalinformatie Signal information te selecteren druk daarna op ENTER om signaalgegevens weer te geven waaronder kanaalnummer frequentie kwaliteit en sterkte 6 CI informatie Druk op ...

Page 38: ...NAL modus 3 Helderheid Zorg met behulp van de pijltjestoetsen Omhoog Omlaag dat de aanduiding voor Helderheid Brightness geel gemarkeerd wordt Met de pijltjestoetsen Links Rechts kunt u de helderheid aanpassen Dit kan alleen worden aangepast in de PERSONAL modus 4 Kleur Zorg met behulp van de pijltjestoetsen Omhoog Omlaag dat de aanduiding voor KLEURINSTELLING COLOUR SETTING geel gemarkeerd wordt ...

Page 39: ...uiding voor Hoge tonen TREBLE geel gemarkeerd wordt Met de pijltjestoetsen Links Rechts kunt u de hoge tonen aanpassen Deze kunnen alleen worden aangepast in de Persoonlijke modus PERSONAL 3 Lage tonen Zorg met behulp van de pijltjestoetsen Omhoog Omlaag dat de aanduiding voor Lage tonen Bass geel gemarkeerd wordt Met de pijltjestoetsen Links Rechts kunt u de lage tonen aanpassen Deze kunnen allee...

Page 40: ...cherm te selecteren 1 Systeemblokkering Druk op de pijltjestoetsen Omhoog Omlaag om Systeemblokkering Lock System te selecteren druk daarna op ENTER om de volgende 3 opties in te schakelen Standaard wachtwoord is 0000 2 Wachtwoord instellen Druk op de Omhoog Omlaag toets om Wachtwoord instellen Set Password te selecteren druk daarna op ENTER om het submenu te openen om een nieuw wachtwoord in te s...

Page 41: ... of Uit Off te selecteren 5 Beeldverhouding Aspect Ratio Zorg met behulp van de pijltjestoetsen Omhoog Omlaag dat de aanduiding voor Aspect Ratio geel gemarkeerd wordt Druk daarna op ENTER om het submenu te openen Druk op de Omhoog Omlaag toets om Aspect Ratio te kiezen Beschikbare opties Auto 4 3 16 9 ZOOM1 ZOOM 2 Just Scan 6 Blauw scherm Zorg met behulp van de pijltjestoetsen Omhoog Omlaag dat d...

Page 42: ...D 41 LED LED 1920 1080 56 1920 1080 Afstandsbediening voedingsadapter voedingskabel twee AAA batterijen instructiehandle Schroevendraaier met schroeven 3 stuks TV voet iding garantiekaart 2 x 5W ...

Page 43: ...D 42 ...

Page 44: ...D 43 E ...

Page 45: ...D 44 ...

Page 46: ...D 45 ...

Page 47: ...D 46 ...

Page 48: ...D 47 Repeat ...

Page 49: ...D 48 D DISP D DISP D DISP D DISP D DISP D DISP D DISP D DISP D DISP D DISP ...

Page 50: ...D 49 Subtitles ...

Page 51: ...D 50 Angle ...

Page 52: ...D 51 ...

Page 53: ...D 52 ...

Page 54: ...D 53 ...

Page 55: ...D 54 4 ...

Page 56: ...D 55 ...

Page 57: ...D 56 ...

Page 58: ...D 57 PORTUGUESE ...

Page 59: ...D 58 PORTUGUESE PORTUGUESE ...

Page 60: ...D 59 PORTUGUESE ...

Page 61: ...D 60 ...

Page 62: ...hroefgaten voor bevestiging aan de wand Draai de vier schroeven los om de standaard te verwijderen 1 Bevestiging van de voet Om de voet te bevestigen plaatst u de voet aan de onderzijde van de TV en bevestigt u de 3 schroeven met een schroevendraaier 2 Wandmontage ...

Page 63: ... wijze waarop het product moet worden weggegooid De materialen zijn recycleerbaar zoals door de desbetreffende markeringen wordt aangeduid Door recyclen het recyclen van materialen of andere vormen van hergebruik van oude apparatuur levert u een belangrijke bijdrage aan de bescherming van het milieu Raadpleeg de lokale instanties voor meer informatie over de officiële locatie waar het apparaat kan...

Page 64: ...se overheating and or shorten the life of the product Do not insert any foreign objects metals or flammable objects into the TV which may cause electric shock or fire Do not place the LED TV close to other furniture furnishing or electronic products This product is not designed for built in installation do not place in an enclosed place without proper ventilation Keep this product away from direct...

Page 65: ... play 10 Support CI slot 11 Support DVD playback The remote unit is operated with 2 x AAA size batteries 1 Push and hold the hook the battery cover is opened 2 Insert batteries according to the polarity marks 3 Replace the cover Remarks Battery replacement is necessary when the remote control fails to operate the TV set Battery Cautions Incorrect use of batteries can cause chemical leakage which w...

Page 66: ...ot put it into your household waste 4 Product Overview 5 Control Panel Overview E 3 1 Control Panel Functions 1 INPUT Select the input signals ATV DTV Media AV PC Component SCART HDMI1 HDMI2 2 MENU Enter into MENU 3 VOL Volume down Left orientation 4 VOL Volume up Right orientation 5 CH TV channel down 6 CH TV channel up 7 STANDBY Switches the TV to standby and on again 8 OPEN CLOSE in DVD mode 9 ...

Page 67: ...posite video component mode 5 Audio input for VGA mode connects to your PC audio output 8 Headphone output 12 75 Ω aerial input connects antenna connector or aerial interface here to receive cable aerial signal 1 2 3 4 5 6 7 8 9 10 11 12 13 Indicator Light Status When the unit is on the indicator light turns blue The indicator light is red when the TV is in standby mode DC IN USB HDMI1 HDMI2 SCART...

Page 68: ...E 5 ...

Page 69: ...nterface connector on the PC Then connect the other end to the VGA video interface connector on the back of the LED TV Tighten the screws on the VGA connectors once they are firmly connected Connect the DC 12V power input with the adaptor come with your LED TV Turn on the power of the LED TV first and then turn on the power of the PC Press the INPUT button to set the video input mode of the LED TV...

Page 70: ... are off Connect a Composite video cable not supplied to the yellow composite video connector input on the back of the LED TV Now insert the other end of the composite cable into the yellow composite connector output on the AV device Connect a YPBPR Cable not supplied provide better image quality to the YPBPR connector on the back of the LED TV Now insert the other end of the YPBPR cable into the ...

Page 71: ...n with the text NO SIGNAL On the LED MENU you can read how the channels can be programmed auto search or manual search It is recommended first to let the channels automatically to be searched You can use key CH CH button or the number keys on the remote control to select the channel you want to watch D Connect with SCART signal 1 Scart input 2 DC 12V power input Connection steps Read the user guid...

Page 72: ...vices and ensure that it has a HDMI connector Make sure that the power of the LED TV is off Connect a HDMI cable to the corresponding interface connector on the back of the LED TV Turn on the power of the LED TV Press the INPUT button to set the video input mode of the LED TV to HDMI1 or HDMI2 mode 2 1 DC IN USB HDMI1 HDMI2 SCART PC AUDIO VGA COAX YPbPr CVBS R L RF IN CI SLOT 2 1 DC IN USB HDMI1 H...

Page 73: ...the LED TV will go into standby mode and the indicator light turns red Switch Among Different Inputs Press the Input button to display the inputs mode menu then press key to select a input source and press Enter key to confirm Audio control 1 Press the VOL button to increase the volume A number will appear on screen indicating the volume level 2 Press the VOL button to decrease the volume A number...

Page 74: ...ou want to choose a channel bigger than 9 please press the button until is indicated on the screen Enter the two digits of the channel number you want to watch For example select channel 16 E 11 Select the DTV channel you want There are four ways of channel selection as follows 1 Stepping through the channel list Press the CH button to browse up and the CH button to browse down the available chann...

Page 75: ...V 10 Apr 2007 14 00 15 00 10 Apr 2007 14 23 Barnaby John Nettles questions the guilt of a woman who is on trial for the murder of her best friend SUBTITLES DTV Press the SUBTITLE button to display Subtitle Language and use UP DOWN arrows to select subtitle language or Off then press ENTER button to confirm it 9 PVR operating instructions 1 PVR Function list Item 1 Press button to record the curren...

Page 76: ...s ENTER button to enter Then it will check the USB speed 3 Recording methods Mode1 Shortcut key 1 Press button to record the current program Press to stop recording 2 Press STOP button to stop recording then it will return to normal broadcast television Select Disk C Check PVR File System Start Format Free Record Limit 6 Hr USB Disk Time Shift Size Speed OK Menu Select Disk C Check PVR File System...

Page 77: ...eration can make the frame still and record program in the background Mode3 Timer 1 You can also press EPG button to set record Press the red button to start recording 2 You can choose the time of the appointment to record you want PROGRAMME GUIDE 10 Apr 14 E4 The Force Double Indemnity Surprisel Brilliant Creatu 15 00 16 00 16 00 17 00 17 00 18 00 28 ITV4 32 Fitm4 1 75 CITV 10 Apr 2007 14 00 15 0...

Page 78: ...input source 2 Press to choose Media press ENTER to enter 3 Press red button can delete the recorded program Ar e y ou s ur e Yes No RECORDER 1 YLE TV1 15 Minute 03 Minute 07 Date 07 Date End Time Start Time 08Hour 09 Hour Dec Month Dec Month Mode once OK Back 3 Sec to Switch channel Yes No Timer Overlay 21 TMF 13 Jul 2007 03 00 Y R F Resolution 1200X900 Size 1381KBytes Date 2010 05 09 Time 16 13 ...

Page 79: ...button to select the option you want to adjust in the main Media menu then press ENTER button to enter Photo Menu Press button to select PHOTO in the main menu then press ENTER button to enter Press menu button to return back to the previous menu and exit menu to quit Press button to select drive disk you want to watch then press ENTER button to enter Press button to select return option to go bac...

Page 80: ... Flower00 jpg Press button to select the file folder you want to search in the file selecting menu then press red or ENTER button on your remote control to enter sub menu Press button to select the file you want to delete in the file selecting menu then press red button on your remote control and press ENTER button to delete files Music Menu Press button to select MUSIC in the main menu then press...

Page 81: ...y and operate file details Press button to select menu in the bottom you want to run then press ENTER button to operate Press menu button to go back to the previous menu and exit button to quit the entire menu Press button to hide the menu in the bottom Movie Menu Press button to select MOVIE in the main menu then press ENTER button to enter Press menu button to return to the previous menu and exi...

Page 82: ...and exit menu to quit Press button to select drive disk you want to watch then press ENTER button to enter Press button to select return option to go back to the previous menu When highlighting the option you select the file information will appear on the right and text will be previewed in the center Press media button to view the selected text Press display button to select menu in the bottom yo...

Page 83: ...howing how this service can be accessed For most channels that have this digital teletext service is accessed by pressing the RED or TEXT button Once started follow the on screen instruction to navigate through the available information The standard navigation method is using theUP DOWN LEFT RIGHT ARROW buttons and the ENTER button Some services will offer shortcuts via the coloured buttons on the...

Page 84: ... Adjust 4 Size Press Up Down button to select Size then press OK button to enter sub menu Press Left Right button to adjust display size Auto Adjust 0 ard Exit Auto Adjust V Offset 50 Size 50 Phase 50 Position Reset H Offset 50 SCREEN SCREEN SCREEN LED LED ...

Page 85: ...Tint 50 Sharpness 30 PICTURE Move Return Select Exit Contrast 50 Picture mode Standard Colour Temp Normal Noise Reduction Middle Dynamic Standard Mild Personal This can only be adjusted in the PERSONAL mode This can only be adjusted in the PERSONAL mode ...

Page 86: ... 0 Sound Mode Standard Balance 0 Auto Volume Off SPIDF Mode Off AD Switch Off Select Exit Auto Volume Press UP Down button to select Auto Volume then press ENTER button to select On of Off 6 SPDIF MODE Press UP Down button to select SPDIF MODE then press ENTER button to select Auto PCM Off 7 AD Switch Press UP Down button to select AD Switch then press ENTER button to select On of Off Standard Mus...

Page 87: ...utton to select Parental Guidance then press ENTER button to enter sub menu to select Available options are Off 4 18 5 Key Lock Press Up Down button to select Key Lock then press Left Right button to select On or Off The key board will invivild if you set Key Lock On 3 Block Program Press Up Down button to select Block Program then press ENTER button to enter sub menu Press Up Down button to selec...

Page 88: ... ENTER button to enter sub menu Press Up Down button to select aspect ratio Available options are Auto 4 3 16 9 Zoom1 Zoom2 Just Scan 6 Blue Screen Press Up Down button to select Blue Screen then press ENTER button to select On or Off 7 First Time Installation Press Up Down button to select First Time Installation then press ENTER button to set relevant options including OSD language country and t...

Page 89: ...0 Colour 50 Tint 50 Sharpness 30 PICTURE Move Return Select Exit Contrast 50 Picture mode Standard Colour Temp Normal Noise Reduction Middle AV SCART HDMI Component Media LOCK the SETUP menu LED This can only be adjusted in the PERSONAL mode ...

Page 90: ...ove Return Treble 5 0 Sound Mode Standard Balance 0 Auto Volume Off SPIDF Mode Off AD Switch Off Select Exit Auto Volume Press UP Down button to select Auto Volume then press ENTER button to select On of Off 6 SPDIF MODE Press UP Down button to select SPDIF MODE then press ENTER button to select Auto PCM Off 7 AD Switch Press UP Down buttonto select AD Switch then press ENTER button to select On o...

Page 91: ...on to select Parental Guidance then press ENTER button to enter sub menu to select Available options are Off 4 18 5 Key Lock Press Up Down button to select Key Lock then press Left Right button to select On or Off The key board will invalid if you set Key Lock On 3 Block Program Press Up Down button to select Block Program then press ENTER button to enter sub menu Press Up Down button to select th...

Page 92: ... to enter sub menu Press Up Down button to select aspect ratio Available options are Auto 4 3 16 9 Zoom1 Zoom2 Just Scan 6 Blue Screen Press Up Down button to select Blue Screen then press ENTER button to select On or Off 7 First Time Installation Press Up Down button to select First Time Installation then press ENTER button to set relevant options including OSD language country and tuning 8 Reset...

Page 93: ...g then press ENTER button to enter password to enter sub menu Default password is 0000 4 Program Edit Press Up Down button to select Program Edit then press ENTER button to enter sub menu 00 Program Edit Menu Fav OK D Rename elete Move Skip 1 C 03 2 C 04 3 C 045 This option has five functions Use Red button to Delete the current channel Use Green button to Rename the current channel Use Yellow but...

Page 94: ...Tint 50 Sharpness 30 PICTURE Move Return Select Exit Contrast 50 Picture mode Standard Colour Temp Normal Noise Reduction Middle Dynamic Standard Mild Personal This can only be adjusted in the PERSONAL mode This can only be adjusted in the PERSONAL mode ...

Page 95: ...ve Return Treble 5 0 Sound Mode Standard Balance 0 Auto Volume Off SPIDF Mode Off AD Switch Off Select Exit Auto Volume Press UP Down button to select Auto Volume then press ENTER button to select On of Off 6 SPDIF MODE Press UP Down button to select SPDIF MODE then press ENTER button to select Auto PCM Off 7 AD Switch Press UP Down button to select AD Switch then press ENTER button to select On o...

Page 96: ...button to select Parental Guidance then press ENTER button to enter sub menu to select Available options are Off 4 18 5 Key Lock Press Up Down button to select Key Lock then press Left Right button to select On or Off The key board will invalid if you set Key Lock On 3 Block Program Press Up Down button to select Block Program then press ENTER button to enter sub menu Press Up Down button to selec...

Page 97: ... to enter sub menu Press Up Down button to select aspect ratio Available options are Auto 4 3 16 9 Zoom1 Zoom2 Just Scan 6 Blue Screen Press Up Down button to select Blue Screen then press ENTER button to select On or Off 7 First Time Installation Press Up Down button to select First Time Installation then press ENTER button to set relevant options including OSD language country and tuning 8 Reset...

Page 98: ...s Left Right button to select channel number you want to store Press Up Down button to select the second option Press Left Right button to select audio system Press Up Down button to select search then press ENTER button to start tuning Press red button on your remote control to save the settings and menu button to hack to the previous menu 4 Program Edit Press Up Down button to select Program Edi...

Page 99: ... to your favorite channel If the current channel already is one of your favorite channels press FAV button again to set it to a normal channel 5 Signal Information Press Up Down button to select Signal Information then press ENTER button to display signal details including Channel Number Frequency Quality and Strength 6 CI Information Press Up Down button to select CI Information then press ENTER ...

Page 100: ...Tint 50 Sharpness 30 PICTURE Move Return Select Exit Contrast 50 Picture mode Standard Colour Temp Normal Noise Reduction Middle Dynamic Standard Mild Personal This can only be adjusted in the PERSONAL mode This can only be adjusted in the PERSONAL mode ...

Page 101: ...l Noise Reduction Middle CHANNEL Bass 50 SOUND Move Return Treble 5 0 Sound Mode Standard Balance 0 Auto Volume Off SPIDF Mode Off AD Switch Off Select Exit Auto Volume Press UP Down button to select Auto Volume then press ENTER button to select On of Off 6 SPDIF MODE Press UP Down button to select SPDIF MODE then press ENTER button to select Auto PCM Off ...

Page 102: ...p Down button to select Set Password then press ENTER button to enter sub menu to set new password 4 Parental Guidance Press Up Down button to select Parental Guidance then press ENTER button to enter sub menu to select Available options are Off 4 18 5 Key Lock Press Up Down button to select Key Lock then press Left Right button to select On or Off The key board will invalid if you set Key Lock On...

Page 103: ...nter sub menu Press Up Down button to select aspect ratio Available options are Auto 4 3 16 9 Zoom1 Zoom2 Just Scan 6 Blue Screen Press Up Down button to select Blue Screen then press ENTER button to select On or Off 7 First Time Installation Press Up Down button to select First Time Installation then press ENTER button to set relevant options including OSD language country and tuning 8 Reset Pres...

Page 104: ...resolution 1920 1080 Features Input interface Left right audio input interface Headphone Output Accessories Audio 1 Left right audio input interface Audio 2 High Quality Audio Video input socket for connecting an external device fitted with an HDMI output 56 50 Portuguese PAL B G AUTO SECAM L 2 x 5W ...

Page 105: ...E 42 ...

Page 106: ...E 43 E ...

Page 107: ...E 44 ...

Page 108: ...E 45 ...

Page 109: ...E 46 ...

Page 110: ...E 47 D DISP D DISP ...

Page 111: ...E 48 D DISP ...

Page 112: ...E 49 ...

Page 113: ...E 50 ...

Page 114: ...E 51 ...

Page 115: ...E 52 ...

Page 116: ...E 53 4 ...

Page 117: ...E 54 ...

Page 118: ...E 55 ...

Page 119: ...E 56 PORTUGUESE PORTUGUESE ...

Page 120: ...E 57 PORTUGUESE OFF PORTUGUESE ...

Page 121: ...E 58 PORTUGUESE ...

Page 122: ...E 59 ...

Page 123: ...ions Screw taps x 4 for wall mounting Remove the stand by taking out the 4 screws 1 Attaching the TV Stand To attach the stand place the stand on the nect of the TV insert and tighten the 3 screws with the screwdriver 2 Wall Mount instructions ...

Page 124: ...he instructions for use or the packing will inform about methods for disposal The materials are recyclable as mentioned in its marking By recycling material recycling or other forms of re utilization of old appliances you are making an important contribution to protect our environment Please inquire at the community administration for the authorized disposal location Instructions on environment pr...

Reviews: