MSV NVR16CH User Manual Download Page 79

Embedded 

Network Video Recorder

User

’s Manual

English

79

3.4 Recording Configurations

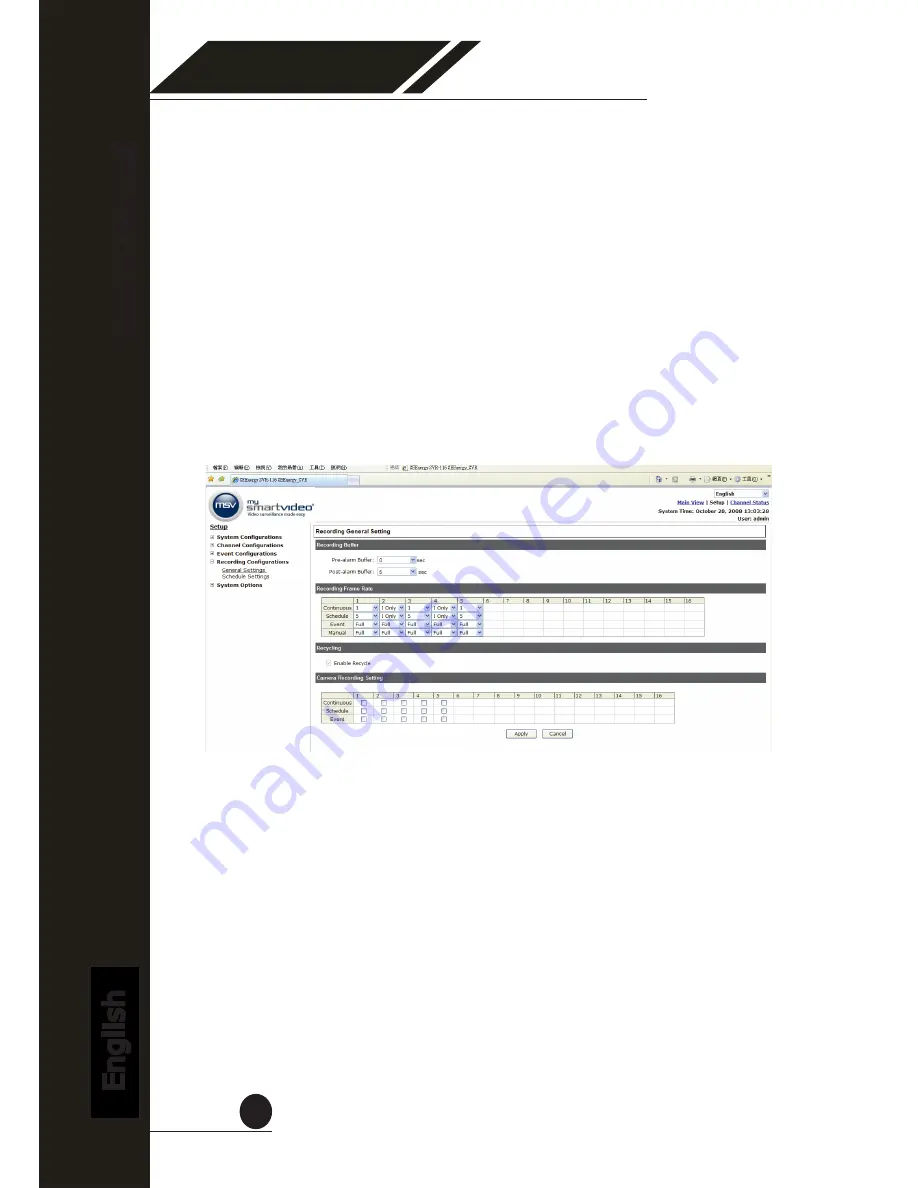
3.4.1 General Settings

The “recording configurations” gives users the overall control of how 

and when a recording is performed and the quality of different types 
of recordings performed on each channels. It can help the recorder to 

operate with sufficient system resource by performing recording only 

when it’s necessary with adjustable recording frame rate.

You can define the following in “General Settings”:

• 

Pre-Alarm/Post-Alarm recording length

• 

Recording frame rate

• 

Enable/disable different recording types on different cameras

• 

  Enable/disable audio recording

MSV-NVR Network Video Recorder

Summary of Contents for NVR16CH

Page 1: ...Network Video Recorder Model NVR4CH 8CH 16CH User s Manual EN M16 08122010 001...

Page 2: ...os 37 2 2 Export Playback Videos to AVI Files 43 2 3 Play Exported AVI Videos With NVR Media Player 45 2 4 Open Event Snapshot Images with NVR Media Player 46 3 System Setup 47 3 1 System Configuratio...

Page 3: ...System Options 84 3 5 1 Device Information 84 3 5 2 Logs and Reports 85 3 5 3 Maintenance 85 Reboot the NVR 86 Firmware Upgrade 87 Reset the NVR to Factory Default 89 3 5 4 DO Status 90 3 5 5 Disk St...

Page 4: ...oses only and due care has been taken in its preparation Any risk arising from the use of this information rests with the recipi ent and nothing herein should be construed as constituting any kind of...

Page 5: ...ed RAM Minimum 1 GB of RAM 2GB or above is recommended Network Minimum 10 100 Ethernet Gigabit Ethernet is recommended Graphics Adapter AGP or PCI Express minimum 1024 768 16 bit colors We highly reco...

Page 6: ...ord their camera pictures It is possible to perform the settings or operate the NVR using a web browser installed on a PC connected to a network or remote controller Recorded video can be played back...

Page 7: ...English 7 Install Hard Disk Start by removing the screws on the side Push the top housing forward Then lift it up The NVR supports SATA I or SATA II hard disks The NVR supports max per hard disk and i...

Page 8: ...r s Manual English 8 There is a cable connected between the fron LED board and the main board You can remove it from the main board or simply put the top housing on the side like shown below Next slid...

Page 9: ...User s Manual English 9 Place the top housing back and secure it with the bot tom housing Make sure the SATA connectors are aligned with each other correctly Secure the hard drive with the tool less...

Page 10: ...MSV Network Video Recorder User s Manual English 10 Hardware Illustration Front 16 Channel 8 Channel...

Page 11: ...MSV Network Video Recorder User s Manual English 11 4 Channel...

Page 12: ...Embedded Network Video Recorder User s Manual English 12 I O Ports and RS 485 Rear Pin Signal 1 12V DC 2 GND 3 10 Alarm input 11 Out1 12 Out2 13 Out3 14 Out4 15 RS485 16 RS485...

Page 13: ...MSV Network Video Recorder User s Manual English 13 LEDs Definition 4 Channel 8 Channel 16 Channel...

Page 14: ...rade Green Shows solid green for normal operation Blinking green when firmware upgrade is done Red Flashes red for failed firmware upgrade Power Green Normal operation Red System off power adapter rem...

Page 15: ...a network without DHCP server or you are connecting to it directly Access NVR with its default IP Use Smart Device Search Utility If the NVR is placed in a corporate network or a local area network wh...

Page 16: ...search should start automatically and its status should be dis played The NVR should be located and its IP address should be displayed Double click on it and the program should automatically access t...

Page 17: ...admin and then click OK to enter the system You will be prompted for the NVR s login information before proceeding to change device s IP address You may click on the button highlighted below to perfor...

Page 18: ...use a PC that is on the same network over a switch or hub or connect the PC directly to the NVR using a crossover CAT5 Ethernet cable The PC that is connected directly to the NVR or within the same l...

Page 19: ...video split window view with one video displays on a larger window Se lect a channel from the drop down menu to display its video on the larger split window You can also double click on any of the sma...

Page 20: ...llowing functions Retrieve camera s video stream Retrieve camera s status Perform Live Sequence Viewing PTZ Control Perform PTZ Preset Sequence viewing Perform manual recording Take snapshot Receive a...

Page 21: ...r 16 video mode NVR16CH Click on a Group ex Group 1 to display videos from cameras under that group in quad view Click on any camera to display video in single view mode 1 2 Retrieve camera s status T...

Page 22: ...ext select one or more camera s or camera group s for sequence viewing Then select dwell interval from the drop down menu Finally click Start to start sequence viewing Click All Channels to quickly se...

Page 23: ...zoom a PTZ camera as well as the ability to adjust camera focus and iris Camera s that are currently being selected for live viewing will be listed in the PTZ drop down menu Simply select a camera the...

Page 24: ...viewing of a particular camera Auto pan a particular camera Perform preset point sequence viewing Start by selecting a PTZ camera from the drop down list Its available PTZ preset points will be liste...

Page 25: ...ows you to view multiple preset points videos of a camera without having to select them one by one Once you have defined the prefered preset points in Channel Configurations PTZ Setting PTZ Preset Seq...

Page 26: ...live video window comes with control buttons with func tions described below Take a snapshot of a live video Full screen view of a live video Turn on off audio of a live video Start stop recording of...

Page 27: ...live video click the button and the snapshot of the video will be displayed in a pop up window shown like below Right click anywhere on the image and select Save Image as from the pull down menu In t...

Page 28: ...o do so The button will show in different color once the audio is turned on Click on it again to turn off audio Start Stop Recording of a Live Video You can manually start or stop recording of a live...

Page 29: ...ge You can change the web UI display language from the current login username link located at the upper right hand corner Click on the link opens up a new window which displays detail infor mation abo...

Page 30: ...w to the NVR by using its Safari browser To be able to view the live video through the Safari browser make sure javascript is on under Settings Safari Javascript Once Javascript is enabled click the H...

Page 31: ...s Manual English 31 You should be prompted to enter the username and password to access the NVR Upon successful login you should see the live view video of the first channel Click on the Channe drop d...

Page 32: ...TZ camera is selected the corresponding control buttons will display control PT only Please note that this function is camera dependent and is not available to all cameras Certain cameras do not allow...

Page 33: ...ng its Safari browser To be able to view the live video through its browser make sure javascript is enabled under Browser Menu button Options Browser Configuration 1 2 Enable the Support Javascript op...

Page 34: ...Recorder User s Manual English 34 Make sure two options illustrated below are enabled Press the menu button and click the Save Options to save settings 1 2 Press the button highlighted below to go ba...

Page 35: ...MSV Network Video Recorder User s Manual English 35 Type in the IP address of the NVR in the address bar You should be prompted to enter its username and password for ac cess...

Page 36: ...ecorded by a chosen recording method or due to an event trigger The NVR offers synchronized playback from up to 4 channels and various types of search methods are provided to help you find the footage...

Page 37: ...videos recorded within that range Search by event Find videos that were recorded due to event triggers Play by start time Enter a specific time a video was recorded to start playing back the video Se...

Page 38: ...in those dates Click on any blue cell box should direct you to the hour channel table if there were multiple videos recorded during that date Videos from other cameras that are recorded on the same d...

Page 39: ...er User s Manual English 39 Click on the cell box again will start playing back the videos if you have reached the end of search results Videos found from other cameras that were recorded at the same...

Page 40: ...h on Selected channels will be marked in red Select Search by event from the Search Method drop down list and click Go to start the search Results will then be listed like what is shown below displays...

Page 41: ...he number of results to be displayed at once max 30 and perform the search again Play by specific time If you know when a recording was taken place you may choose the Play by start time from the Searc...

Page 42: ...lish 42 Search by event Most Recent This function quickly displays the most recent event recordings from the selected channels displaying the most recent result top down You may click Update to update...

Page 43: ...on the PC by a 3rd party media player such as VLC player or Windows Media player Once you locate the recorded videos with steps described in the pre vious section hit the Export AVI button on a video...

Page 44: ...ile will be automatically named and saved under the C partition You will be notified once the process is completed successfully The exported AVI file will be saved under the C partition ffdshow is req...

Page 45: ...rouble of installing third party media player or codecs when playing the exported AVI videos The NVR Media Player will be automatically installed after the CMS software is installed You can launch the...

Page 46: ...e Video Play Speed 2 4 Open Event Snapshot images with NVR Media Player The NVR sends snapshots that are taken when an event occurs to a destined FTP server or mail recepient These type of snapshot im...

Page 47: ...e so videos will be recorder with correct timestamp To better secure the system for unwanted disturbance we will guide you on setting up user s account and privileges to prevent settings gets altered...

Page 48: ...der 3 Enable DHCP Server under DHCP Server if you wish to use the recorder as a DHCP server or leave it disabled if there is already a DHCP server in the network 4 Click Apply for the settings to take...

Page 49: ...a dynamic public IP which once the DDNS is properly setup users can access the NVR remotely with the DDNS domain name without worrying if the IP hs changed or not The NVR currently only works with fre...

Page 50: ...In order to properly configure the DDNS service function please reg ister a free DDNS domain name and account from DynDNS first Go to www dyndns com from the browser to do so Click on the Signup FREE...

Page 51: ...down menu Click here to automatically fill in the current public IP in the IP Address field Pick one or more options here any is fine Click to go to the next step The page will check whether the hostn...

Page 52: ...he necessary fields as illustrated below Create an username and a password here This will be used in the NVR s configuration Enter a valid email ad dress as well Enter the security code Check to agree...

Page 53: ...and the username password you created in the User ID and Password field and click Apply to finish You can click the Check DDNS Status button to check the DynDNS service status If you are getting a Dis...

Page 54: ...DynDNS server once every hour and update its latest public IP to the server The Apply button does the same thing which if you are see the Disconnected status you can use it to manually check with the...

Page 55: ...f event logs and when they actually oc cur After selecting the time zone choose an option below to set the re corder time Manual Use the drop down list and configure the time manually Sync with NTP se...

Page 56: ...To change the password of the admin account 1 Click and highlight the admin account in the account list and click Edit 2 Its information should be displayed in User Account Informa tion 3 Enter a new...

Page 57: ...groups and five built in privi lege profiles except the admin and the guest accounts the other five groups are fully customizable or you can simply assign a group with one of the default privilege pr...

Page 58: ...type of privilege you would like this group to have from the Privilege Type drop down menu Its access privilege will then be displayed You can alter its settings by allowing or denying access to other...

Page 59: ...for recording You can obtain basic information about the disk you installed in this page To initialize it simply click the Format button You can also connect external USB thumb drive to the recorder...

Page 60: ...he option to let the recorder automatically find the cameras or it is possible to enter camera s information and add it manually Automatic Search 1 Click the Search button to perform the camera search...

Page 61: ...username and password and select the channel ID and name the camera 5 Click on Detect to establish connection between the recorder and the camera If connection establishes successfully camera s de tai...

Page 62: ...ribed above but instead of using the Search function enter the camera s IP address and cre dential in the Camera Information manually then follow step 5 6 described above Enter manually 1 2 If cameras...

Page 63: ...ay options if you would also like the re corder to automatically embed the system time or the frame rate for you Or simply choose to display a custom message of your own 3 Next define where the text w...

Page 64: ...s helpful if you need to monitor multiple spots in one area from a particular camera 1 To set up PTZ preset points select a camera from the Camera drop down menu and click Add 2 Select a position numb...

Page 65: ...preset point a Home point among all other preset points as well as making the camera to move to this particular point when an event is triggered Move Here when Event Trigger In order for this function...

Page 66: ...To configure preset sequence for a camera select a camera from the Camera drop down menu The available preset points should be listed in Camera Presets sec tion Pick the ones you like for sequence vi...

Page 67: ...ntify which camera has detected an unusual event and where this event is happening This function works by incorporating the event detection function as well as the recording function which as a result...

Page 68: ...era icon to move the camera to define its location Access the E Map Monitor page from the upper right hand corner menu When the NVR receives an event triggered from any of the cameras their videos wil...

Page 69: ...ifferent locations To configure locations of each camera first determine the location you d like to place the camera to on the map You can do so by 1 Zoom in to a smaller area by using the zoom contro...

Page 70: ...rag the camera icon to move it to the desired location The Google Map Monitor requires active Internet connection and can not be used in conjunction with the regular E Map monitor function You can cli...

Page 71: ...will be triggered Such setting can reduce the management overhead and notify the administrator only when it s necessary Start the event configuration by defining the general settings Define when an ev...

Page 72: ...gers from a particular camera s input port and trigger a de vice such as an alarm that is connected to the recorder or camera s output port Cameras that do not have built in digital input output port...

Page 73: ...ween cameras and the recorder Only connected cameras will be displayed in the list Some cameras only allow one trigger source be configured at a time e g if the camera has the motion detection functio...

Page 74: ...sk failure the recorder can send notification with the acceptable format image txt to a destined event server according to the configuration Configuring an FTP server To add an FTP server 1 Start by g...

Page 75: ...or leave it unchecked to use active mode 6 Click Test to verify if all information is entered correctly and the connection to the FTP server can be established successfully 7 Click Apply for the sett...

Page 76: ...address of the SMTP server 2 Enter the port of the SMTP server 3 Specify the sender s name in the Sender s name field 4 Enter the sender s e mail address 5 Check Enable Authentication and enter the us...

Page 77: ...at is considered to be an event Where the warnings will be sent to and how they will be sent Select Channels to Enable Event Trigger and which type of event should be triggered Use the checkbox to ena...

Page 78: ...der to send out notifications Define how the notifications will be sent and where they will be sent to Event trigger may not work for cameras that are placed outside of your local network or on the In...

Page 79: ...ent types of recordings performed on each channels It can help the recorder to operate with sufficient system resource by performing recording only when it s necessary with adjustable recording frame...

Page 80: ...ct one of the pre defined frame rates for a particular recording type Users can also set to keep a previous number of days of recording data by enabling the option below This is quite often used in ap...

Page 81: ...Manual English 81 The section at the bottom allows you to turn on or off a particular recording type on any channels The section at the bottom of the page allows you to disable audio recording record...

Page 82: ...mera drop down menu and select a camera first 2 You can use the schedule table to set the time range Click the cell boxes then move the curser horizontally lets you set what hours to perform recording...

Page 83: ...f clicking cell boxex one by one on the time ta ble Simply check what days you would like to perform recording and specify the recording duration by either choosing All Day or enter a start and end ti...

Page 84: ...allows users to perform maintenance tasks such as upgrading firm ware restore backup device settings or reboot device etc 3 5 1 Device Information The Device Information provides the general informati...

Page 85: ...c information for troubleshooting 3 5 3 Maintenance Maintenance provides functions for users to Reboot the NVR when necessary Reboot cameras directly from the NVR Perform Firmware Upgrade Backup the N...

Page 86: ...e to take effect Such process would prevent a recording from getting interrupted be cause the system would not automatically reboot itself after the new firmware is loaded onto the recorder Simply cli...

Page 87: ...lease use the file as is DO NOT unzip it It s normal that you may only see tar as the file extension in Windows as the OS hide the known file extention by de fault A Upgrade through Web UI 1 Login int...

Page 88: ...SB disk 3 Plug USB flash disk into USB port on the NVR 4 The Status LED on the NVR will start to flash in amber This indi cates firmware upgrade is in process 5 Warning Please wait until upgrade proce...

Page 89: ...glish 89 Reset the NVR to Factory Default To reset the recorder back to its factory default click Default but ton and begin the proces The process should be displayed and you should be prompted back t...

Page 90: ...O Status This is where you can get the current status of the NVR digital output ports You can also change their status from this page 3 5 5 Disk Status Disk Status gives you a more detailed informatio...

Page 91: ...ws users to backup the recording data in its database file format not AVI to the externally connected USB hard disk Insert a USB hard disk that has more than 100MB free space to the NVR You can check...

Page 92: ...in the drop down menu displaying the remaining disk space Make your selection from the drop down menu if you have more than one disks connected to the NVR Next select channels which you would like to...

Page 93: ...needs to have more than 100MB remaining space If multiple partitions are presented in one disk only the first par titition will be detected and used for backup Process Progress will be displayed on t...

Page 94: ...ckup file with the NVR Media Player The backup files can be played with the NVR media player To do open the player and select Open Media Database Click Browse to select the file from the USB disk A ne...

Page 95: ...English 95 When done click Check to validate the file Once the file has been successfully verified you should be prompted with the message shown below Select the time zone according to your current lo...

Page 96: ...MSV Network Video Recorder User s Manual English 96 The player should now play the backed up file...

Page 97: ...e NVR Refer to the diagram below to connect the UPS with its RS 232 interface to the NVR s DI DO port The NVR can receive signal from the UPS when there is a power fail ure and shut down itself automa...

Reviews: