background image

3-22

System Operations

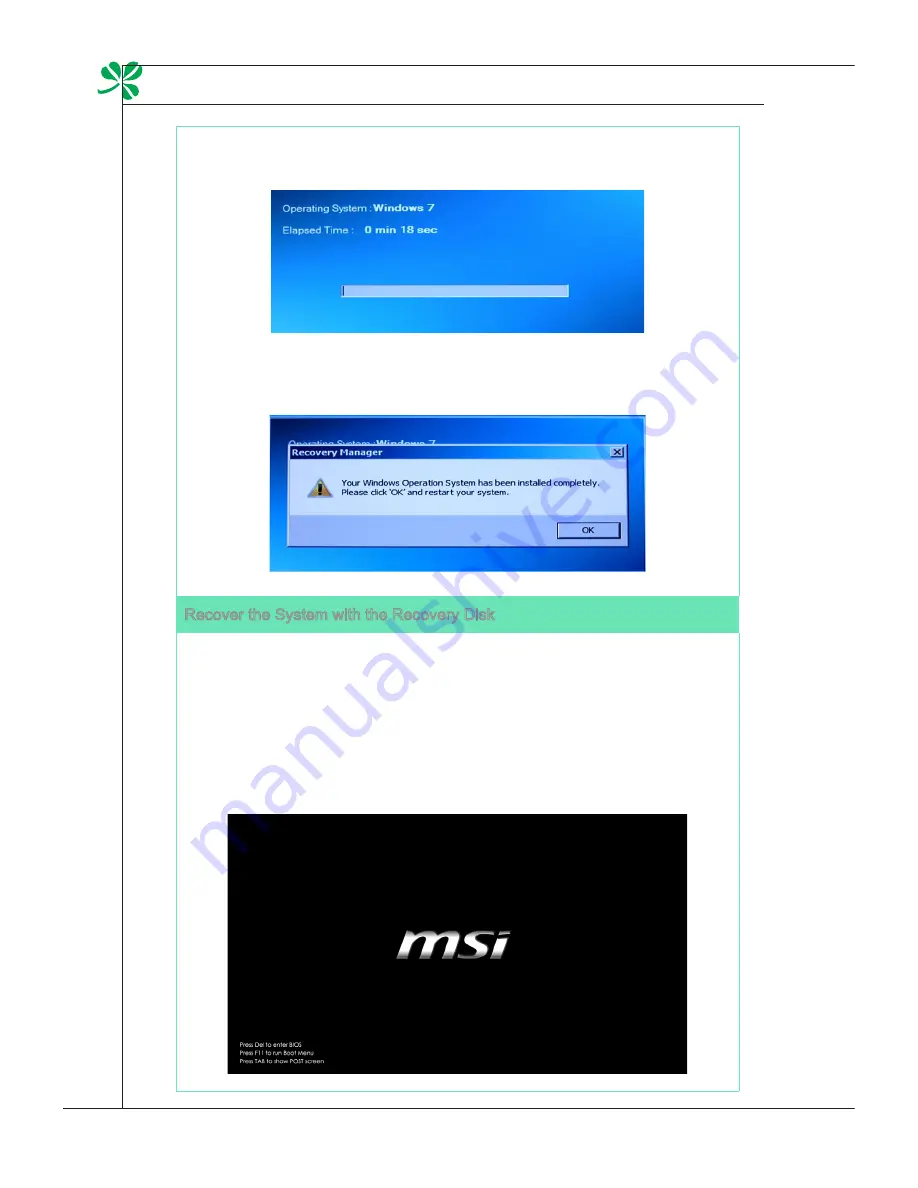
7. The System Recovery Function is proceeding now. 

8. The following message indicates successful system recovery. Press [OK] to 

reboot the system and access Windows operating system as usual.

Recover the System with the Recovery Disk

If your system is equipped with an optical disk drive or an external one, you 

may perform the System Recovery Function with the Recovery Disk that you 

created earlier.  

Follow the instructions below to continue: 

1. Insert the Recovery Disk into the optical disk drive and restart the system by 

pressing the Power button. 

2. Press the F11 hotkey on the keyboard when the following image appears. 

3. Select the [CD/DVD] device as the boot device and press [Enter] to confirm 

the selection. Press any key to reconfirm the selection when the prompt 

message of [Press any key to boot from CD or DVD…] appears.

4.  The  Language  Menu  appears.  Select  the  language  you  prefer  or  select 

[EXIT] to restart the system. 

Summary of Contents for Wind Box DC500

Page 1: ...Wind Box DE500 DC500 MS 6676 V1 X System G52 66761X7...

Page 2: ...ications 1 8 System Specifications 1 9 Component Replacement Upgrade 1 10 2 Getting Started 2 1 Safety Comfort Tips 2 2 Having Good Working Habits 2 3 Knowing the Keyboard Optional 2 4 Connecting Peri...

Page 3: ...a registered trademark of American Megatrends Inc ATI is a registered trademark of ATI Technologies Inc Award is a registered trademark of Phoenix Technologies Ltd Intel is a registered trademark of...

Page 4: ...ced that the acquisition of replaceable parts or compatible ones of the product users purchased in certain countries or territories may be fulfilled by the manufacturer within 5 years at most since th...

Page 5: ...the interference by one or more of the measures listed below Reorient or relocate the receiving antenna Increase the separation between the equipment and receiver Connect the equipment into an outlet...

Page 6: ...oltage is within its safety range and has been adjusted properly to the value of 100 240V before connecting the equipment to the power outlet Do not disable the protective earth pin from the plug The...

Page 7: ...situations arises get the equipment checked by ser vice personnel The power cord or plug is damaged Liquid has penetrated into the equipment The equipment has been exposed to moisture The equipment do...

Page 8: ...m Ende seines Baruchbarkeitsdauer zur ckzunehmen Spanish Espa ol Bajo la directiva 2002 96 EC de la Uni n Europea en materia de desechos y o equipos electr nicos con fecha de rigor desde el 13 de agos...

Page 9: ...rendez sek gy rt i k teless v lnak az ilyen term kek visszav tel re azok hasz nos lettartama v g n Czech e tina Podle sm rnice Evropsk unie EU o likvidaci elektrick ch a elektronick ch v robk 2002 96...

Page 10: ...ului electronic vizat vor fi obliga i s primeasc napoi pro dusele respective la sf r itul duratei lor de utilizare Portuguese Portugu s De acordo com a Directiva 2002 96 EC de Res duos de Equipamen to...

Page 11: ...U direktiv om deponering av elektroni sk og elektrisk utstyr direktiv 2002 96 EC som trer i effekt 13 august 2005 kan ikke produkter av elektronisk og elektrisk ustyr lenger deponeres som husholdnings...

Page 12: ......

Page 13: ...hasing the Wind Box DE500 DC500 MS 6676 System This system is your best slim PC choice With the fantastic appearance and ultrasmall form factor it can easily be set anywhere The feature packed platfor...

Page 14: ...items is damaged or missing The picture is for your reference only and your packing contents may slightly vary depending on the model you purchased Wind Box Series AC DC Adapter AC Power Cord User Man...

Page 15: ...off The power LE D glows when the system is turned on and goes off when the system is shut down In terms of power saving the LE D blinks in S3 Suspend to RAM mode and goes off in S4 Suspend to Disk m...

Page 16: ...USB Universal Serial Bus port is for attaching USB devices such as mouse keyboard printer scanner camera PDA and other USB compat ible devices Card Reader Drive Optional The built in card reader may...

Page 17: ...ort Output The DB15 pin female connector is provided for monitor USB Port The USB Universal Serial Bus port is provided for attaching USB devices such as mouse keyboard printer scanner camera PDA or o...

Page 18: ...data rate is selected Orange On 1000 Mbit sec data rate is selected Power Jack The AC DC adapter converts AC power to DC power for this jack Power supplied through this jack supplies power to your per...

Page 19: ...er and its display device To connect an LCD monitor simply plug your monitor cable into the DVI D connector and make sure that the other end of the cable is properly connected to your monitor refer to...

Page 20: ...ssor D410 D510 Optional Chipset Intel NM10 chipset Memory 2 DDR2 667 SO DIMM slot 200 pins 1 8V Supports the maximum of 2GB LAN Gigabit Fast Ethernet by Realtek RTL8111DL GbE controller Audio Chip int...

Page 21: ...dphone speaker jack 1 HDMI port Optional 1 DVI D port Optional Power Supply 65 watt AC DC adapter with active PFC Input 100 240V 50 60Hz 1 5A Output 19V 3 42A Built In Card 1 wireless LAN card Optiona...

Page 22: ...1 2 Component Replacement Upgrade Please note that certain components preinstalled in the product may be up gradable or replaceable by user s request depending on the models users pur chased 1 CPU 2 M...

Page 23: ...orized service center closest to your location for as sistance To learn more about upgrade limitation please refer to the specifications in the User s Manual For any further information on the product...

Page 24: ......

Page 25: ...g Started This chapter provides you with the information on hardware set up procedures While connecting peripheral devices be careful in holding the devices and use a grounded wrist strap to avoid sta...

Page 26: ...mfortably Place you feet flat and naturally on the floor so that your knees and el bows have the proper position about 90 degree when operating Put your hands on the desk naturally to support your wri...

Page 27: ...rk with your Wind Box DE500 DC500 for long periods of time otherwise it may cause discomfort or injury to you Please keep the following tips in mind when operating Change your posture frequently Stret...

Page 28: ...376 4 L X 155 09 W X 21 91 H mm Cable Length 150cm Weight 440g Features Multimedia function keys with PC New isolated keycap for easy typing Soft touch and tactile feedback for comfortable typing New...

Page 29: ...function Fn F11 Volume down Fn F12 Volume up Hot Keys Fn F1 Launch the default E Mail applications Fn F2 Lanuch the default internet browser and go to the de fault home page Fn F3 Back to the previou...

Page 30: ...SB devices such as mouse keyboard digital camera webcam printer external optical storage device and etc To connect these devices install the drivers for each device first if necessary and then connect...

Page 31: ...e Support is a new interface standard for PCs displays and consumer electronics devices that supports standard enhanced and high definition video plus multi channel digital audio on a single cable To...

Page 32: ...r of the Wind Box DE500 DC500 allows you to connect the LAN local area network devices such as a hub switch and gateway to build a network connection For more instructions or detailed steps on connect...

Page 33: ...und within a broad coverage area and still be connected to the network By using the 64 bit 128 bit Wired Equivalent Privacy WEP encryption technol ogy and Wi Fi Protected Access feature the optional b...

Page 34: ...l storage device Therefore it is usually used to install the operating sys tem and software applications To avoid unexpected data loss in your sys tem please backup your critical files regu larly Do n...

Page 35: ...et Important We suggest that you connect the AC DC adapter to your Wind Box DE500 DC500 first and then connect the AC power cord to the socket outlet for safety concerns Disconnecting the AC Power Ste...

Page 36: ......

Page 37: ...s system boot setup recovery disk creation network connection SRS Premium Sound and so on Important It is highly recommended that you create a system recovery disk as the backup solution in the event...

Page 38: ...se terms box and click Next to continue Step 7 Select Use recommended settings for Help protect your computer and improve Windows automatically Step 8 Review your time and date settings Click Next to...

Page 39: ...other ac cidents Before moving forward please make sure your system booting setup is complete and go over the following procedures to get it done Step 1 Double click the BurnRecovery icon on the deskt...

Page 40: ...Operations Step 3 Select Create and burn a recovery disk and click Next to continue Alternatively choose Advanced to bring forth advanced options Choose between the provided options and click Next to...

Page 41: ...g to create the image of recovery disk It takes some time to finish the processing Step 5 Follow the on screen instructions to prepare enough number of blank DVD disks Insert the blank DVD disk into t...

Page 42: ...3 6 System Operations Step 6 The Windows Disc Image Burner pops up Click Burn to start the burn ing progress It takes a while to finish the processing...

Page 43: ...e disk creation click Close to exit and take out the disk Follow the on screen instructions to create all recovery disks Step 8 All recovery disks have been successfully created Please store the disks...

Page 44: ...3 8 System Operations Step 9 Check the following box if you want to remove the temporary files Click Finish to complete recovery disk creation...

Page 45: ...3 9 MS 6676 Network Connection under Windows 7 Wired LAN Step 1 Go to Start Control Panel Step 2 Select Connect to the Internet under Network and Internet...

Page 46: ...ns Step 3 Select Broadband PPPoE to connect using DSL or cable that requires a user name and password Step 4 Type the information from your Internet Service Provider ISP and click Connect to establish...

Page 47: ...3 11 MS 6676 Wireless LAN Step 1 Go to Start Control Panel Step 2 Select Connect to the Internet under Network and Internet...

Page 48: ...ireless net work Step 4 A list of available WLAN connections pops up Choose a connection from the list or click Open Network and Sharing Center to establish a new connection Step 5 To establish a new...

Page 49: ...reless network and click Next to continue Step 7 Enter information for the wireless network you intend to add and click Next to proceed Step 8 A new WLAN connection has been made Click Close to exit o...

Page 50: ...Connection Optional Step 1 Right click the Ralink Wireless LAN Card status icon in the lower right corner and then click Launch Config Utility Step 2 The window displays some available wireless networ...

Page 51: ...3 15 MS 6676 Step 3 There may prompt you to enter a key Type the network key and then click OK Step 4 Now you re ready to browse the Web wirelessly...

Page 52: ...er bass clearer dialog and outstanding surround sound Features Premium audio experience for music video and games on the PC Immersive surround sound experience from internal or external speakers and e...

Page 53: ...and are provided for External Speakers and Headphones SRS Center adjusts the center channel sound SRS Space adjusts the amount and width of the sound stage TruBass Level adjusts the bass or low frequ...

Page 54: ...f your display or set your PC to sleep mode after a period of user inactivity Power Management in Windows OS Power Options in Windows OS allow you to control the power man agement features of your dis...

Page 55: ...se the keyboard Energy Saving Tips Turn off the monitor by pressing the LCD power button after a period of user inactivity Utilize the Fn Z sleep mode keys to turn into power saving mode Tune the sett...

Page 56: ...se backup the important data saved on your system drive to other storage devices If the following solution fails to recover your system please contact the autho rized local distributor or service cent...

Page 57: ...covery Manager to start the System Recovery Function or select EXIT to restart the system 5 The System Recovery Function will get your system back to default settings Press OK to confirm 6 Press OK to...

Page 58: ...e System with the Recovery Disk If your system is equipped with an optical disk drive or an external one you may perform the System Recovery Function with the Recovery Disk that you created earlier Fo...

Page 59: ...vice and press Enter to confirm the selection Press any key to reconfirm the selection when the prompt message of Press any key to boot from CD or DVD appears 4 The Language Menu appears Select the la...

Page 60: ...Recovery Function process or select EXIT to restart the system 6 The system recovery process will format your hard disk drive partition Make sure that the important data has been backed up before cont...

Page 61: ...the System Recovery Function As sure that the AC power is connected to the system before moving forward to the next step 8 DO NOT turn off the system power while performing the System Recovery Functi...

Page 62: ...stem recovery process is finished please click OK to restart the system Now your system is restored to its factory default setting 10 If the recovery process is interrupted or failed please repeat rec...

Reviews: