background image

Chapter  4

4-24

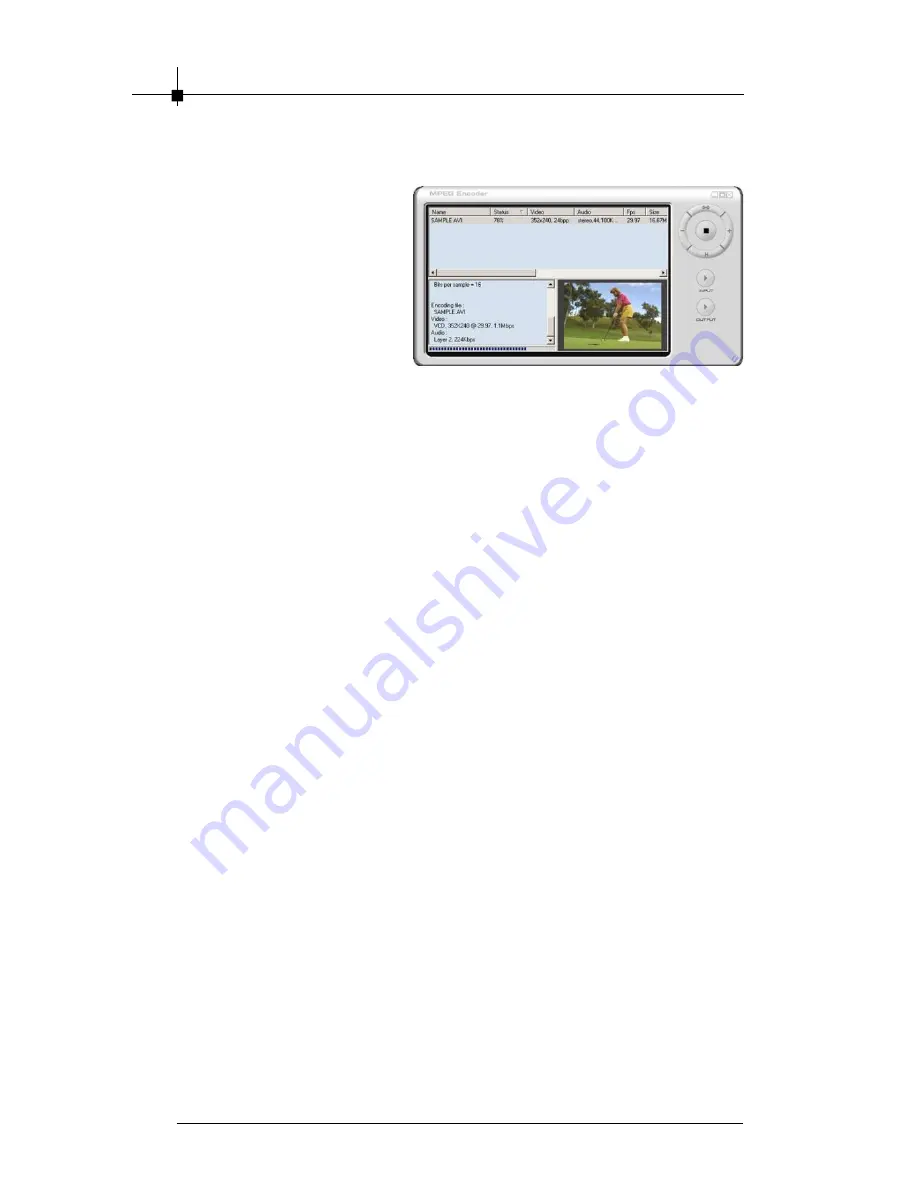
During Transcoding, the Status
column changes to display  the
percent of  progress
accomplished. Also, once the
transcoding  process has
begun, the (right arrow)
Encoding button changes to a
Stop button. If the Stop button
is clicked-on during
transcoding, the process  will
stop. Once the  transcoding process completes  successfully,  the status will
change to Done. To transcode the same file again - for example, with an option
change - double click on the  file in the Batch Process Display Window and the
Status will change to Waiting. To change the options again, highlight  the file
with a single mouse click and then click on the 

Option

 or 

Edit

 button to

execute the Option Selection Dialog box.

 To view the transcoded output video file, highlight the video file and click-on
the Output Play button.

Summary of Contents for TV anywhere Plus

Page 1: ...i USER S GUIDE Version 1 0 January 2005 TV nywhere Plus ...

Page 2: ...rea is likely to cause harmful interference in which case the user will be required to correct the interference at his own expense Notice 1 The changes or modifications not expressly approved by the party responsible for compliance could void the user s authority to operate the equipment Notice 2 Shielded interface cables and A C power cord if any must be used in order to comply with the emission ...

Page 3: ...gistered trademark of American Megatrends Inc nVIDIA nfiniteFXTM is a registered trademark of nVIDIA Corporation Macrovision Corporation Product Notice This product incorporates copyright protection technology that is protected by method claims of certain U S patents and other intellectual property rights owned by Macrovision Corporation and other right owners Use of this copyright pro tection tec...

Page 4: ...n it Do not place anything on the power cord 7 Always Unplug the Power Cord before inserting any add on card or module 8 All cautions and warnings on the equipment should be noted 9 Never pour any liquid into the opening that could damage the equipment or cause an electrical shock 10 If any of the following situations arise get the equipment checked by a service personnel The power cord or plug is...

Page 5: ...hannel 4 7 4 4 2 Main Panel Function 4 8 4 4 3 Input Source 4 11 4 4 4 Schedule Function 4 11 4 4 5 Setup Utility 4 14 4 4 6 Channel Preview 4 17 4 4 7 Snapshot 4 17 4 4 8 Sleeping Timer 4 17 4 4 9 Audio Output Mode 4 18 4 4 10 FM function 4 18 4 4 11 Pop Up Menu 4 20 4 4 12 Remote function 4 21 4 5 MPEG Encoder 4 22 4 5 1 Interface Explanation 4 22 4 5 2 Practice Streaming Video Translation 4 22 ...

Page 6: ...vi Νοτε ...

Page 7: ...1 GETTINGSTARTED This user s guide is designed for a series of TV Tuner cards Read this chapter first and itwill give you a clear instruction on how to use this guide 1 1 ...

Page 8: ...mended to read the Reference information first which indexes the correspoding founction description of each different TV Tuner card and then find the proper function description for your TV Tuner card in the other chapters Chapter 3 HARDWARE INSTALLATION tells you howto install your TV Tuner card into your computer correctly and the function of each con nector on the TV Tuner card Also note that y...

Page 9: ... ystem Requirem ents 2 2 2 2Product List 2 4 4 Software Installation 4 1 3 Hardware I nstallation 3 1 Unpack the package and inspect al l the items careful ly If any item contai ned is da maged or m issin g pl ease contact your lo cal dea ler as soon as possibl e Also keep the box and packi ng material s i n case you need to ship the unit in the future Your VGA card package sh ou ld co nta in the ...

Page 10: ...Chapter 1 1 4 Νοτε ...

Page 11: ... need to refer to the other chapters Note that the card you purchased may not cover all functions mentioned herein therefore it is recommended that you read the Reference information first which indexes the correspoding founction description to each different card and then find the proper function description for your card in other chapters ...

Page 12: ... Hardisk Others Graphic Card Support Microsoft DirectX 9 0 or above Sound Card SoundBlaster 16 Compatible Sound Card Available Terrestrial Signal in your region PC with Pentium III 800 or above 128M RAM 256MB is recommended or compatible system PCI 2 2 Compliant Slot VGA support minimum 640 x 480 resolution Windows XP 2000 Double Speed or Higher Work UHF VHF Antenna 1GB Free HDSpace ...

Page 13: ...Introduction 2 3 TV nywhere Plus Layout Philips 7131 PCI Interface Remote IC TDA 8275 FM Radio Antenna Connector CATV_IN Connector AV_IN OUT Connector Remote Receiver Connector 2 2 Product List CATV ...

Page 14: ...rding in MPEG 4 2 1 format MPEG4 is compatible with DivX or Microsoft MPEG4 Note you have to download the codec by yourself Support Scheduled Recording Support Still Image Capture in JPEGor BMP format Support Picture In Picture PIP function Additional AV S Video Input for Connect Other Video Sources such as DVD Player VCD VHS Camcorder SRPO Schedule Recording in PC Power Off Mode Power Off PC by R...

Page 15: ...g materials in case you need to ship the unit in the future Your card package should contain the following items Reference 1 GETTINGSTARTED 1 1 2 INTRODUCTION 2 1 2 1 System Requirements 2 2 2 3 Product List 2 4 3 HARDWARE INSTALLATION 3 1 3 1 Card Installation 3 2 4 SOFTWARE INSTALLATION 4 1 TV nywhere PCI Card Software Pack CD User s Guide Remote Controller 4 in 1 AV Cable FM Radio Antenna Remot...

Page 16: ...Chapter 2 2 6 Νοτε ...

Page 17: ...ter correctly and how to use the con nectors on the card Note that your card may not cover all functions mentioned in this chapter Check on Chapter 2 INTRODUCTION for the specification of the card you purchased if you have any problem in finding the proper function descrip tion for your card ...

Page 18: ...s one end of the card into the slot first Gently but firmly press the other end until it is fully seated in the slot Se cure the card with a bracket screw 2 Remove the cover from your computer MSIremindsyou Warning Always remember to turn off your computer before installing or removing hardware to or from your computer Nei ther the manufacturer nor the dealer is responsible for damages if the user...

Page 19: ...HardwareInstallation 3 3 5 Connect all necessary cables 4 Install the computer cover CATV Remote Receiver Connector FM Radio Antenna AV_IN OUT Connector CATV_IN Connector ...

Page 20: ...Chapter 3 3 4 Νοτε ...

Page 21: ...3 1 4 SOFTWARE INSTALLATION This chapter describes how to install software under Windows XP 2000 including the drivers and useful utilities ...

Page 22: ...ions as anti virus software and system monitoring applications 1 When you finish the hardware setup and restart your system The Found New Hardware Wizard window will pop up Please click Cancel and you can make use of DVB T setup utilities to easily install it 2 Please click Driver_Install to install drivers and utilities of TV Anywhere Plus 3 The TV card driver utilities will help you to install a...

Page 23: ...matically Please click Next to install TV Anywhere Plus 5 When you see the message as left that means all of your drivers has been installed and it will start launch TV Setup and initialize TV settings Please select Yes I want to restart my computer now and click Finish to end the installation ...

Page 24: ...virus software and system monitoring applications Please follow the step below to install the TV Anywhere Plus application 1 Insert the installation CD disk into th e C D R OM dr i ve T he TV Anywhere Plus Auto run Page will appear as the above please select TV ANYWHERE PLUS PVR Plus 2 Then the install wizard will guide you to install the TV Anywhere Plus application please click Next to continue ...

Page 25: ...rom the existing folders list After you click Next the installshield wizard will start copy files to your destination folders It may take a few minutes please wait a moment 5 After the installshield wizard has finished installing TV Anywhere Plus on your computer it will show the message as left Please click Finish to end the installation ...

Page 26: ...ect one of the functions as below TVR turns your PC into a full featured video recorder For the detailed instruction please refer to chapter 4 4 MPEG Encoder allows you to convert AVI files into MPEG format For the detailed instruction please refer to chapter 4 5 Video Editor makes editing MPEG videos easy For the detailed instruction please refer to chapter 4 6 Burn DVD allows you to create a VCD...

Page 27: ...dard NTSC PAL or SECAM either by country or TV system 2 In this step you have to select the TV frequency scan mode and TV audio live recording port 1 Scan all of your TV channel To scan your TV channels1 we suggest you can use the Use default table to scan all of your channels first If some of the TV channels can t been scan please select the Use free scan to scan your channels again 2 Selectthe T...

Page 28: ...pends on current country code of Windows OS to give you a default value on country but this might not be correct you should check and select a valid option for your environment otherwise you can t view all TV programs anyway 2 When you want to re configure your current TV frequency table anytime you can choice Reset TV Option on popup menu to do this job again 4 4 2 Main Panel Function Main window...

Page 29: ...el Channel down Go to next enabled channel Note You must set channel to enabled state either by manual selecting or auto scanning then you can use channel up down functions Recall channel Go to last selected channel Volume Adjust Part Information Window Display current time state Live REC Playback Time Shifting TV sound state Mono Stereo or SAP recording file size recording time time control bar m...

Page 30: ...log that show all captured files you have done and all recent played files You can assign more than one file from recorded file or importing from file dialog TVR will gather all files you selected to a play list Add selected item to Play list Double click the selected item to add it into the Play list Delete selected item Delete all items Rename selected item Import file s to play list Clear all i...

Page 31: ...ting they are Antenna Cable Memory Composite and S Video You can change video source by click video source like or button on control panel or choice Switch Video Source on popup menu to do this job When video source is changed successfully the control panel will also change to current status as you see 4 4 4 Schedule Function When you click you can start setting the schedule properties Capture Cap...

Page 32: ...e All Delete all of the record schedule Start Power off Schedule If you click this button the system will turn off immediately When the scheduled recording time comes your PC will turn on automatically and start recording TV programs as scheduled It will show all of the record schedule items of the day Time option Current time Show the current time Starting time Enter the date and time when you wa...

Page 33: ...change the different capture folder to save your record files Auto execute at start up Enabling this option makes schedule agent always execute at start up other wise it doesn t Default is enabled Enable Power off schedule recording mode Enabling this option makes system shutdown automatically when schedule recording finishes Default is disabled 3 Log 4 Setup ...

Page 34: ...preview setup property page allows you to customize and configure your TV channels for channel surfing There two preview option standard and customized At standard mode channel surfing order Normal Group Switch TV source from Antenna or Cable Memory Group Using Memory Group function At memory mode users can assign any order of channel number or video source they like Auto Scan Click the button to ...

Page 35: ...apture frame rate Capture location To setting your capture folder Capture filename Setting your capture file name You can choose User date time as filename or define by yourself Enable time limit To limit your record time Capture audio device You can select Capture audio Capture audio only No Video or no audio When you select Capture audio only No Video you can capture the file as WAV or MP3 forma...

Page 36: ...ystem Other Setup Function Always On Top The preview window will show topmost Enable high quality preview Enable high quality preview mode Don t use overlay as display surface If your graphic card doesn t supports Overlay mode click on this option Display Aspect Ratio You can change the display aspect ratio at 4 3 16 9 or free mode Multi language option To select the different language interface o...

Page 37: ...Image Capture on current preview window by click on control panel or choose Snapshot from the pop up menu When snapshot is done the snapshot window will show up and you can do View Save Delete for all images Note that the saved image format supports both BMP and JPEG you can decide which format you want to save when you execute Save Save All on file dialog 4 4 8 Sleeping Timer You can use sleeping...

Page 38: ...ols on a electric appliance you can click button on control panel to do the function you want The following page shows descriptions for the FM control panel functions and tips for operating FM features Information Window Display current time current state FM REC Playback audio state recording time recording file size and current time minimize maximize and help file Tuning Frequency Adjusting You c...

Page 39: ...ice Capture on popup menu Once you are in capturing click stop button on control panel or choice Stop on popup menu to stop current recording You can review your recorded files in the playback list after recording Playback Same as playback of TVR Please refer chapter 4 4 2 Enter the number key and Enter or wait 1 seconds that direct jump to the channel you input Go to last selected channel or Mute...

Page 40: ...isplay window Free 4 3 or 16 9 Switch Video Source Switch video source DVB T Composite or S Video Previous Channel Go to previous available channel Next Channel Go to next available channel Recall Channel Go back to last selected channel Memo Channel Channel Preview Browse available channels as sub window Capture Start recording video Play Start playback of recorded program Time shifting Start tim...

Page 41: ... Click this button to playback recorded file 13 BACKWARD Go backward while playback a recorded file 14 FORWARE Go forward while playback a recorded file 15 CH Click this button to go to next channel 16 CH Click this button to go to previous channel 17 VOL Click this button to increase the audio volume 18 VOL Click this button to decrease the audio volume 19 PIP Enable the PIP Picture In Picture fu...

Page 42: ...ys the video of the file being transcoded 4 5 2 Practice Streaming Video Translation MPEG Encoder transcodes multimedia files among video formats For using MPEG Encoder they must be able to be played with Windows Media Player File formats that can be transcoded are AVI DV AVI MPEG 1 MPEG 2 ASF WMV DivX and DAT To add a multimedia file to be transcoded click on the or Add This will open the Browse ...

Page 43: ...t type selected The file name can also be manually changed Once the output video format and options are selected click OK and the file will appear in the Batch Process Display Window The Batch Process Display Window shows three states of process in the Status column 1 Waiting The media file displayed is queued for transcoding compression and or translation The transcoding of video files in the Wai...

Page 44: ...scoding process completes successfully the status will change to Done To transcode the same file again for example with an option change double click on the file in the Batch Process Display Window and the Status will change to Waiting To change the options again highlight the file with a single mouse click and then click on the Option or Edit button to execute the Option Selection Dialog box To v...

Page 45: ...ce arrangement merge multiple frames into one video Title Edit Area add title font style size color movement straight line curve line Audio Edit Area add audio and create sound effect Special Effect Edit Area use Color Effect Filter Effect Transition Effect Transition In Effect Transition Out Effect Noise Reduction Filter 4 6 2 Menu Area File open Clip File delete Support MPEG 1 2 system file Vide...

Page 46: ... window In Title editing mode Title can be edited in this window In Audio editing mode it displays registered audio files In Special Effect mode it displays all available filters Displays the progress informa tion when final video is created Edited Video Display Window Displays videos in Staging Clips Double Click or Drag and Drop Videos in Original Clips can be displayed in this window Preview fu...

Page 47: ...Original Clips are either double click on the video clip or drag and drop the video clip from the Original Clips area on to the Original Video Display window b Clicking on the right mouse button will bring up a Pop up Menu This menu performs the following functions copy delete and show property information Staging Clips This is the area where video clips are added after frame ranges are specified ...

Page 48: ...ips area or drag and drop them to original video Display Window to view and select frames for further editing 2 Selecting frame ranges for video editing click mark in to specify the beginning of a clip and mark out to set the end of the clip Next click on the button to move the clips from the auto edit window to the Staging Clips area 3 Editing video frames Select video frames in staging clips are...

Page 49: ...edia data CD 2 Click and the dialog box will shows up as left It will show you all the video files in this folder Please select the video file which you want use 3 Added files also can be deleted Click on the file then click the button the file will be delete from the list 4 When all necessary files are added click on to move to next step ...

Page 50: ...lect video type Support XVCD and XSVCD Data rate is not checked in order to support XVCD and XSVCD Perform Writing Test before recording Checks to insure that the DVD CD writer is functioning correctly before actual burning Use Windows temporary directory Default Use Win dows temporary directory as DVD Maker s temporary directory Path Users can specify DVD Maker s temporary directory 7 After selec...

Page 51: ...hibernate support Please click on the function so that you can use the power off schedule recording function Step 3 Then you can click on the button to start setting the schedule properties After you finish the setting please click the OK to the next step Step 4 Then you would see your setting in the schedule If you want to use power off schedule recording now please click on the Start Power off S...

Page 52: ...PEG4 format Step 1 We provide two kinds of MPEG4 format Microsoft and DIVX Please download the MPEG4 Codec from Internet DIVX http www divx com Microsoft http www microsoft com Or you can e mail to our technical support department Step 2 Install the MPEG4 codec Step 3 Click the setup button and enter to the capture setting Please select the MPEG4 record format Step 4 Go to the other setting Select...

Page 53: ...Software Installation 4 33 Νοτε ...

Reviews: