background image

C-19

Intel ICH9R SATA RAID

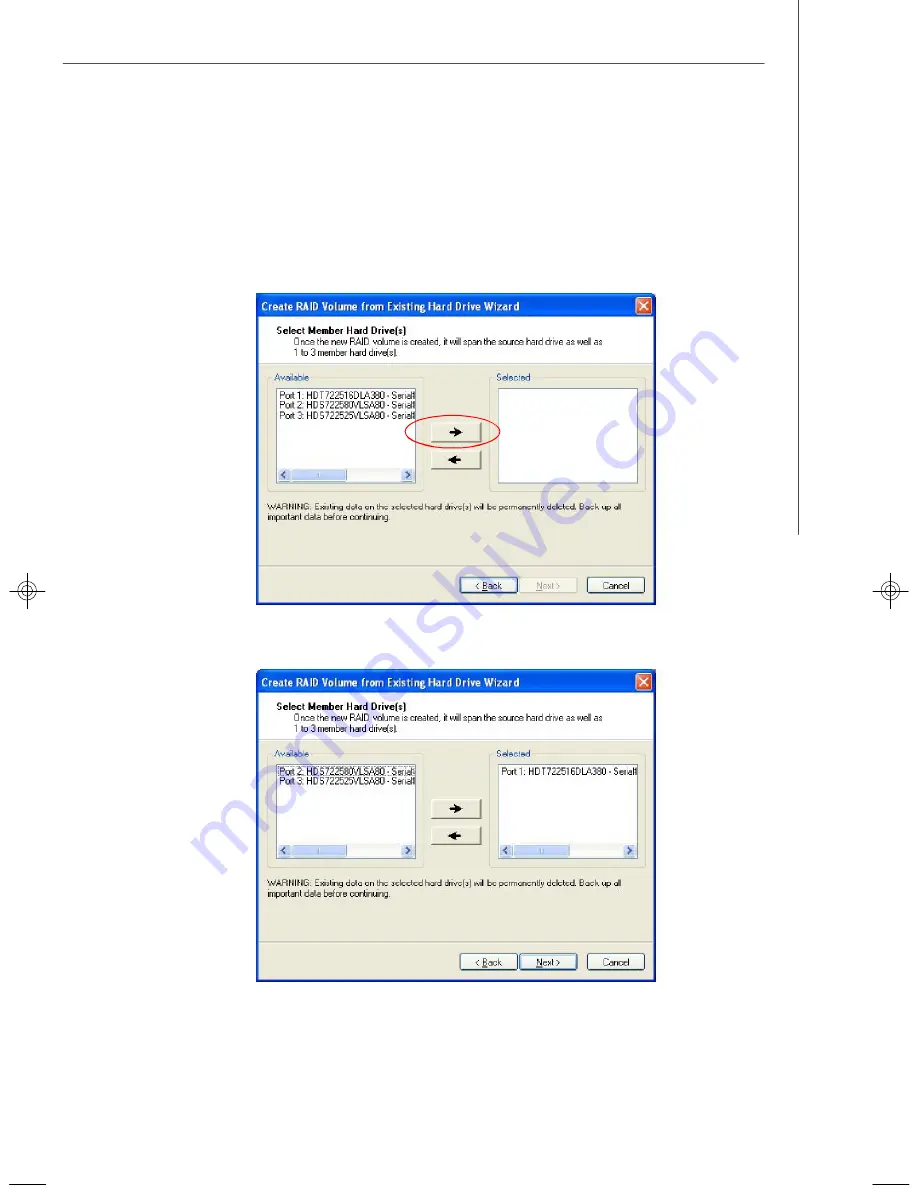
(3) Select  Member Hard  Drive(s)

Then select the member disk (the target disk) that you wish to use and then click 

-

-->


to move it to the 

Selected 

field. Then click 

Next

 to continue.

Please  note  that  the  existing  data  on  the  selected  hard  drive(s)  will  be  deleted
permanently. Do not forget to back up all the important data before continuing.

7345v1.0-C_ICH9R RAID.p65

 2007/5/17, 

上午

 11:28

19

Summary of Contents for P35 NEO2-FR - Motherboard - ATX

Page 1: ...e the system is first configured in order to take advantage of RAID when upgrading to a second SATA hard drive 1 BIOS must be configured for RAID before installing Windows on the single SATA hard drive Refer to On Chip ATA Devices for properly setting of the BIOS 2 Install the Intel Application Accelerator RAID Driver during Windows Setup Refer to Installing Software for instructions on installing...

Page 2: ... disk choose Action Create RAID Volume from Existing Hard Drive Note The Action button only appears in advance mode To enable the advance mode go to View Basic mode and click it The Create RAID Volume from Existing Hard Drive Wizard pops up to lead you for the following procedure Click Next to continue ...

Page 3: ...dancy will provide you with a realtime duplicate copy of your data Note Only half of the available volume space will be avail able for data storage RAID 5 Useful RAID 5 can be used on three or more disks with zero or more spare disks The resulting RAID 5 device size will be N 1 S where N is the how many drive S is the size of the smallest drive in the array If one of the disks fail all data are st...

Page 4: ...typical strip size settings are 4KB For specialized usage models requiring 4KB strips 8KB For specialized usage models requiring 8KB strips 16KB Best for sequential transfers 32KB Good for sequential transfers 64KB Good general purpose strip size 128KB Best performance for most desktops and workstations 2 Select the source disk Then select the source disk that you wish to use and then click to mov...

Page 5: ...er disk the target disk that you wish to use and then click to move it to the Selected field Then click Next to continue Please note that the existing data on the selected hard drive s will be deleted permanently Do not forget to back up all the important data before continuing ...

Page 6: ... space will be worked as RAID 1 volume which is the new technology called Intel Matrix RAID Then click Next to continue 5 Start Creating RAID Volume from Existing Hard Drive Wizard Before you continue the procedure of RAID volume creation from existing hard drive read the dialogue box below carefully Please note that once you click Finish the existing data on the selected hard drive s will be dele...

Page 7: ...le you can still continue using your computer during the migration process once the migration proc ess starts it cannot be stopped If the migration process gets interrupted and your system is rebooted for any reason it will pick up the migration process where it left off You will be provided with an estimated completion time the remaining time will depend on your system once the migration process ...

Page 8: ...rresponds to the current situation Missing Hard Drive Member 1 Make sure the system is powered off 2 Reconnect the hard drive 3 Reboot the system to Windows the rebuild will occur automatically Failed Hard Drive Member 1 Make sure the system is powered off 2 Replace the failed hard drive with a new one that is of equal or greater capacity 3 Reboot the system to Intel RAID Option ROM by press Ctrl ...

Page 9: ... system 6 When prompted to rebuild the RAID volume click Yes 7 The Intel R Storage Utility will be launched Right click the new hard drive and select Rebuild to this Disk The Rebuild Wizard will be launched which will guide you through the process of rebuilding to the new hard drive ...

Reviews: