background image

2-7

Hardware Setup

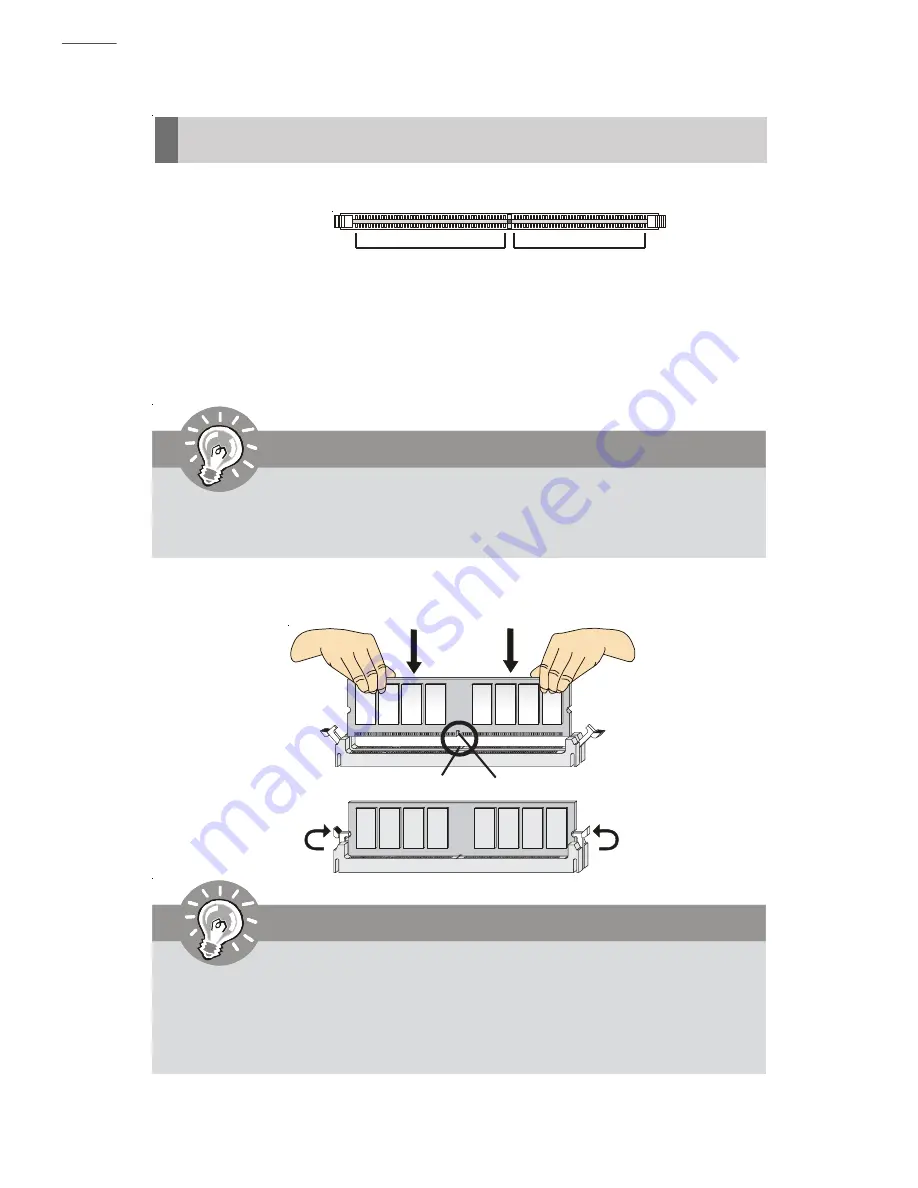
Memory

These DIMM slots are used for installing memory modules.

Installing Memory Modules

1. The memory module has only one notch on the center and will only fit in the right

orientation.

2. Insert the memory module vertically into the DIMM slot. Then push it in until the

golden finger on the memory module is deeply inserted in the DIMM slot.

3. The plastic clip at each side of the DIMM slot will automatically close.

You can barely see the golden finger if the memory module is properly

inserted in the DIMM slot.

1. DDR2 memory modules are not interchangeable with DDR and the DDR2

standard is not backwards compatible. You should always install DDR2

memory modules in the DDR2 DIMM slots.

2. To enable successful system boot-up, always insert the memory modules

into the DIMM1 first.

Important

Volt

Notch

Important

64x2=128  pin

56x2=112  pin

DDR2

240-pin, 1.8V

Summary of Contents for NVIDIA MS-7504PV

Page 1: ...i MS 7504PV V1 1 Mainboard ...

Page 2: ...ntium are registered trademarks of Intel Corporation PS 2 and OS 2 are registered trademarks of International Business Machines Corpo ration Windows 95 98 2000 NT XP are registered trademarks of Microsoft Corporation Netware is a registered trademark of Novell Inc Award is a registered trademark of Phoenix Technologies Ltd AMI is a registered trademark of American Megatrends Inc Revision History R...

Page 3: ...he power cord such a way that people can not step on it Do not place anything over the power cord 8 Always Unplug the Power Cord before inserting any add on card or module 9 All cautions and warnings on the equipment should be noted 10 Never pour any liquid into the opening that could damage or cause electrical shock 11 If any of the following situations arises get the equipment checked by service...

Page 4: ...erference by one or more of the measures listed below h Reorient or relocate the receiving antenna h Increase the separation between the equipment and receiver h Connect the equipment into an outlet on a circuit different from that to which the receiver is connected h Consult the dealer or an experienced radio television technician for help Notice 1 The changes or modifications not expressly appro...

Page 5: ...v WEEE Waste Electrical and Electronic Equipment Statement ...

Page 6: ...v i ...

Page 7: ...vii ...

Page 8: ...inboard Specifications 1 2 Mainboard Layout 1 4 C h a p t e r 2 H a r d w a r e S e t u p 2 1 Quick Components Guide 2 2 CPU Central Processing Unit 2 3 Memory 2 7 Power Supply 2 8 Back Panel 2 9 Connectors 2 11 Jumpers 2 15 Slots 2 16 C h a p t e r 3 B I O S S e t u p 3 1 Entering Setup 3 2 The Main Menu 3 4 Standard CMOS Features 3 6 Advanced BIOS Features 3 9 Integrated Peripherals 3 12 Power M...

Page 9: ...icro ATX mainboard This mainboard is based on NVIDIA MCP73O sigle chipset for optimal system efficiency Designed to fit the advanced Intel CoreT M 2 Quad CoreT M 2 Duo Pentium and Celeron LGA775 processors this mainboard deliver a high performance and professional desktop platform solution ...

Page 10: ...M 240pin 1 8V 2 DDR2 DIMMs 4GB Max LAN Supports LAN 10 100 1000 Fast Ethernet by Realtek RTL 8211BL IEEE 1394 Chip integrated by VIA VT6308P Transfer rate is up to 400Mbps Audio Chip integrated by Realtek ALC888S Flexible 8 channel audio with jack sensing Compliant with Azalia 1 0 Spec S ATA 4 SATA ports by NVIDIA MCP73PV Supports four SATA devices Supports storage and data transfers at up to 300 ...

Page 11: ...LAN jack 1 IEEE 1394 port 6 flexible audio jacks On Board Pinheaders 2 USB 2 0 pinheaders 1 IEEE 1394 pinheader 1 S PDIF Out pinheader 1 Front Panel Audio pinheader Slots 1 PCI Express x16 slot 1 PCI Express x1 slot 2 PCI slots support 3 3V 5V PCI bus Interface Form Factor Micro ATX 24 4cm X 24 4cm Mounting 8 mounting holes ...

Page 12: ...1 JBAT1 VIA VT6308P NVIDIA MCP73VP FINTEK F71882FG REALTEK RTL8211BL REALTEK ALC888S JFP1 SYSFAN CPUFAN PWR1 DIMM1 DIMM2 PWR2 SATA1 SATA3 SATA2 SATA4 Top LAN jack Bottom USB ports IEEE 1394 port T M B Line In Line Out Mic T RS Out M CS Out B SS Out Top USB ports Bottom VGA port Top Coaxial S PDIF Out jack Bottom Optical S PDIF Out jack ...

Page 13: ...s well as how to setup the jumpers on the mainboard Also it provides the instructions on connecting the peripheral devices such as the mouse keyboard etc While doing the installation be careful in holding the components and follow the installation procedures Hardware Setup Chapter 2 ...

Page 14: ...onents Guide Memory p 2 7 JFP1 p 2 12 PWR2 p 2 8 SATA1 4 p 2 11 SYSFAN p 2 11 JBAT1 p 2 15 Back Panel p 2 9 CPUFAN p 2 11 CPU p 2 3 PWR1 p 2 8 PCI Slots p 2 16 PCIE Slots p 2 16 JAUD1 p 2 13 JUSB1 2 p 2 14 J1394_1 p 2 14 JSPD1 p 2 12 ...

Page 15: ...n can work properly to protect the CPU from overheating Make sure that you apply an even layer of thermal paste or thermal tape between the CPU and the heatsink to enhance heat dissipation Replaceing the CPU While replacing the CPU always turn off the ATX power supply or unplug the power supply s power cord from the grounded outlet first to ensure the safety of CPU Important Introduction to LGA 77...

Page 16: ...d on the top to prevent overheating Meanwhile do not forget to apply some thermal paste on CPU before installing the heat sink cooler fan for better heat dispersion Follow the steps below to install the CPU cooler correctly Wr o n g i n s t a l l a t i o n w i l l cause the damage of your CPU mainboard Important 2 Remove the cap from lever hinge side as the arrow shows 1 The CPU socket has a plast...

Page 17: ...t down the CPU in the socket housing frame Be sure to grasp on the edge of the CPU base Note that the align ment keys are matched 7 Visually inspect if the CPU is seated well into the socket If not take out the CPU with pure vertical motion and reinstall alignment k e y 5 Lift the load lever up and open the load plate ...

Page 18: ...switch refer to the correct di rection marked on it to lock the hooks 9 Press down the load lever lightly onto the load plate and then se cure the lever with the hook under retention tab locking switch 1 Whenever CPU is not installed always protect your CPU socket pin with the plastic cap covered shown in Figure 1 to avoid damaging 2 Mainboard photos shown in this section are for demonstration of ...

Page 19: ...rted in the DIMM slot 3 The plastic clip at each side of the DIMM slot will automatically close You can barely see the golden finger if the memory module is properly inserted in the DIMM slot 1 DDR2 memory modules are not interchangeable with DDR and the DDR2 standard is not backwards compatible You should always install DDR2 memory modules in the DDR2 DIMM slots 2 To enable successful system boot...

Page 20: ... power sup plies to ensure stable operation of the mainboard 2 Power supply of 200 watts and above is highly recommended for system s t a b i l i t y 3 ATX 12V power connection should be greater than 16A ATX 12V Power Connector PWR1 This 12V power connector is used to provide power to the CPU pin 12 pin 13 PIN SIGNAL 13 3 3V 1 4 12V 15 G N D 16 PS ON 17 G N D 18 G N D 19 G N D 20 N C 21 5V 22 5V 2...

Page 21: ...ided for monitor IEEE 1394 port The IEEE 1394 port on the back panel provides connection to IEEE 1394 devices LAN jack The standard RJ 45 LAN jack is for connection to the Local Area Network LAN You can con nect a network cable to it LinkIndicator A c t i v i t yI n d i c a t o r LED Color LED State Condition O f f LAN link is not established L e f t Orange On steady state LAN link is established ...

Page 22: ...fects Line In Blue Line In is used for external CD player tapeplayer or other audio devices Line Out Green Line Out is a connector for speakers or head phones Mic Pink Mic is a connector for microphones RS Out Black Rear Surround Out in 4 5 1 7 1 channel mode CS Out Orange Center Subwoofer Out in 5 1 7 1 channel mode SS Out Gray Side Surround Out 7 1 channel mode ...

Page 23: ...he fan power connectors support system cooling fan with 12V When connecting the wire to the connectors always note that the red wire is the positive and should be connected to the 12V the black wire is Ground and should be connected to GND If the mainboard has a System Hardware Monitor chipset on board you must use a specially designed fan with speed sensor to take advantage of the CPU fan control...

Page 24: ...el Front Panel I O Connectivity Design Guide V C C SPDIF G N D JSPD1 1 2 9 1 0 JFP1 H D D LED Reset Switch Power LED Power Switch PIN SIGNAL DESCRIPTION 1 HD_LED Hard disk LED pull up 2 FP PWR SLP MSG LED pull up 3 HD_LED Hard disk active LED 4 FP PWR SLP MSG LED pull up 5 RST_SW Reset Switch low reference pull down to GND 6 PWR_SW Power Switch high reference pull up 7 RST_SW Reset Switch high ref...

Page 25: ...ctive low signal signals BIOS that a High Definition Audio dongle is connected to the analog header PRESENCE 0 when a High Definition Audio dongle is connected 5 LINE out_R Analog Port Right channel 6 MIC_JD Jack detection return from front panel microphone JACK1 7 Front_JD Jack detection sense line from the High Definition Audio CODEC j a c kd e t e c t i o nr e s i s t o rn e t w o r k 8 N C No ...

Page 26: ...J1394_1 This connector allows you to connect the IEEE1394 device via an optional IEEE1394 bracket Important Note that the pins of VCC and GND must be connected correctly to avoid possible damage Pin Definition PIN SIGNAL PIN SIGNAL 1 TPA 2 TPA 3 Ground 4 Ground 5 TPB 6 TPB 7 Cable power 8 Cable power 9 Key no pin 10 Ground J1394_1 1 9 2 10 PIN SIGNAL PIN SIGNAL 1 V C C 2 V C C 3 USB0 4 USB1 5 USB0...

Page 27: ...th the CMOS RAM the system can auto matically boot OS every time it is turned on If you want to clear the system configu ration set the jumper to clear data Important You can clear CMOS by shorting 2 3 pin while the system is off Then return to 1 2 pin position Avoid clearing the CMOS while the system is on it will damage the mainboard Clear Data 1 3 Keep Data 1 3 JBAT1 1 ...

Page 28: ...I Interrupt Request Routing The IRQ acronym of interrupt request line and pronounced I R Q are hardware lines over which devices can send interrupt signals to the microprocessor The PCI IRQ pins are typically connected to the PCI bus pins as follows When adding or removing expansion cards make sure that you unplug the power supply first Meanwhile read the documentation for the expansion card to co...

Page 29: ...BIOS Setup program and allows you to configure the system for optimum use You may need to run the Setup program when An error message appears on the screen during the system booting up and requests you to run SETUP You want to change the default settings for cus tomized features ...

Page 30: ... 2nd 5th digit refers to the model number 6th digit refers to the chipset as I Intel N nVidia and V VIA 7th 8th digit refers to the customer as MS all standard customers V1 0 refers to the BIOS version 102507 refers to the date this BIOS was released Power on the computer and the system will start POST Power On Self Te s t p r o cess When the message below appears on the screen press DEL key to en...

Page 31: ... Then you can use the control keys to enter values and move from field to field within a sub menu If you want to return to the main menu just press the Esc General Help F1 The BIOS setup program provides a General Help screen You can call up this screen from any menu by simply pressing F1 The Help screen lists the appropriate keys to use and the possible selections for the highlighted item Press E...

Page 32: ...ures Integrated Peripherals Use this menu to specify your settings for integrated peripherals Power Management Setup Use this menu to specify your settings for power management PnP PCI Configurations This entry appears if your system supports PnP PCI H W Monitor This entry shows your PC health status Frequency Voltage Control Use this menu to specify your settings for frequency voltage control and...

Page 33: ...nu to load the default values set by the mainboard manufacturer specifi cally for optimal performance of the mainboard Set Supervisor Password Use this menu to set the supervisor password for BIOS Set User Password Use this menu to set the user password for BIOS Save Exit Setup Save changes to CMOS and exit setup Exit Without Saving Abandon all changes and exit setup ...

Page 34: ... by BIOS Read only month The month from Jan through Dec date The date from 1 to 31 can be keyed by numeric function keys year The year can be adjusted by users Time HH MM SS This allows you to set the system time that you want usually the current time The time format is hour minute second Serial ATA 1 4 Channel Press Enter to enter the sub menu and the following screen appears Standard CMOS Featur...

Page 35: ... formatted with LBA mode disabled DMA Mode Select DMA Mode Hard Disk S M A R T This allows you to activate the S M A R T Self Monitoring Analysis Report i n g Technology capability for the hard disks S M A R T i sa u t i l i t yt h a tm o n i t o r s your disk status to predict hard disk failure This gives you an opportunity to move data from a hard disk that is going to fail to a safe place befor...

Page 36: ... 8 MS 7504 Mainboard This sub menu shows the CPU information BIOS version and memory status of your system Read only System Information Press Enter to enter the sub menu and the following screen appears ...

Page 37: ...le this function at all times The only time when you need to disable it is when you want to update the BIOS After updating the BIOS you should immediately re enable it to protect it against viruses Full Screen Logo Display This item enables you to show the company logo on the bootup screen Settings are Enabled Shows a still image logo on the full screen at boot Disabled Shows the POST messages at ...

Page 38: ...e vendor of your operating system Optical Drive AAM Use this field to configure the AAM Automatic Acoustic Management mode CPU Feature Press Enter to enter the sub menu and the following screen appears Execute Bit Support Intel s Execute Disable Bit functionality can prevent certain classes of malicious buffer overflow attacks when combined with a supporting operating system This functionality all...

Page 39: ...y only OnChip or PCI Express VGA Both Display both OnChip and PCI Express VGA iGPU Frame Buffer Size This field is used to detect the onboard VGA Frame Buffer Size 1st 2nd 3rd Boot Device The items allow you to set the 1st 2nd 3rd boot device where BIOS attempts to load the disk operating system Boot From Other Device Setting the option to Yes allows the system to try to boot from other device if ...

Page 40: ...is used to decide whether to invoke the Boot ROM of the Onboard LAN Chip Onboard IEEE 1394 Controller This setting allows you to enable disable the onboard IEEE 1394 controller HD Audio Controller This setting is used to enable disable the onboard audio controller On Chip ATA Devices Press Enter to enter the sub menu and the following screen appears ...

Page 41: ...3 13 BIOS Setup On Chip SATA Controller This item allows you to enable disable the SATA c o n t r o l l e r RAID mode This item is used to enable disable the RAID function for SATA devices ...

Page 42: ...to activate the ACPI Advanced Configuration and Power Management Interface Function If your operating system is ACPI aware such as Windows 2000 XP select Enabled Important S3 related functions described in this section are available only when your BIOS supports S3 sleep mode ...

Page 43: ...n applications files is saved to main memory that remains powered while most other hardware components turn off to save energy The information stored in memory will be used to restore the system when a wake up event occurs Soft off by PWR BTTN When Enabled turning the system off with the on off button places the system in avery low power usage state with only enough circuitry receiving power to de...

Page 44: ...Device When set to Enabled the feature allows your system to be awakened from the power saving modes through any event on PCIE device Resume By Onboard LAN When set to Enabled the feature allows your system to be awakened from the power saving modes through any event on the onboard LAN Resume By RTC Alarm The field is used to enable or disable the feature of booting up the system on a scheduled ti...

Page 45: ...vice can hold the bus before another takes over When set to higher values every PCI device can conduct transactions for a longer time and thus improve the effective PCI bandwidth For better PCI performance you should set the item to higher values PCI Slot1 2 IRQ These items specify the IRQ line for each PCI slot IRQ Resource Setup Press Enter to enter the sub menu and the following screen appears ...

Page 46: ...the IRQ by assigning an Reserved setting to it Onboard I O is configured by AMI BIOS A l l IRQs used by onboard I O are configured as Available If all IRQs are set to Reserved and IRQ 14 15 are allocated to the onboard PCI IDE IRQ 9 will still be available for PCI and PnP devices Important IRQ Interrupt Request lines are system resources allocated to I O devices When an I O device needs to gain at...

Page 47: ...ature reaches to the target value the smart fan function will be activated It provides several sections to speed up for cooling down automaticlly CPU Min FAN Speed This item allows users to select how percentage of minimum speed limit for the CPU f a n CPU System Temperature CPU SYS FAN Speed CPU Vcore 3 3V 5V 12V 5V SB These items display the current status of all of the monitored hardware device...

Page 48: ...oprocessor whether the computer is running on battery or AC power This field will appear after you installed the CPU which support speedstep technology DRAM Frequency This setting allows you to set the bus frequency for installed DRAM Advance DRAM Configuration Press Enter to enter the sub menu and the following screen appears Frequency Voltage Control Important Change these settings only if you a...

Page 49: ...ons on the SPD Serial Presence Detect EEP ROM on the DRAM module Spread Spectrum When the motherboard s clock generator pulses the extreme values spikes of the pulses create EMI Electromagnetic Interference The Spread Spectrum function reduces the EMI generated by modulating the pulses so that the spikes of the pulses are reduced to flatter curves ...

Page 50: ...rformance of the mainboard The Fail Safe Defaults are the default values set by the BIOS vendor for stable system performance When you select Load Fail Safe Defaults a message as below appears Pressing Y loads the BIOS default values for the most stable minimal system performance When you select Load Optimized Defaults a message as below appears Pressing Y loads the default factory settings for op...

Reviews: