background image

MS-AE31

1-9

MS-AE31

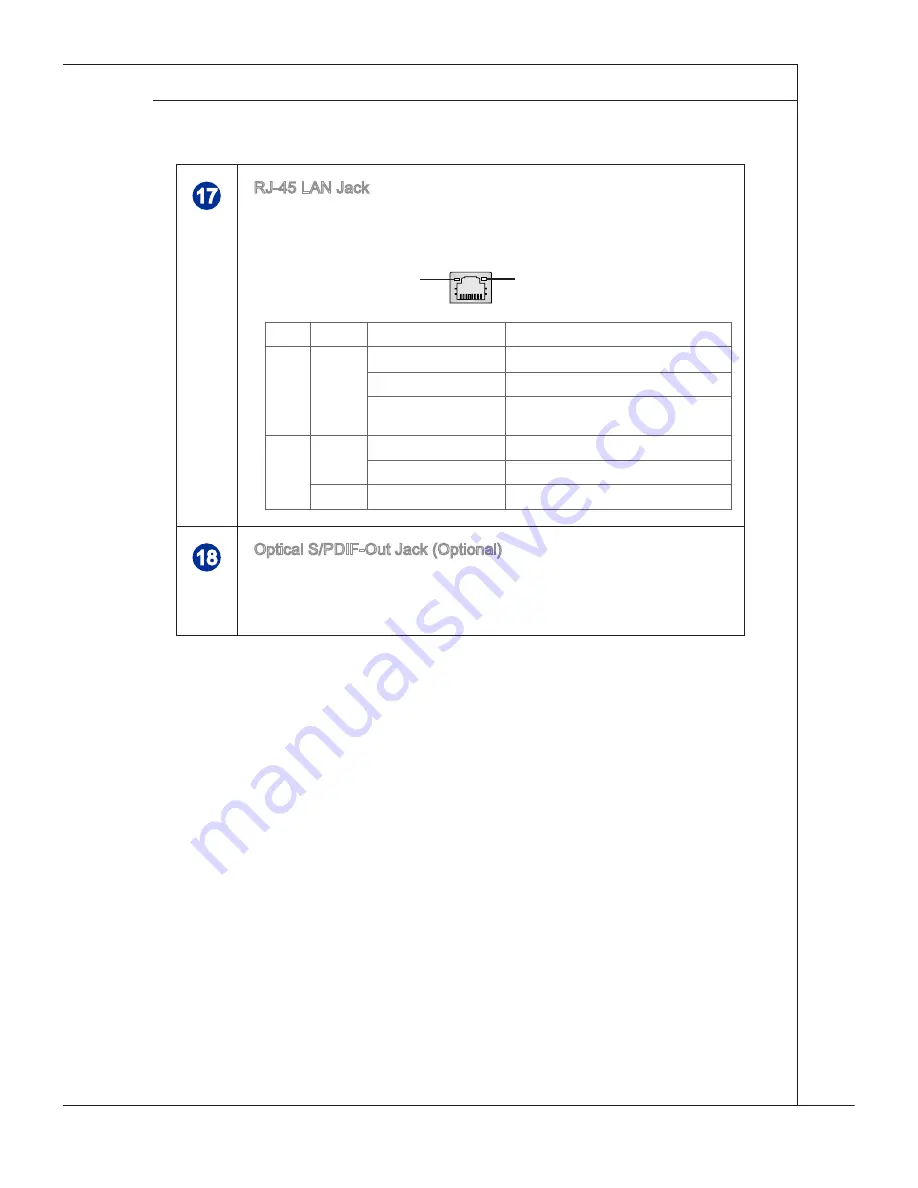
17

RJ-45 LAn Jack  
- the standard RJ-45 LAn jack is provided for connection to the Lo-

cal Area network (LAn). You can connect a network cable to it.

Yellow

Green/ orange

LED

color

LED State

condition

Left

Yellow

off

LAn link is not established.

on (steady state)

LAn link is established.

on (brighter & pulsing)

the  computer  is  communicating  with 

another computer on the LAn.

Right

Green

off

10 Mbit/sec data rate is selected.

on

100 Mbit/sec data rate is selected.

orange

on

1000 Mbit/sec data rate is selected.

18

optical S/PDIF-out Jack (optional)
-  this  S/PDIF  (Sony  &  Philips  Digital  Interconnect  Format)  jack 

is  provided  for  digital  audio  transmission  to  external  speakers 

through an optical fiber cable.

Summary of Contents for MS-AE31

Page 1: ...Wind Top AE2420 Series All in One AIO PC MS AE31 V1 X System G52 AE311X9...

Page 2: ...view 1 3 System Specifications 1 12 Component Replacement Upgrade 1 14 2 Getting Started 2 1 Safety Comfort Tips 2 2 Having Good Working Habits 2 3 Knowing the Keyboard Optional 2 4 Positioning your S...

Page 3: ...anges without notice Trademarks All trademarks are the properties of their respective owners MSI is a registered trademark of Micro Star Int l Co Ltd Intel is a registered trademark of Intel Corporati...

Page 4: ...ced that the acquisition of replaceable parts or compatible ones of the product users purchased in certain countries or territories may be fulfilled by the manufacturer within 5 years at most since th...

Page 5: ...ronmental Policy The product has been designed to enable proper reuse of parts and recycling and should not be thrown away at its end of life Users should contact the local authorized point of collect...

Page 6: ...utlet Do not disable the protective earth pin from the plug The equipment must be connected to an earthed mains socket outlet Always unplug the AC power cord before installing any add on card or modul...

Page 7: ...tal shield is reliably connected to protective earthing system of the building Cable distribution system should be grounded earthed in accordance with ANSI NFPA 70 the National Electrical Code NEC in...

Page 8: ...evision reception which can be determined by turning the equipment off and on the user is encouraged to try to correct the interference by one or more of the measures listed below Reorient or relocate...

Page 9: ...e am Ende seines Baruchbarkeitsdauer zur ckzunehmen Spanish Espa ol Bajo la directiva 2002 96 EC de la Uni n Europea en materia de desechos y o equipos electr nicos con fecha de rigor desde el 13 de a...

Page 10: ...t i k teless v lnak az ilyen term kek visszav tel re azok hasz nos lettartama v g n Czech e tina Podle sm rnice Evropsk unie EU o likvidaci elektrick ch a elektronick ch v robk 2002 96 EC platn od 13...

Page 11: ...El ctricos e Electr nicos da Uni o Europeia UE efectiva desde o 13 de Agosto do ano 2005 os produtos de equipamento el ctrico e electr nico n o podem ser descartados como res duo municipal e os fabri...

Page 12: ...oldningsavfall og fabrikantene av disse produktene er forpliktet ta tilbake slike produkter ved slutten av produktets levetid Bulgarian 2002 96 EC 13 2005 Croatian Hrvatski U okviru Direktive Europske...

Page 13: ...e with a mirror screen which displays the sim plicity of modern individualism and the comfort of home With a touchscreen display flawless audio video capabilities and intui tive user interface it blen...

Page 14: ...d or missing The illustrations are for reference only and your packing contents may slightly vary depending on the model you purchased Wind Top Series User Manual Quick Guide Driver Utility Disk Stylu...

Page 15: ...MS AE31 1 3 MS AE31 System Overview Front View 2 4 5 6 7 8 9 10 11 12 1 3 4...

Page 16: ...chieve 3D visualization 5 System Power Button Touch this button to power on power off or suspend the system up to the OS settings 6 Display Power Button Touch this button to power on off the monitor 7...

Page 17: ...tton In Menu mode this button indicates the cursor movement or OSD manual selection in incremental values Out of Menu mode it works as Volume Up button 12 Left Volume Down Button In Menu mode this but...

Page 18: ...Rear View Important We suggest that you connect the AC DC adapter to your AIO PC first and then con nect the AC power cord to the socket outlet for safety concerns 1 6 8 10 11 12 14 17 18 1 2 4 5 3 7...

Page 19: ...may vary without notice USB Port The USB Universal Serial Bus port is provided for attaching USB devices such as mouse keyboard printer scanner camera PDA or other USB compatible devices 4 Cable Rout...

Page 20: ...vice 12 USB Port The USB Universal Serial Bus port is provided for attaching USB devices such as mouse keyboard printer scanner camera PDA or other USB compatible devices 13 HDMI In Port Optional The...

Page 21: ...shed On steady state LAN link is established On brighter pulsing The computer is communicating with another computer on the LAN Right Green Off 10 Mbit sec data rate is selected On 100 Mbit sec data r...

Page 22: ...al disk drive manually if the eject button does not work 4 Card Reader Drive The built in card reader may support various types of memory card such as XD eXtreme Digital SD Secure Digital SDHC SD High...

Page 23: ...is provided for attaching USB devices such as mouse keyboard printer scanner camera PDA or other USB compatible devices 6 Ventilator The ventilator on the enclosure is used for air convection and to p...

Page 24: ...3 6 inch full HD display with 1920 x 1080 resolution 16 9 widescreen and Multi Touch function Rear Panel I O 1 TV tuner antenna connector Standard for DVB T ATSC 1 DC power connector 1 VGA Out port 4...

Page 25: ...1 3MP WebCam with microphone Power Supply Option 1 180 Watt AC DC adapter with active PFC Input 100 240V 2 25A 50 60Hz Output 19V 9 5A Option 2 180 Watt AC DC adapter with active PFC Input 100 240V 2...

Page 26: ...Component Replacement Upgrade Please note that certain components preinstalled in the product may be up gradable or replaceable by user s request depending on the models users pur chased 1 CPU 2 Memo...

Page 27: ...uthorized service center closest to your loca tion for assistance To learn more about upgrade limitation please refer to the specifications in the User s Manual For any further information on the prod...

Page 28: ......

Page 29: ...g Started This chapter provides you with the information on hardware set up procedures While connecting peripheral devices be careful in holding the devices and use a grounded wrist strap to avoid sta...

Page 30: ...back comfortably Place you feet flat and naturally on the floor so that your knees and el bows have the proper position about 90 degree when operating Put your hands on the desk naturally to support y...

Page 31: ...have to work with your AIO PC for long periods of time otherwise it may cause discomfort or injury to you Please keep the following tips in mind when operating Change your posture frequently Stretch...

Page 32: ...ht 440g Features Multimedia function keys with AIO PC New isolated keycap for easy typing Soft touch and tactile feedback for comfortable typing New concept elegant and slim keyboard in streamline sha...

Page 33: ...Mute function Fn F11 Volume down Fn F12 Volume up Hot Keys Fn F1 Launch the default E Mail applications Fn F2 Lanuch the default internet browser and go to the de fault home page Fn F3 Back to the pre...

Page 34: ...your system on a flat and steady surface such as a table or desk Step 2 Pull the stand open and tilt the LCD display To stabilize the system make sure that you pull the stand to its fullest extent unt...

Page 35: ...rious USB devices such as mouse keyboard digital camera webcam printer external optical storage de vice and etc To connect these devices install the drivers for each device first if necessary and then...

Page 36: ...ameras etc VGA Video Graphics Array is a graphics display system for PCs VGA connec tors and their associated cabling are always used solely to carry analog video signals along with digital clock and...

Page 37: ...MS AE31 2 9 MS AE31 To connect the VGA HDMI device first make sure the AIO PC and the targeted device are both powered off and then connect the cable of the device to the VGA HDMI port of your AIO PC...

Page 38: ...onnect an external Serial ATA hard disk de vice The eSATA standard interface supports plug and play technology so that you can connect and remove the eSATA devices without turning off the AIO PC To co...

Page 39: ...RJ 45 connector of the AIO PC allows you to connect the LAN local area network devices such as a hub switch and gateway to build a network con nection For more instructions or detailed steps on conne...

Page 40: ...within a broad coverage area and still be connected to the network By using the 64 bit 128 bit Wired Equivalent Privacy WEP encryption technol ogy and Wi Fi Protected Access feature the optional buil...

Page 41: ...trical outlet Important We suggest that you connect the AC DC adapter to your AIO PC first and then connect the AC power cord to the socket outlet for safety concerns Disconnecting the AC Power Step 4...

Page 42: ......

Page 43: ...ns such as system boot setup recovery disk creation network connection and so on Important It is highly recommended that you create a system recovery disk as the backup solution in the event of a cata...

Page 44: ...e terms box and click Next to continue Step 7 Select Use recommended settings for Help protect your computer and improve Windows automatically Step 8 Review your time and date settings Click Next to c...

Page 45: ...or other ac cidents Before moving forward please make sure your system booting setup is complete and go over the following procedures to get it done Step 1 Double click the BurnRecovery icon on the d...

Page 46: ...Operations Step 3 Select Create and burn a recovery disk and click Next to continue Alternatively choose Advanced to bring forth advanced options Choose between the provided options and click Next to...

Page 47: ...nning to create the image of recovery disk It takes some time to finish the processing Step 5 Follow the on screen instructions to prepare enough number of blank DVD disks Insert the blank DVD disk in...

Page 48: ...3 6 System Operations Step 6 The Windows Disc Image Burner pops up Click Burn to start the burn ing progress It takes a while to finish the processing...

Page 49: ...f the disk creation click Close to exit and take out the disk Follow the on screen instructions to create all recovery disks Step 8 All recovery disks have been successfully created Please store the d...

Page 50: ...3 8 System Operations Step 9 Check the following box if you want to remove the temporary files Click Finish to complete recovery disk creation...

Page 51: ...MS AE31 3 9 MS AE31 Network Connection under Windows Wired LAN Step 1 Go to Start Control Panel Step 2 Select Connect to the Internet under Network and Internet...

Page 52: ...ns Step 3 Select Broadband PPPoE to connect using DSL or cable that requires a user name and password Step 4 Type the information from your Internet Service Provider ISP and click Connect to establish...

Page 53: ...MS AE31 3 11 MS AE31 Wireless LAN Step 1 Go to Start Control Panel Step 2 Select Connect to the Internet under Network and Internet...

Page 54: ...ireless net work Step 4 A list of available WLAN connections pops up Choose a connection from the list or click Open Network and Sharing Center to establish a new connection Step 5 To establish a new...

Page 55: ...a wireless network and click Next to continue Step 7 Enter information for the wireless network you intend to add and click Next to proceed Step 8 A new WLAN connection has been made Click Close to ex...

Page 56: ...ience for music movies and games while remaining true to the source and intention of the artists who created it Using the THX TruStudio PRO Step 1 To launch the THX TruStudio PRO open its control pane...

Page 57: ...s and games Instructions Select Surround Drag the slider left or right Changes can be heard when adjusting the slid er Click the triangle under the slider to confirm the adjustment Play an audio file...

Page 58: ...2 3 4 Smart Volume adjusts the loudness of your audio playback automatically to minimize sudden volume changes Instructions Select Smart Volume Drag the slider left or right Changes can be heard when...

Page 59: ...ng Step 1 Right click your computer desktop and then click Screen Resolution Step 2 Click Advanced Settings in the Screen Resolution dialog box Important Please note that 100 and 120 Hertz activate th...

Page 60: ...es dialog box click the Monitor tab Step 4 Select a desired refresh rate from the drop down list You may choose 120 Hertz to experience the 3D visualization or select 60 Hertz for nor mal 2D work Step...

Page 61: ...orner Step 1 Touch the MENU button to bring up the OSD main menu Step 2 Use the Right and Left arrow buttons to select the desired function menu submenu and touch the MENU button to enter Step 3 Use t...

Page 62: ...etup Use this menu to per sonalize your monitor settings Enter this menu to adjust the color temperature and RGB value of the monitor Enter this menu to tune the appearance and time out value of the O...

Page 63: ...olor Submenus OSD Submenus Important Whenever any error takes place and incurs abnormal display or volume malfunc tion enter the OSD menu and auto adjust your monitor to restore all set tings to manuf...

Page 64: ...f your display or set your PC to sleep mode after a period of user inactivity Power Management in Windows OS Power Options in Windows OS allow you to control the power man agement features of your dis...

Page 65: ...mouse the keyboard Energy Saving Tips Turn off the monitor by pressing the LCD power button after a period of user inactivity Utilize the Fn Z sleep mode keys to turn into power saving mode Tune the...

Page 66: ...work normally Before using the System Recovery Function please backup the important data saved on your system drive to other storage devices If the following solution fails to recover your system plea...

Page 67: ...I Recovery Manager to start the System Recovery Function or select EXIT to restart the system 5 The System Recovery Function will get your system back to default settings Press OK to confirm 6 Press O...

Page 68: ...ws operating system as usual Recovering the System with the Recovery Disks If the F3 hotkey recovery cannot work try recovering your system with the recovery disks that you created beforehand Follow t...

Page 69: ...to boot from CD or DVD 4 The Windows OS starts loading files Windows is loading files 5 The system recovery menu pops up Hard Disk Recovery will format the whole HDD All data on the HDD will be erased...

Page 70: ...es will not be affected It is highly recommended that users select System Partition Recovery to restore the system 6 The system recovery will format your HDD partition Make sure that the important dat...

Page 71: ...ion or it may cause unknown damage to the system 8 The following message indicates successful system recovery Press OK to restart the system and access the Windows operating system as usual 9 If the r...

Reviews: