MSB Technology DAC IV plus User Manual Download Page 11

11

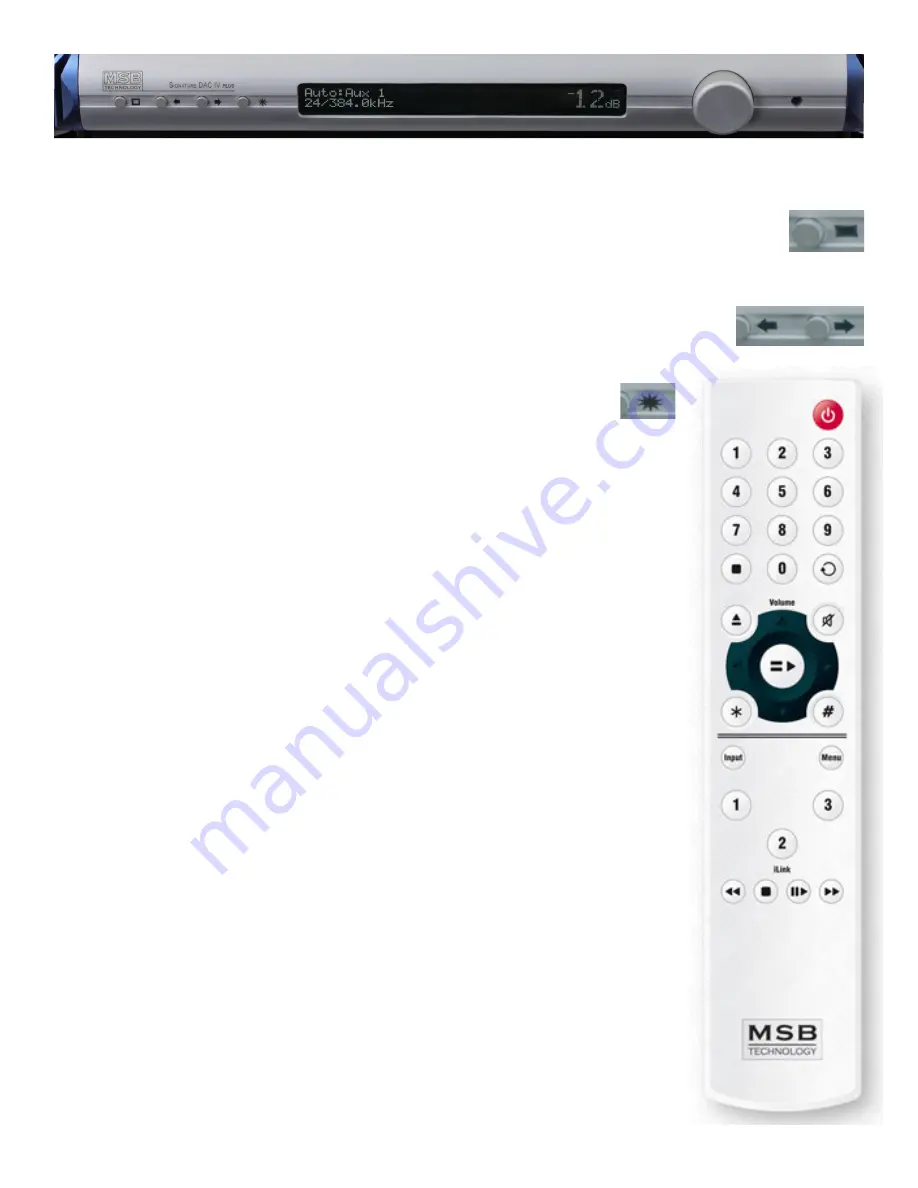
Front Panel Controls

Although the user interface is very simple and easy to use, in depth menus allow complete control of the DAC.

Menu Button  

– The square button is single purpose. It will enter the setup mode at the top of the menu tree.  If in the setup, 

and it doesn’t matter where, this button will exit the setup and return to the normal operational mode.

Input Selection 

– Each of the six  inputs can be selected manually, or the auto mode can be selected.  The auto mode is an 

automatic priority switching with auto signal detection.  The right and left arrows switch inputs.  If the AUTO input is selected, the unit 

will automatically switch inputs based on a priority (from left to right - Analog = lowest priority, MSB 2 = highest priority).  When a 

source with a higher priority becomes active, the unit will automatically switch to the new higher priority input.  

Toggling through the inputs manually will defeat any auto switching. When in the setup menu the arrows move 

right and left through the menu structure. 

User Select Button 

- The star button is user defined.  In the default configuration, it does phase invert.  In 

the setup menu it can be changed to turn upsampling or reclocking On/Off, or to select the 

digital filter, upsampler algorithm.

Input/Volume Knob 

- The large knob will select between inputs if the volume control option is 

not installed.  The right and left arrow  buttons on the front of the unit will also switch between inputs.   

When the volume control module is installed, the knob becomes the volume control.  This knob adjusts 

the volume b9 dB and -69 dB.    Our 0 dB actually equates to a 2.62 V rms output, just a little 

high in relation to the industry standard 2 Vrms level. 

Display 

- The display shows the Input in the upper left.  The lower left shows the input sample rate and 

bit depth.  The right shows the volume.

Remote

The MSB remote can be used to operate several MSB products.  The top half is primary for the transport.  

The center is for the DAC and the lower part for the iLink. 

Power 

– The power button turns on and off the Power Base when the optional front controls have been installed.  If 

your Platinum Power Base does not have a switch on the front, this button will do nothing.  When the power base 

is linked to the Amplifiers and any other MSB products, this button will turn off the entire system. (see power base 

manual for details)

Data CD IV controls 

– .  The keypad, stop and repeat buttons are for the DATA CD IV transport and have no effect 

on the DAC IV. 

Volume up and down 

– The center block of the remote has several functions.  The volume up and down buttons 

change the system remote if the optional volume controls are installed in the DAC.  Steps sizes are shown on the 

DAC display.  The mute button instantly mutes the audio if the volume option is installed.

< > = * and # buttons 

– These central buttons are also for controlling the DATA CD IV transport, but also can be 

used for navigation of the DAC IV menus.  See MENU below.

Input 

– This button toggles directly through the inputs of the DAC IV even if the DAC is set to the auto mode.

Menu 

– This is equivalent to pressing the menu button on the front panel and puts the DAC IV into the menu/setup 

mode.  The menus can navigated from the front panel or using the < >, volume up/down  buttons on the remote 

as left, right, up and down.

1, 2, 3 

– These are user defined buttons.  They can be programmed in the setup menu to execute any function you 

wish from the following options.

Phase Invert - Toggles phase invert on and off.

Upsampling - Toggles Upsampling on and off.

Reclocking - Toggles reclocking on and off.  This is especially useful for watching movies, where 

reclocking may cause an objectionable audio delay.

Digital Filter Select - Toggles through the installed digital filters.

Upsampler Select - Toggles through the installed upsamplers.

iLink Controls 

– Provides basic iPod controls when this option is installed.

Batteries 

– The remote control requires two CR2025 Lithium batteries.

Summary of Contents for DAC IV plus

Page 1: ...edance 106 ohms without volume controls 76 ohms with volume controls Volume Control optional Signature 1 4 1 2 or 1 dB stepped attenuator 78 156 or 312 steps Platinum 2 dB steps Sampling Frequency 32...

Page 2: ...DAC IV volume control in your system The volume control modules can be easily installed or removed by your dealer Setup and Quick Start The front panel is quite simple with few user controls Input sou...

Page 3: ...a few seconds for the iPod to reconnect Play Pause starts and stops playback Forward and Back jump to the next track in the playlist The iLink II will charge the iPod when plugged in It works well wi...

Page 4: ...ource gives a true 24 bit resolution without the losses and errors that make your normal 16 or 24 bit DAC perform far less than their actual resolution normal 16 bit DACs only muster a meager 12 bits...

Page 5: ...ll The MSB Sign Magnitude Ladder DAC is like a Ladder DAC but refined in two ways Because the jars are typically 1 2 full when finished we start with very accurately 1 2 filled containers instead of e...

Page 6: ...Digital Filter which was feeding our DACs While the excellent Burr Brown Now owned by Texas Instruments DF1704 Digital Filter had served us well in the past it had became the bottleneck once we start...

Page 7: ...ment without problems Improvements we have made in our digital filter with its single stage design and 80 bit computation allow us to use very steep filters with no compromises Custom Filter Options W...

Page 8: ...atinum connected to a transport that will not change the Data Almost all older CD players are acceptable however there are some important exceptions Upsampling CD transports will not work The Upsampli...

Page 9: ...ontrol independently of the first analog input How to Hook Up a Subwoofer Main AMP Balanced Set the DAC for a balanced output and attach main amp normally Use the single ended output for subwoofer Pre...

Page 10: ...clock to be sent back to the transport But if you do have a need to access this clock it can be done Within the MSB Network connection is a clock interface that allows multiple Platinum products to b...

Page 11: ...o operate several MSB products The top half is primary for the transport The center is for the DAC and the lower part for the iLink Power The power button turns on and off the Power Base when the opti...

Page 12: ...for setup options DAC IV Menu Tree Top level menus are for operational controls Setup menus follow on the next pages Press the menu button on either the front panel or remote Navigate up and down the...

Page 13: ...l Filter Upsampler Select Phase Invert Upsampling Reclocking Digital Filter Upsampler Select Off On Balanced Single Ended Connected Lifted 1 15 Default 3 On Auto off Off Test Mode On 9dB 6dB 3dB 0dB 3...

Page 14: ...14...

Page 15: ...etely replaces the incoming clock Other sampling frequencies use the incoming clock from the source The DSP allocates a huge internal FIFO buffer 1 2 second at 44 1 that stores the incoming audio to d...

Page 16: ...cise DAC for making measurements Restore Settings Puts settings back to factory default setting Startup Volume This is the volume setting that is set upon power up Maximum Volume This is the maximum v...

Page 17: ...or more detailed and up to date information check our web site All three levels of USB input work basically the same with the difference being the maximum sample rate they can receive Apple MAC OS On...

Page 18: ...x 1 or Aux 2 slot One tricky thing we did is we tied the word sync option to a specific input In most cases when word sync is present it will be there for one source to the DAC but the rest of the sou...

Page 19: ...grade slot in the DAC IV The Network connector installs in one of the AUX input holes Unfortunately it is too big to fit in the older Diamond DAC IV without modifying the large heat sink This job will...

Page 20: ...hear a click and the front display should indicate frequency You hear audio clipping with outboard preamp the output level may be too high for your preamp Check the input specifications on your pream...

Reviews: