background image

5.

6.

GETTING STARTED

Unpack your Coffeemaker 

1.   Unpack your coffeemaker and remove plastic bags, cartons and any tape 

on the unit.


WARNING:

 KEEP PLASTIC BAGS AWAY FROM CHILDREN. 

Clean Coffeemaker Before Use 

Just follow these simple steps: 

1.  Wash the carafe and the brew basket in a mixture of mild detergent and 

water. Rinse each thoroughly.

2.  Replace all the parts and close the lid. Then, run a brew cycle by adding 

only water to the coffeemaker. After adding water, press Brew Now.

3.  When brewing is complete, turn your coffeemaker off. Turn your 

coffeemaker off by pressing the Brew Now button again.

4.  Discard the water in the carafe and rinse the carafe, carafe lid, and brew basket. 


NOTE:

 Carafe and brew basket are top rack dishwasher safe. 

Setting the Clock

Plug in the coffeemaker and set the current time using the hour and minute 

buttons. 3 Seconds of inactivity will set clock at time selected.

HOW TO MAKE YOUR FIRST POT OF COFFEE

Suggested Coffee Measurement Chart: 

To Brew

Ground Coffee

1 level tablespoon (tbsp) = 5 gr./0.17 oz. 

1 cup = 5 fl. oz. of brewed coffee

Use more or less coffee to suit your taste.

4 cups

4 tbsp

6 cups

6 tbsp

8 cups

8 tbsp

10 cups

10 tbsp

12 cups

12 tbsp

*Using fine coffee or decaf may cause overflow.
1.  Fill the carafe with fresh cold water to the desired level. 


NOTE:

 Some water will be absorbed into the coffee grounds and water 

filter during the brewing process.

2.  Line the brew basket with a standard basket-style paper filter (sold 

separately) or reusable filter (if included). 

3.   Referencing the chart above, scoop the equivalent amount of coffee 

grounds into the filter using a tablespoon. 

4.  You are ready to brew now!

5.   Enjoy fresh coffee every time!

Bonus: For a BOLDER 

CUP, use heaping TBS

BREW NOW

NOTE:

 This coffeemaker allows you to set the number of cups of coffee 

you’d like to brew, rather than using all available water in the reservoir. A 

full reservoir can brew up to three 4-Cup batches before needing to refill. 

However, if the number of cups is not selected, the machine will act like a 

traditional coffeemaker by brewing all the water in the reservoir. 

1.   After filling the coffeemaker with water and grounds, press the Brew Now 

button.

2.   The display will change for a few seconds to allow you to select the 

number of cups you desire to brew. You can select to brew 4, 6, 8, 10, 12 

cups of coffee or ALL. The default ALL cup function allows you to brew all 

the water in the reservoir without selecting a specific cup size.

3.   A green light will appear on the display once the machine is in the 

brewing process and will remain ON until the machine is turned off or after 

the 4 hours have passed.

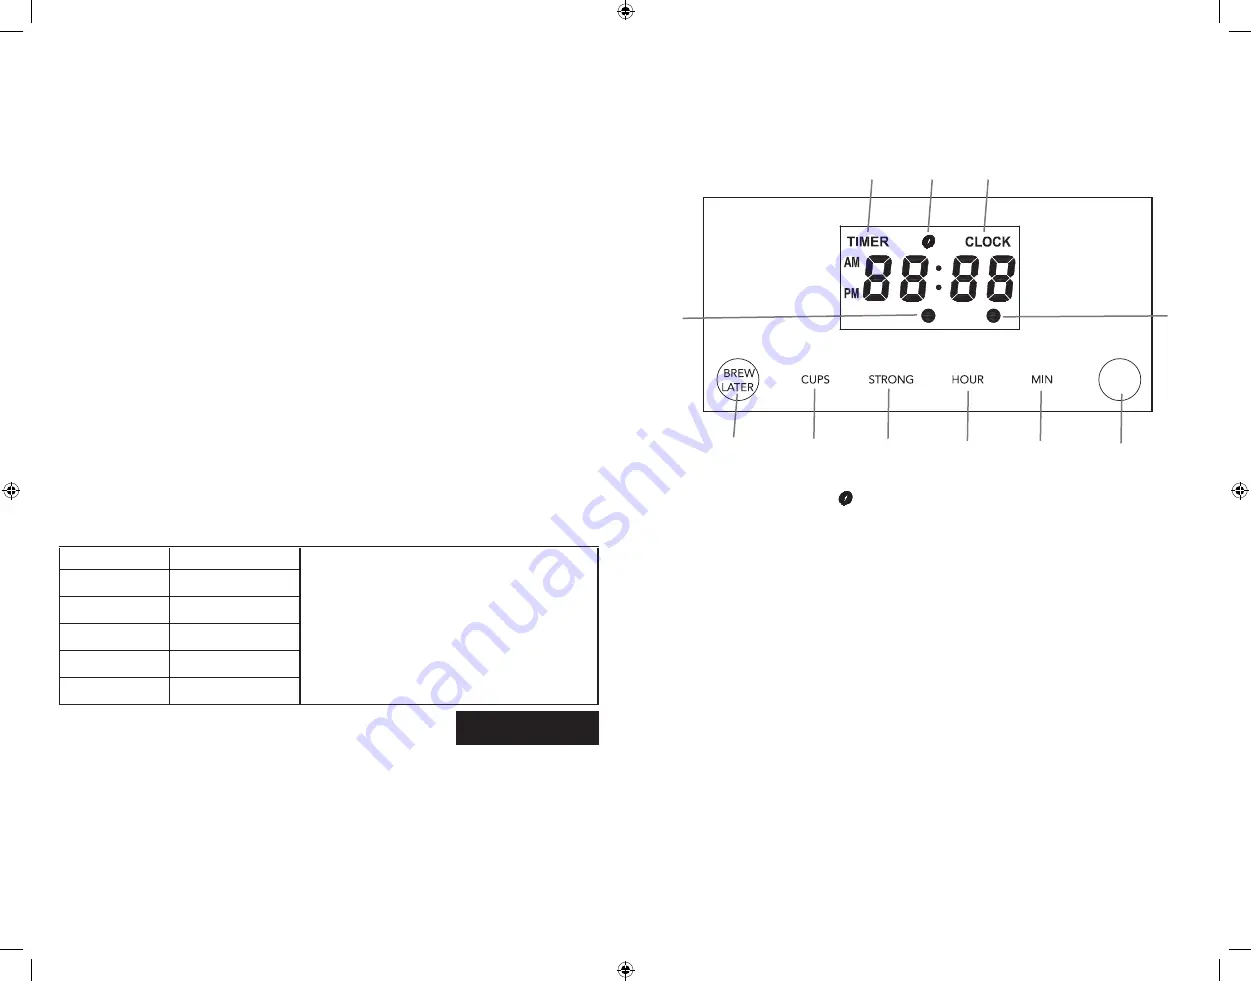
UNDERSTAND YOUR CONTROL PANEL

A.  Clock Display

B.   Strong Brew Indicator ( ) 

C.   Set Brew Later indicator 

D.   Brew Later indicator (Amber light) 

E.   Brew Now Indicator (Green Light)

F.   Brew Later Button

G.   Cup Selector Button

H.   Strong Brew Button

I.   Hour Button

J.   Minute Button

K.   Brew Now

BREW

NOW

F

H

I

J

K

G

A

B

C

D

E

BVMC-TP-115_20ESM2 (US).indd   5-6

BVMC-TP-115_20ESM2 (US).indd   5-6

6/5/20   09:49

6/5/20   09:49

Summary of Contents for TOUCH DISPLAY Series

Page 1: ...C JC P N ART0000856524 Rev A www mrcoffee com LED TOUCH DISPLAY Coffeemaker TOUCH DISPLAY SERIES USER MANUAL WITH SELECT A CUP BREW NOW OR LATER automatically measures water for the selected cup size...

Page 2: ...e 6 Do not operate any appliance with a damaged cord or plug or after the appliance malfunctions or has been damaged in any manner Return appliance to an Authorized Service Center for examination repa...

Page 3: ...2 Glass carafes only Discard the carafe immediately if it is ever boiled dry 3 Glass carafes only Protect the carafe from sharp blows scratches or rough handling 4 Do not operate the appliance with an...

Page 4: ...t with a standard basket style paper filter sold separately or reusable filter if included 3 Referencing the chart above scoop the equivalent amount of coffee grounds into the filter using a tablespoo...

Page 5: ...u change your mind and wish to turn off the BREW LATER feature simply press the BREW LATER button again and it will turn off Once the BREW LATER feature has been set up the coffeemaker will automatica...

Page 6: ...w Cycles CARAFE USE AND CARE Follow the instructions below to reduce or eliminate the chance of breaking the glass carafe Discard the carafe immediately if it is ever cracked Protect the carafe from s...

Page 7: ...ility Sunbeam shall not be liable for any incidental or consequential damages caused by the breach of any express implied or statutory warranty or condition Except to the extent prohibited by applicab...

Page 8: ...v A www mrcoffee com Cafetera CON PANTALLA LED T CTIL SERIE DE PANTALLA T CTIL MANUAL DE USUARIO CON SELECTOR DE TAZA PREPARE CAF AHORA O LUEGO mide autom ticamente el agua seg n el n mero de tazas el...

Page 9: ...l si es proporcionado no est en uso y antes de limpiarlo Permita que el aparato se enfr e antes instalarle o retirarle piezas y antes de limpiarlo 6 No opere ning n aparato que tenga un cable o enchuf...

Page 10: ...rato despejada durante el uso ya que vapor caliente saldr del aparato ENCHUFE POLARIZADO Este aparato tiene un enchufe polarizado un contacto es m s ancho que el otro Para reducir el riesgo de descarg...

Page 11: ...cafeinado puede ocasionar desbordamiento 1 Llene la jarra con agua fresca hasta el nivel deseado NOTA Los granos de caf y el filtro absorber n un poco del agua durante el proceso de preparaci n Bono p...

Page 12: ...funci n de BREW LATER simplemente presione el bot n BREW LATER una vez m s y se apagar Una vez que la funci n de BREW LATER se ha programado la cafetera recordar autom ticamente la ltima programaci n...

Page 13: ...RA Siga las instrucciones a continuaci n para reducir o eliminar el riesgo de romper la jarra de vidrio Descarte la jarra de inmediato si en alguna ocasi n se raja Proteja la jarra contra golpes secos...

Page 14: ...m no ser responsable de da os incidentales o emergentes causados por el incumplimiento de alguna garant a o condici n expresa impl cita o legal Excepto en la medida en que lo proh ba la ley aplicable...

Reviews: